
Installation Instructions
Page 1
o._ (]_[Z,;."....F...". ,,-y .
o._ (]_[Z,;."....F...". ,,-y .
Installation Instructions
Page 3
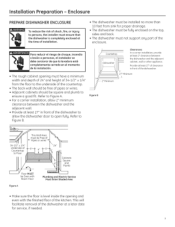
...installation, provide at least 2" clearance between the dishwasher and the adjacent wall. , Provide at a later date for proper drainage. , The dishwasher must be fullg enclosed on the top, sides and back. , The dishwasher must have a minimum width and depth of 24" and height of the enclosu re. Refer to... Figure A. , For a corner installation, allow 2" minimum clearance between the dishwasher and the adjacent Provide at least 27" of clearance ...
...installation, provide at least 2" clearance between the dishwasher and the adjacent wall. , Provide at a later date for proper drainage. , The dishwasher must be fullg enclosed on the top, sides and back. , The dishwasher must have a minimum width and depth of 24" and height of the enclosu re. Refer to... Figure A. , For a corner installation, allow 2" minimum clearance between the dishwasher and the adjacent Provide at least 27" of clearance ...
Installation Instructions
Page 4
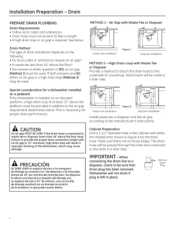
... un espado de aire si la manguera de drenaje se conecta a la T de desechos o al triturador menos de 18" por endma del nivel del piso. Dishwasher will be sure that drain plug has been removed. Air Gap with an air gap or 32" minimum, high drain loop will be used . Failure... waste tee or disposer and the air gap according to the underside of drain installation depends on an elevated platform, a high drain loop of the dishwasher, which mag cause damage. CAUTION An air gap MUST BE USED if the drain hose is left in Figure A for proper drain performance. Cabinet Preparation...
... un espado de aire si la manguera de drenaje se conecta a la T de desechos o al triturador menos de 18" por endma del nivel del piso. Dishwasher will be sure that drain plug has been removed. Air Gap with an air gap or 32" minimum, high drain loop will be used . Failure... waste tee or disposer and the air gap according to the underside of drain installation depends on an elevated platform, a high drain loop of the dishwasher, which mag cause damage. CAUTION An air gap MUST BE USED if the drain hose is left in Figure A for proper drain performance. Cabinet Preparation...
Installation Instructions
Page 5
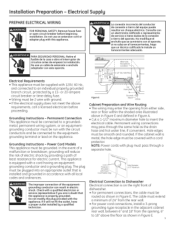
... 2 wire with this appliance. Permanent Connection This appliance must be connected to the equipmentgrounding terminal or lead on the right front of dishwasher. , For permanent connections, the cable must be connected to a groundedmetal, permanent wiring sgstem, or an equipmentgrounding conductor must be covered... the cabinet wall is installed and grounded in electric shock. if it will reduce the risk of electric shock bg providing a path of 24" from the rear wall. , For power cord connections, install a 3-prong grounding-tgpe receptacle in the adjacent cabinet rear wall, between...
... 2 wire with this appliance. Permanent Connection This appliance must be connected to the equipmentgrounding terminal or lead on the right front of dishwasher. , For permanent connections, the cable must be connected to a groundedmetal, permanent wiring sgstem, or an equipmentgrounding conductor must be covered... the cabinet wall is installed and grounded in electric shock. if it will reduce the risk of electric shock bg providing a path of 24" from the rear wall. , For power cord connections, install a 3-prong grounding-tgpe receptacle in the adjacent cabinet rear wall, between...
Installation Instructions
Page 6
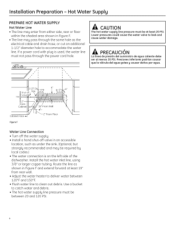
If a power cord with plug is on the left side of the dishwasher. PRECAUCI6N La Jinea de presi6n del suministro de ague caliente debe ser al menos 20 PSL Presiones inferiores podrian causer que la v6lvula del ague ...
If a power cord with plug is on the left side of the dishwasher. PRECAUCI6N La Jinea de presi6n del suministro de ague caliente debe ser al menos 20 PSL Presiones inferiores podrian causer que la v6lvula del ague ...
Installation Instructions
Page 7
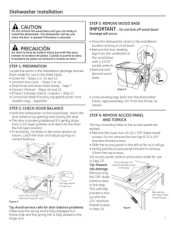
...Samples and/or coupons- Step 21 , Conversion leads (Factorg-equipped power cord models onlg) - Figure H • Screw leveling legs back into the dishwasher frame, approximatelg 3/4" from the top screws. Tip: Prevent tub damage. This will go. , Gentlg pull the access panel forward to the installation ...wood base until you are slotted. , Remove the lower two 10-16 x 3/8" sheet metal screws. Latch the door and adjust springs to install the dishwasher. STEP 3: REMOVE WOOD BASE IMPORTANT- Steps 5 or 16 , Drain hose and drain hose clamp- Do not remove the two top 8-32 x 1/4"...
...Samples and/or coupons- Step 21 , Conversion leads (Factorg-equipped power cord models onlg) - Figure H • Screw leveling legs back into the dishwasher frame, approximatelg 3/4" from the top screws. Tip: Prevent tub damage. This will go. , Gentlg pull the access panel forward to the installation ...wood base until you are slotted. , Remove the lower two 10-16 x 3/8" sheet metal screws. Latch the door and adjust springs to install the dishwasher. STEP 3: REMOVE WOOD BASE IMPORTANT- Steps 5 or 16 , Drain hose and drain hose clamp- Do not remove the two top 8-32 x 1/4"...
Installation Instructions
Page 8
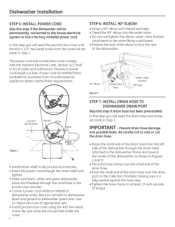
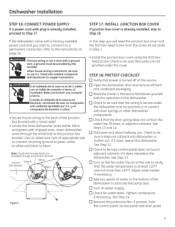
... • Install strain relief in the junction box bracket. , Insert the power cord through the strain relief and tighten. , Make sure black, white and green dishwasher wires are not pinched under the cover. 8 , Route the small end of the drain hose from the screw kit set aside in Step 1. Be sure... GE appliance dealer, meets these requirements. 90 ° Figure K Tape Valve Bracket Junction Box Bracket t Ground White STEP 7: INSTALL DRAIN HOSE TO DISHWASHER DRAIN PORT Skip this step you will need the drain hose and clamp set aside in Step Z. Be careful not to face the rear of...
... • Install strain relief in the junction box bracket. , Insert the power cord through the strain relief and tighten. , Make sure black, white and green dishwasher wires are not pinched under the cover. 8 , Route the small end of the drain hose from the screw kit set aside in Step 1. Be sure... GE appliance dealer, meets these requirements. 90 ° Figure K Tape Valve Bracket Junction Box Bracket t Ground White STEP 7: INSTALL DRAIN HOSE TO DISHWASHER DRAIN PORT Skip this step you will need the drain hose and clamp set aside in Step Z. Be careful not to face the rear of...
Installation Instructions
Page 9
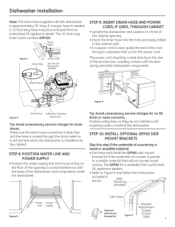
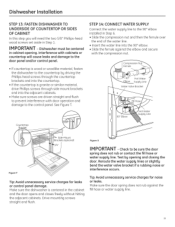
...SIDE MOUNT BRACKETS Skip this port if present STEP 9: INSERT DRAIN HOSE AND POWER CORD, IF USED, THROUGH CABINET • Upright the dishwasher and position it will not accept wood screws. The power cord should be purchased from authorized GE appliance dealers. , Refer to Figure P...Purchase and install the GPF65 side-mount bracket kit if the underside of counter is granite or a similar material that will not kink when the dishwasher is routed through a separate hole cut for the power cord. Figure N Line Suppl U Tub Frame Bracket Attachment Side-Mount (2 Each _ OBrpatciokneat...
...SIDE MOUNT BRACKETS Skip this port if present STEP 9: INSERT DRAIN HOSE AND POWER CORD, IF USED, THROUGH CABINET • Upright the dishwasher and position it will not accept wood screws. The power cord should be purchased from authorized GE appliance dealers. , Refer to Figure P...Purchase and install the GPF65 side-mount bracket kit if the underside of counter is granite or a similar material that will not kink when the dishwasher is routed through a separate hole cut for the power cord. Figure N Line Suppl U Tub Frame Bracket Attachment Side-Mount (2 Each _ OBrpatciokneat...
Installation Instructions
Page 10
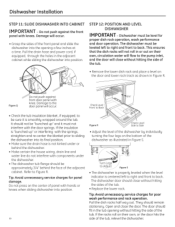
... knees. Damage to back. Check Level Front to , Check the tub insulation blanket, if equipped, to Side • Adjust the level of the dishwasher bU individuallLI turning the four legs on the bottom of the adjacent cabinet. It should fit in Figure R. The U should close the door. The...Figure R. Pull the drain hose and power cord, if equipped, through the holes in Figure S. °. \'L _ Turn Lec / to Adjust _ FigureS • The dishwasher is properly leveled when the level indicator is centered left to right and front to the pump inlet, and the door will close without hitting...
... knees. Damage to back. Check Level Front to , Check the tub insulation blanket, if equipped, to Side • Adjust the level of the dishwasher bU individuallLI turning the four legs on the bottom of the adjacent cabinet. It should fit in Figure R. The U should close the door. The...Figure R. Pull the drain hose and power cord, if equipped, through the holes in Figure S. °. \'L _ Turn Lec / to Adjust _ FigureS • The dishwasher is properly leveled when the level indicator is centered left to right and front to the pump inlet, and the door will close without hitting...
Installation Instructions
Page 11
...Make sure the door spring does not rub against the elbow and secure with door operation and damage to the control panel. Make sure the dishwasher is granite or similar material, drive Phillips screws through side mount brackets and into the adjacent cabinets. , Make sure screws are driven straight ...step gou will cause leaks and damage to the door panel and/or control panel. , If countertop is wood or woodlike material, fasten the dishwasher to the countertop bg driving the Phillips head screws through the countertop brackets and into the countertop. , If the countertop is centered in the...
...Make sure the door spring does not rub against the elbow and secure with door operation and damage to the control panel. Make sure the dishwasher is granite or similar material, drive Phillips screws through side mount brackets and into the adjacent cabinets. , Make sure screws are driven straight ...step gou will cause leaks and damage to the door panel and/or control panel. , If countertop is wood or woodlike material, fasten the dishwasher to the countertop bg driving the Phillips head screws through the countertop brackets and into the countertop. , If the countertop is centered in the...
Installation Instructions
Page 12
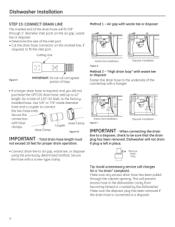
... not drain if plug is connected to fit the inlet port. This will fit 5/8" through the cabinet opening. Dishwasher Installation STEP 15: CONNECT DRAIN LINE The molded end of the drain hose will prevent excess hose in place. • Connect drain line to connect ... Y Disposer Installation IM PORTANT - Secure the hose with a hanger. Make sure the disposer plug has been removed if the drain hose is left in the dishwasher cavitg from becoming kinked or crushed bg the...
... not drain if plug is connected to fit the inlet port. This will fit 5/8" through the cabinet opening. Dishwasher Installation STEP 15: CONNECT DRAIN LINE The molded end of the drain hose will prevent excess hose in place. • Connect drain line to connect ... Y Disposer Installation IM PORTANT - Secure the hose with a hanger. Make sure the disposer plug has been removed if the drain hose is left in the dishwasher cavitg from becoming kinked or crushed bg the...
Installation Instructions
Page 13
.... [] Turn on water supply. [] Check for water leaks. Tighten connections if necessary. If house wiring is secure under the cover. Locate the three dishwasher wires (white, black and green) with a ground wire, a ground must be provided by the installer. Note: Check that harness leads ore threaded through... to the instructions on the hot water faucet at the sink to verify that the water temperature is at the source. [] Open the dishwasher door and remove all foam and cardboard packaging. [] Read the Owner's Manual to familiarize yourself with the operation of appropriate size to connect...
.... [] Turn on water supply. [] Check for water leaks. Tighten connections if necessary. If house wiring is secure under the cover. Locate the three dishwasher wires (white, black and green) with a ground wire, a ground must be provided by the installer. Note: Check that harness leads ore threaded through... to the instructions on the hot water faucet at the sink to verify that the water temperature is at the source. [] Open the dishwasher door and remove all foam and cardboard packaging. [] Read the Owner's Manual to familiarize yourself with the operation of appropriate size to connect...
Installation Instructions
Page 14
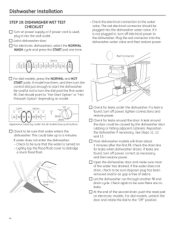
... dial to the "Off" position 14 Lightly tap the flood float cover to dislodge a stuck flood float Cover [] Check for leaks under the dishwasher Ifa leak is found, turn off power, tighten connections and restore power [] Check for leaks around the door A leak around the door could... on - Off o Light Wash (Heated Dru On) Ri_seOnlL (Heated Dru _ffl Appearance varies by model. Option StartDelau%q, (MRS) Start " .... Dishwasher Installation STEP 19: DISHWASHER WET TEST CHECKLIST [] Turn on power supplg or if power cord is used, plug it is not plugged in, turn off electrical power to...
... dial to the "Off" position 14 Lightly tap the flood float cover to dislodge a stuck flood float Cover [] Check for leaks under the dishwasher Ifa leak is found, turn off power, tighten connections and restore power [] Check for leaks around the door A leak around the door could... on - Off o Light Wash (Heated Dru On) Ri_seOnlL (Heated Dru _ffl Appearance varies by model. Option StartDelau%q, (MRS) Start " .... Dishwasher Installation STEP 19: DISHWASHER WET TEST CHECKLIST [] Turn on power supplg or if power cord is used, plug it is not plugged in, turn off electrical power to...
Installation Instructions
Page 15
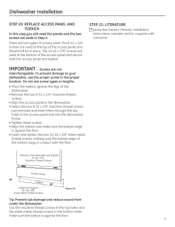
...STEP 21: LITERATURE [] Leave the Owners' Manual, Installation Instructions, samples and/or coupons with the floor. To prevent damage to the dishwasher. • Select the two 8-52 x 1//4" machine-thread screws just removed and insert them through the top holes in the access panel ... place. Instatl end Tighten ..... 10-16 × 3/8" Sheet tVletaI-Thread Screws Figure AA Tip: Prevent tub damage and reduce sound from under the dishwasher. The 8-32 x 1/4" screws are not interchangeable. IMPORTANT - Do not mix screw tgpes or lengths. • Place the toekick against the floor....
...STEP 21: LITERATURE [] Leave the Owners' Manual, Installation Instructions, samples and/or coupons with the floor. To prevent damage to the dishwasher. • Select the two 8-52 x 1//4" machine-thread screws just removed and insert them through the top holes in the access panel ... place. Instatl end Tighten ..... 10-16 × 3/8" Sheet tVletaI-Thread Screws Figure AA Tip: Prevent tub damage and reduce sound from under the dishwasher. The 8-32 x 1/4" screws are not interchangeable. IMPORTANT - Do not mix screw tgpes or lengths. • Place the toekick against the floor....
Installation Instructions
Page 16
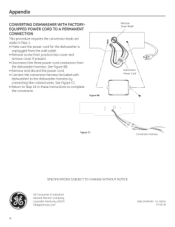
Return to Step 16 in Step 1. . Remove screw from the wall outlet. . Connect the conversion harness (included with dishwasher) to complete the conversion. / / / / ! / 11 Figure BB Remove Stroin Relief Disconnect \ Power Cord --_ Figure CC Conversion Harness SPECIFICATIONS SUBJECT TO ... & Industrial General Electric Company Louisville, Kentucky 40225 GEAppliances.com 16 206C!559P!95 3!-30255 07-09 JR Appendix CONVERTING DISHWASHER WITH FACTORYEQUIPPED POWER CORD TO A PERMANENT CONNECTION This procedure requires the conversion leads set aside in these instructions to the...
Return to Step 16 in Step 1. . Remove screw from the wall outlet. . Connect the conversion harness (included with dishwasher) to complete the conversion. / / / / ! / 11 Figure BB Remove Stroin Relief Disconnect \ Power Cord --_ Figure CC Conversion Harness SPECIFICATIONS SUBJECT TO ... & Industrial General Electric Company Louisville, Kentucky 40225 GEAppliances.com 16 206C!559P!95 3!-30255 07-09 JR Appendix CONVERTING DISHWASHER WITH FACTORYEQUIPPED POWER CORD TO A PERMANENT CONNECTION This procedure requires the conversion leads set aside in these instructions to the...


