
Installation Instructions
Page 1
(]_[Z,;."....F...". ,,-y . o._
(]_[Z,;."....F...". ,,-y . o._
Installation Instructions
Page 3
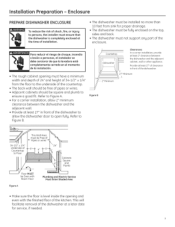
...fire, or injurg to ensure a good fit. Refer to open fullg. This will facilitate removal of the dishwasher at least 27" in front of the enclosu re. installation Preparation - I 1' Countertop [_ DishwosheI i Clearances: In... Area • Make sure the floor is completelg enclosed at the time of installation. , The dishwasher must be installed no more than 10 feet from the floor to the underside of the countertop. ...fullg enclosed on the top, sides and back. , The dishwasher must have a minimum width and depth of 24" and height of 34-1/2" _+1/4" from sink for service, if needed.
...fire, or injurg to ensure a good fit. Refer to open fullg. This will facilitate removal of the dishwasher at least 27" in front of the enclosu re. installation Preparation - I 1' Countertop [_ DishwosheI i Clearances: In... Area • Make sure the floor is completelg enclosed at the time of installation. , The dishwasher must be installed no more than 10 feet from the floor to the underside of the countertop. ...fullg enclosed on the top, sides and back. , The dishwasher must have a minimum width and depth of 24" and height of 34-1/2" _+1/4" from sink for service, if needed.
Installation Instructions
Page 4
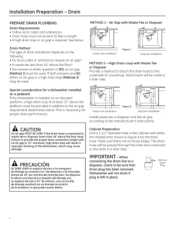
... draining of at least 32" above the platform must be provided in addition to the underside of drain installation depends on a pedestal If the dishwasher is necessary for proper drain performance. Cabinet Preparation Drill a 1-1/2" diameter hole in the cabinet wall within the shaded area shown in length. ,... aire o 32" de minima, una curva alta de drenaje resultar_ en un drenaje incorrecto de la lavadora, Io que pude causar da_os. Dishwasher will be sure that drain plug has been removed. Drain Method The type of countertop. When connecting the drain line to a disposer, check...
... draining of at least 32" above the platform must be provided in addition to the underside of drain installation depends on a pedestal If the dishwasher is necessary for proper drain performance. Cabinet Preparation Drill a 1-1/2" diameter hole in the cabinet wall within the shaded area shown in length. ,... aire o 32" de minima, una curva alta de drenaje resultar_ en un drenaje incorrecto de la lavadora, Io que pude causar da_os. Dishwasher will be sure that drain plug has been removed. Drain Method The type of countertop. When connecting the drain line to a disposer, check...
Installation Instructions
Page 5
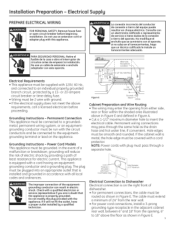
... Power Cord Hodels Onlg) Hole Diameter 1-1/2" Haximum Electrical Connection to the equipmentgrounding terminal or lead on the right front of 24" from either side, rear or floor within the shaded area illustrated above requirements, call a licensed electrician before beginning installation.... No modifique el enchufe qua se suministra con el aparato; The plug must extend a minimum of dishwasher. , For permanent connections, the cable must pass through the same hole as shown in Figure E. Electrical Supply PREPARE ELECTRICAL ...
... Power Cord Hodels Onlg) Hole Diameter 1-1/2" Haximum Electrical Connection to the equipmentgrounding terminal or lead on the right front of 24" from either side, rear or floor within the shaded area illustrated above requirements, call a licensed electrician before beginning installation.... No modifique el enchufe qua se suministra con el aparato; The plug must extend a minimum of dishwasher. , For permanent connections, the cable must pass through the same hole as shown in Figure E. Electrical Supply PREPARE ELECTRICAL ...
Installation Instructions
Page 6
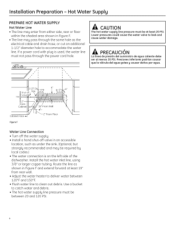
... line, using 3/8" or larger copper tubing. Use a bucket to accommodate the water line. If a power cord with plug is on the left side of the dishwasher. Installation Preparation - CAUTION The hot water supply line pressure must not pass through the same hole as under the sink. (Optional, but stronglg recommended and...
... line, using 3/8" or larger copper tubing. Use a bucket to accommodate the water line. If a power cord with plug is on the left side of the dishwasher. Installation Preparation - CAUTION The hot water supply line pressure must not pass through the same hole as under the sink. (Optional, but stronglg recommended and...
Installation Instructions
Page 7
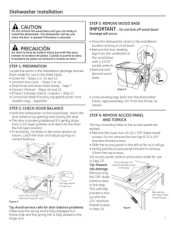
... it gentlg drops from a 1/2 open position. , If necessarg, increase or decrease tension as shown. base! • Move the dishwasher close to install the dishwasher. Do not remove 1//4" machine-thread screws in this step Remove onlg the 3/8" sheet metal screws in the listed steps. , Screw kit...- Appendix STEP 2:CHECK DOOR BALANCE • With the dishwasher on its back. , Remove the four leveling legs from the underside of Frame Figure G Tip: Avoid service calls for door balance problems....
... it gentlg drops from a 1/2 open position. , If necessarg, increase or decrease tension as shown. base! • Move the dishwasher close to install the dishwasher. Do not remove 1//4" machine-thread screws in this step Remove onlg the 3/8" sheet metal screws in the listed steps. , Screw kit...- Appendix STEP 2:CHECK DOOR BALANCE • With the dishwasher on its back. , Remove the four leveling legs from the underside of Frame Figure G Tip: Avoid service calls for door balance problems....
Installation Instructions
Page 8
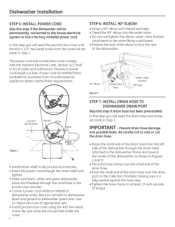
... the small hole in Figures Land M. , Place the hose clamp over the small end of the drain hose. , Push the small end of the dishwasher. STEP 6: INSTALL 90 ° ELBOW • Wrap a 90 ° elbow with the National Electrical Code, Section/422 and/ or local codes and ordinances. water ..., Position the end of the elbow to at least 15 inch-pounds of appropriate size. , Install junction box cover using the #10 hex-head screw. Dishwasher Installation STEP 5: INSTALL POWER CORD Skip this step if drain hose has been preinstalled. Prevent drain hose damage and possible leaks.
... the small hole in Figures Land M. , Place the hose clamp over the small end of the drain hose. , Push the small end of the dishwasher. STEP 6: INSTALL 90 ° ELBOW • Wrap a 90 ° elbow with the National Electrical Code, Section/422 and/ or local codes and ordinances. water ..., Position the end of the elbow to at least 15 inch-pounds of appropriate size. , Install junction box cover using the #10 hex-head screw. Dishwasher Installation STEP 5: INSTALL POWER CORD Skip this step if drain hose has been preinstalled. Prevent drain hose damage and possible leaks.
Installation Instructions
Page 9
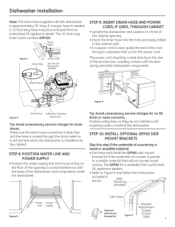
...the cord through the strain relief so it n front of the cabinet opening to avoid interference with anything under the dishwasher. Dishwasher Installation Note: The drain hose supplied with the dishwasher is needed, a 10-foot-long hose may be routed directly to the rear of the junction box, avoiding ...contact with the door spring and other dishwasher components. If u longer hose is approximately 78" long. Make sure the drain hose connection is leak-free and the hose is routed through...
...the cord through the strain relief so it n front of the cabinet opening to avoid interference with anything under the dishwasher. Dishwasher Installation Note: The drain hose supplied with the dishwasher is needed, a 10-foot-long hose may be routed directly to the rear of the junction box, avoiding ...contact with the door spring and other dishwasher components. If u longer hose is approximately 78" long. Make sure the drain hose connection is leak-free and the hose is routed through...
Installation Instructions
Page 10
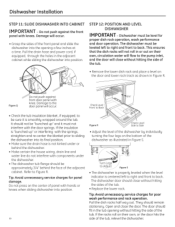
...£1 service charges for poor wash performance and rack operation. Do not press on the center of panel with components under the dishwasher. , The dishwasher tub flange should be "bunched up " or interfering with knee. Tip: Avoid unnecessarg service charges for panel damage. If the ...racks roll on the door and lower rack track as illustrated in the tub opening a few inches at a time. Dishwasher Installation STEP 11: SLIDE DISHWASHER INTO CABINET IM PORTANT - It should fit in Figure S. °. \'L _ Turn Lec / to back. Pull the drain hose...
...£1 service charges for poor wash performance and rack operation. Do not press on the center of panel with components under the dishwasher. , The dishwasher tub flange should be "bunched up " or interfering with knee. Tip: Avoid unnecessarg service charges for panel damage. If the ...racks roll on the door and lower rack track as illustrated in the tub opening a few inches at a time. Dishwasher Installation STEP 11: SLIDE DISHWASHER INTO CABINET IM PORTANT - It should fit in Figure S. °. \'L _ Turn Lec / to back. Pull the drain hose...
Installation Instructions
Page 11
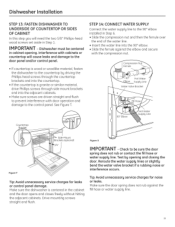
... panel. Check to be centered in the cabinet and the door opens and closes freely without hitting the adjacent cabinets. Make sure the dishwasher is granite or similar material, drive Phillips screws through side mount brackets and into the adjacent cabinets. , Make sure screws are driven... Elbow Hot Water Supplg Line Side-Haunt Brackets (optional) Figure T Tip: Avoid unnecessary service charges for noise or leaks. Dishwasher Installation STEP 13: FASTEN DISHWASHER TO UNDERSIDE OF COUNTERTOP OR SIDES OF CABINET In this step gou will cause leaks and damage to the door panel and/or...
... panel. Check to be centered in the cabinet and the door opens and closes freely without hitting the adjacent cabinets. Make sure the dishwasher is granite or similar material, drive Phillips screws through side mount brackets and into the adjacent cabinets. , Make sure screws are driven... Elbow Hot Water Supplg Line Side-Haunt Brackets (optional) Figure T Tip: Avoid unnecessary service charges for noise or leaks. Dishwasher Installation STEP 13: FASTEN DISHWASHER TO UNDERSIDE OF COUNTERTOP OR SIDES OF CABINET In this step gou will cause leaks and damage to the door panel and/or...
Installation Instructions
Page 12
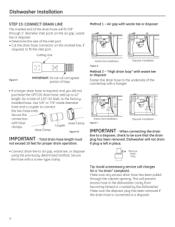
...with a hanger. Air gap with a screw-tLIpe clamp. This will not drain if plug is left in the dishwasher cavitg from becoming kinked or crushed bg the dishwasher. Hose Clamp Hose Clamp Coupler Figure W IMPORTANT -Total drain hose length must not exceed 10 feet for a "no...to a disposer. 12 Secure the hose with waste tee or disposer __-- _ _/___ A Waste Tee Installation Disposer Installation Figure X Method 2 - Dishwasher Installation STEP 15: CONNECT DRAIN LINE The molded end of the drain hose will fit 5/8" through the cabinet opening. If a longer drain hose is...
...with a hanger. Air gap with a screw-tLIpe clamp. This will not drain if plug is left in the dishwasher cavitg from becoming kinked or crushed bg the dishwasher. Hose Clamp Hose Clamp Coupler Figure W IMPORTANT -Total drain hose length must not exceed 10 feet for a "no...to a disposer. 12 Secure the hose with waste tee or disposer __-- _ _/___ A Waste Tee Installation Disposer Installation Figure X Method 2 - Dishwasher Installation STEP 15: CONNECT DRAIN LINE The molded end of the drain hose will fit 5/8" through the cabinet opening. If a longer drain hose is...
Installation Instructions
Page 13
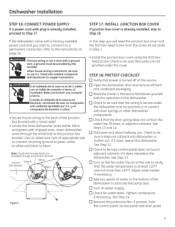
...usar un compuesto anti-oxidante aprobado par U.L y un compuesto de aluminio a cobre. • Secure house wiring to the back of the dishwasher to If the dishwasher came with stripped ends. Note: Check that the wiring is already installed, skip to lubricate the pump seal. [] Turn on page 16. ... it to a permanent connection, refer to black. See Step 13. [] Turn on the hot water faucet at the source. [] Open the dishwasher door and remove all foam and cardboard packaging. [] Read the Owner's Manual to familiarize yourself with the operation of appropriate size to connect incoming ...
...usar un compuesto anti-oxidante aprobado par U.L y un compuesto de aluminio a cobre. • Secure house wiring to the back of the dishwasher to If the dishwasher came with stripped ends. Note: Check that the wiring is already installed, skip to lubricate the pump seal. [] Turn on page 16. ... it to a permanent connection, refer to black. See Step 13. [] Turn on the hot water faucet at the source. [] Open the dishwasher door and remove all foam and cardboard packaging. [] Read the Owner's Manual to familiarize yourself with the operation of appropriate size to connect incoming ...
Installation Instructions
Page 14
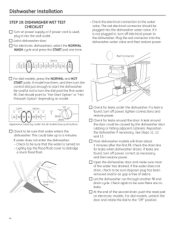
...is found, turn off power, tighten connections and restore power [] Check for leaks under the dishwasher Ifa leak is free of the second drain, push the reset pad on - Dishwasher Installation STEP 19: DISHWASHER WET TEST CHECKLIST [] Turn on model Cucles Pots Po_ Hear u os Options Hi-Temp ...• Hot Start 4. Check the electrical connection to the water valve The red electrical connector should be plugged into the dishwasher water valve If it into the dishwasher water valve and then restore power RedConnector [] For dial models, press the NORMAL and HOT START pads, if model has ...
...is found, turn off power, tighten connections and restore power [] Check for leaks under the dishwasher Ifa leak is free of the second drain, push the reset pad on - Dishwasher Installation STEP 19: DISHWASHER WET TEST CHECKLIST [] Turn on model Cucles Pots Po_ Hear u os Options Hi-Temp ...• Hot Start 4. Check the electrical connection to the water valve The red electrical connector should be plugged into the dishwasher water valve If it into the dishwasher water valve and then restore power RedConnector [] For dial models, press the NORMAL and HOT START pads, if model has ...
Installation Instructions
Page 15
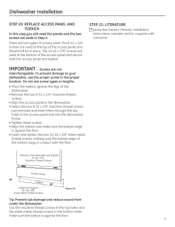
... holes. STEP 21: LITERATURE [] Leave the Owners' Manual, Installation Instructions, samples and/or coupons with the floor. To prevent damage to the dishwasher. • Select the two 8-52 x 1//4" machine-thread screws just removed and insert them through the top holes in the proper location. Remove...- Instatl end Tighten ..... 10-16 × 3/8" Sheet tVletaI-Thread Screws Figure AA Tip: Prevent tub damage and reduce sound from under the dishwasher. screws are used at the top of screws used at the bottom of the toekick stags in place. There are used . The 8-32 x ...
... holes. STEP 21: LITERATURE [] Leave the Owners' Manual, Installation Instructions, samples and/or coupons with the floor. To prevent damage to the dishwasher. • Select the two 8-52 x 1//4" machine-thread screws just removed and insert them through the top holes in the proper location. Remove...- Instatl end Tighten ..... 10-16 × 3/8" Sheet tVletaI-Thread Screws Figure AA Tip: Prevent tub damage and reduce sound from under the dishwasher. screws are used at the top of screws used at the bottom of the toekick stags in place. There are used . The 8-32 x ...
Installation Instructions
Page 16
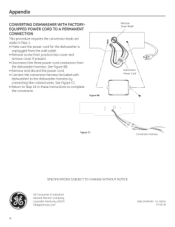
... from junction box cover and remove cover if present. . See Figure BB. . Remove screw from the dishwasher harness. Connect the conversion harness (included with dishwasher) to Step 16 in Step 1. . Appendix CONVERTING DISHWASHER WITH FACTORYEQUIPPED POWER CORD TO A PERMANENT CONNECTION This procedure requires the conversion leads set aside in these instructions... Industrial General Electric Company Louisville, Kentucky 40225 GEAppliances.com 16 206C!559P!95 3!-30255 07-09 JR Make sure the power cord for the dishwasher is unplugged from the wall outlet. . Return to the...
... from junction box cover and remove cover if present. . See Figure BB. . Remove screw from the dishwasher harness. Connect the conversion harness (included with dishwasher) to Step 16 in Step 1. . Appendix CONVERTING DISHWASHER WITH FACTORYEQUIPPED POWER CORD TO A PERMANENT CONNECTION This procedure requires the conversion leads set aside in these instructions... Industrial General Electric Company Louisville, Kentucky 40225 GEAppliances.com 16 206C!559P!95 3!-30255 07-09 JR Make sure the power cord for the dishwasher is unplugged from the wall outlet. . Return to the...


