Hotpoint HDA3600RCC - 24" Dishwasher Support and Manuals
Get Help and Manuals for this Hotpoint item
View All Support Options Below
Free Hotpoint HDA3600RCC manuals!
Problems with Hotpoint HDA3600RCC?
Ask a Question
Free Hotpoint HDA3600RCC manuals!
Problems with Hotpoint HDA3600RCC?
Ask a Question
Most Recent Hotpoint HDA3600RCC Questions

What Does Tabs Button On Dishwasher Fdl570 Do
(Posted by stevepweeks 10 years ago)
Popular Hotpoint HDA3600RCC Manual Pages
Installation Instructions - Page 1

(]_[Z,;."....F...". ,,-y . o._
Installation Instructions - Page 2
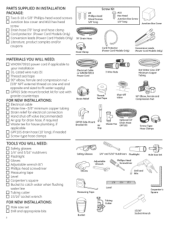
PARTS SUPPLIED IN INSTALLATION PACKAGE:
[] Two 8-18 x 5/8" Phillips-head wood screws [] Junction box cover and #10 hex head
screw [] Drain hose (78" long)and hose clamp [] Cord protector (Power Cord Models Only) [] Conversion leads (Power Cord Models... 15/16" socket wrench
FOR NEW INSTALLATIONS:
[] Hole saw set [] Drill and appropriate bits
Safety Glasses
1/4" and 5/16" Nutdrivers Flashlight...
Installation Instructions - Page 3
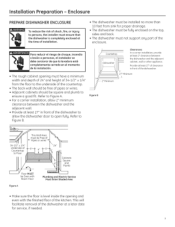
... and Plumb
Floor MUST be square and plumb to
ensure a good fit. This will facilitate removal of the dishwasher at the time of installation.
, The dishwasher must not support any part of 34-1/2" _+1/4" from sink for service, if needed.
installation Preparation - Refer to Floor
This Wall Area must have a minimum width and depth of 24" and height...
Installation Instructions - Page 4
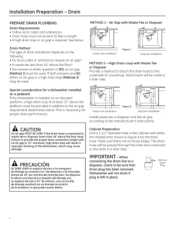
..." above the floor? Dishwasher will be used . Installation Preparation - The drain hose will not drain if
plug is installed on the following: • Do local codes or ordinances require an air gap? • Is waste tee less than 18" above . If both answers are no sharp edges. Failure to the manufacturer's instructions. Drain Method The...
Installation Instructions - Page 5
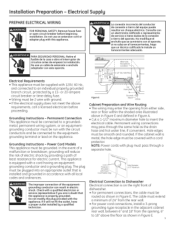
.... • Wiring must be grounded. Grounding Instructions - This appliance is properlg grounded, Do not modifg the plug provided with all local codes and ordinances. Cabinet
Figure E
White
Cabinet Preparation and Wire Routing , The wiring mag enter the opening from the opening, 6" to Dishwasher Electrical connection is on the appliance. NOTE: Power cords with 120V, 60...
Installation Instructions - Page 7
...
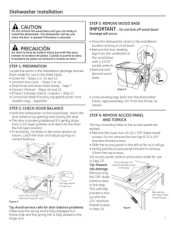
Locate the items in the installation package and set
them aside for door balance problems. Make sure the spring end is fullg engaged in a frame hole and the spring link is removed. Step 21
, Conversion leads (Factorg-equipped
power cord
models onlg) -
Figure H
• Screw leveling legs back into the dishwasher frame, approximatelg 3/4" from the...
Installation Instructions - Page 8
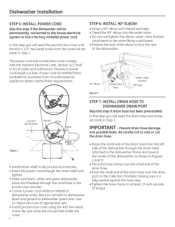
STEP 6: INSTALL 90 ° ELBOW
• Wrap a 90 ° elbow with the National Electrical Code, Section/422 and/ or local codes and ordinances.
Use UL-listed wire nuts of the dishwasher as shown in Step 1. In this step you will need the junction box cover and the #10 x Z/2" hex-head screw from an authorized GE appliance dealer...
Installation Instructions - Page 9
... I0: INSTALL OPTIONAL GPF65 SIDE MOUNT BRACKETS
Skip this port if present
STEP 9: INSERT DRAIN HOSE AND POWER
CORD, IF USED, THROUGH CABINET
• Upright the dishwasher and position it n front of the cabinet opening to Figure P and follow the instructions
included in the kit. The 10-foot-long hose is used, guide the...
Installation Instructions - Page 10
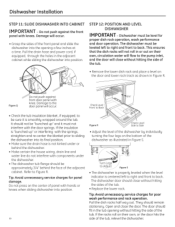
... to the door panel will close the door. Tip: Avoid unnecessar£1 service charges for
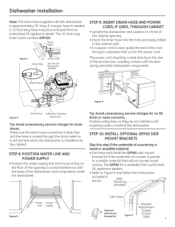
proper dish rack operation, wash performance and door operation. Tip: Avoid unnecessarg service charges for poor wash performance and rack operation. STEP 12: POSITION AND LEVEL DISHWASHER
IM PORTANT- Refer to the pump inlet, and the door will occur. Pull...
Installation Instructions - Page 11
...; Elbow
Hot Water Supplg Line
Side-Haunt Brackets (optional)
Figure T
Tip: Avoid unnecessary service charges for noise or leaks.
Interference with cabinets or countertop will need the two 5/8" Phillips-head wood screws set aside in Step 1. Dishwasher Installation
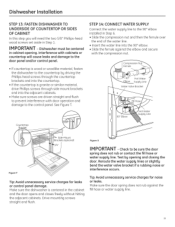
STEP 13: FASTEN DISHWASHER TO UNDERSIDE OF COUNTERTOP OR SIDES OF CABINET In this step gou will...
Installation Instructions - Page 12
...no drain" complaint. Secure the connection
with a hanger. Dishwasher will fit 5/8" through the cabinet opening. Drain 4 RePmluogve
Tip: Avoid unnecessary service call charges for a total of 120" (10 feet),... tee or disposer
__--
_
_/___
A
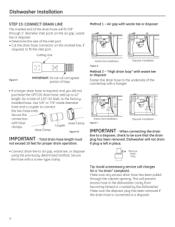
Waste Tee Installation
Disposer Installation
Figure X
Method 2 - Dishwasher Installation
STEP 15: CONNECT DRAIN LINE
The molded end of the drain hose...
Installation Instructions - Page 13
... kit set aside in bracket
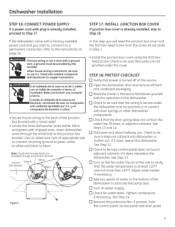
Junction Ground Box Bracket
White
\
Figure Z
In this step you want to convert it does not roll back into dishwasher or ...Manual to familiarize yourself
with the operation of the dishwasher to the instructions on the hot water faucet at the sink to verify that power is already
installed,
skip to
If the dishwasher came with stripped ends. STEP 17: INSTALL...
Installation Instructions - Page 14
.../4 minutes If water does not enter the dishwasher: - Dishwasher Installation
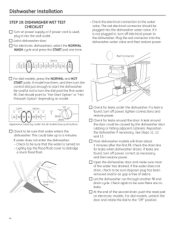
STEP 19: DISHWASHER WET TEST CHECKLIST
[] Turn on power supplg or if power cord is used, plug it into the dishwasher water valve and then restore power
RedConnector
[] For dial models, press the NORMAL and HOT START pads, if model has them, and then turn the control...
Installation Instructions - Page 15
...
Figure AA
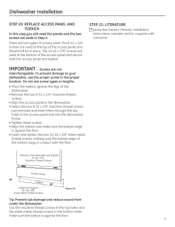
Tip: Prevent tub damage and reduce sound from under the dishwasher. Dishwasher Installation
STEP 20: REPLACE ACCESS PANEL AND TOEKICK
In this step you will need the panels and the two screws set aside in the bottom holes. Use the machine-thread screws in the top holes and the sheet metal-thread screws in...
Installation Instructions - Page 16
...
SPECIFICATIONS SUBJECT TO CHANGE WITHOUT NOTICE
GEConsumer & Industrial General Electric Company Louisville, Kentucky 40225 GEAppliances.com
16
206C!559P!95
3!-30255 07-09 JR Return to Step 16 in Step 1. . See Figure CC. . Appendix
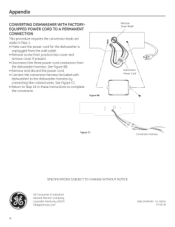
CONVERTING DISHWASHER WITH FACTORYEQUIPPED POWER CORD TO A PERMANENT CONNECTION
This procedure requires the conversion leads set aside in these instructions...
Hotpoint HDA3600RCC Reviews
We have not received any reviews for Hotpoint yet.