Manual
Page 5
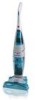
... and push forward. To transport To move your cleaner from room to release clean solution. 3. Clean solution tank cap/ measuring cup 6. Recovery tank lid and filter 9. Cord hooks: Top hook rotates for wet pickup and dry vacuuming. 4. Plug cleaner into a single position but "floats" to turn cleaner off. Wet/Dry pedal...
... and push forward. To transport To move your cleaner from room to release clean solution. 3. Clean solution tank cap/ measuring cup 6. Recovery tank lid and filter 9. Cord hooks: Top hook rotates for wet pickup and dry vacuuming. 4. Plug cleaner into a single position but "floats" to turn cleaner off. Wet/Dry pedal...

Manual
Page 8
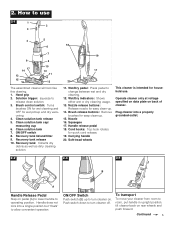
...be emptied after dry vacuuming and before wet operation. Replace filter lid. The filter screen may also be refilled at this filter when suction is low or reduced. To Clean Filter 2-21 S 2-22 Turn cleaner OFF and disconnect from filter by rinsing it under running water. Check the solution tank...top portion until it is locked in the tank lid. Remove recovery tank and lid (Fig. 216 & 2-17). Remove debris from electrical outlet. Allow filter to air dry between uses. Empty tank. 2-18 O 2-19 P Q 2-20 R Dry or loose debris will also collect on tank lid latch (M)...
...be emptied after dry vacuuming and before wet operation. Replace filter lid. The filter screen may also be refilled at this filter when suction is low or reduced. To Clean Filter 2-21 S 2-22 Turn cleaner OFF and disconnect from filter by rinsing it under running water. Check the solution tank...top portion until it is locked in the tank lid. Remove recovery tank and lid (Fig. 216 & 2-17). Remove debris from electrical outlet. Allow filter to air dry between uses. Empty tank. 2-18 O 2-19 P Q 2-20 R Dry or loose debris will also collect on tank lid latch (M)...
Manual
Page 9
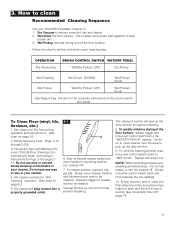
... switch down to remove loose dirt, hair and debris. 2. The cleaner's suction will provide light agitation to operating position; Empty recovery tank or clean the filter when the motor sound becomes higher in your HOOVER 'FloorMate' Cleaner to release solution as needed.
... switch down to remove loose dirt, hair and debris. 2. The cleaner's suction will provide light agitation to operating position; Empty recovery tank or clean the filter when the motor sound becomes higher in your HOOVER 'FloorMate' Cleaner to release solution as needed.
Manual
Page 10
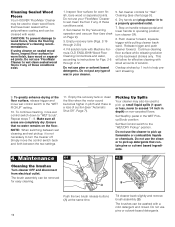
... Step on the backward strokes only. To greatly enhance drying of wax in depth) on Page 9). 3. Empty the recovery tank or clean the filter when the motor sound becomes higher in pitch and there is not necessary to turn cleaner ON. 8. Set Wet Control switch to wood floors, follow... according to instructions for worn finish, bare wood or separated joints. Make sure all areas are completely dry. Cleaning Sealed Wood Floors Your HOOVER 'FloorMate' Cleaner may also be used to clean wood floors that have been sealed with a polyurethane coating and can be cleaned with water.
... Step on the backward strokes only. To greatly enhance drying of wax in depth) on Page 9). 3. Empty the recovery tank or clean the filter when the motor sound becomes higher in pitch and there is not necessary to turn cleaner ON. 8. Set Wet Control switch to wood floors, follow... according to instructions for worn finish, bare wood or separated joints. Make sure all areas are completely dry. Cleaning Sealed Wood Floors Your HOOVER 'FloorMate' Cleaner may also be used to clean wood floors that have been sealed with a polyurethane coating and can be cleaned with water.
Manual
Page 11
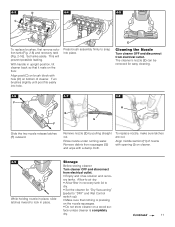
... surface unless cleaner is completely dry. Rinse nozzle under running water. To replace nozzle, make sure latches are out. Allow to air dry. • Allow filter in upright position, tilt cleaner back so that nothing is pressing on the nozzle squeegee. • Do not store cleaner on cleaner. 4-9 While holding nozzle...
... surface unless cleaner is completely dry. Rinse nozzle under running water. To replace nozzle, make sure latches are out. Allow to air dry. • Allow filter in upright position, tilt cleaner back so that nothing is pressing on the nozzle squeegee. • Do not store cleaner on cleaner. 4-9 While holding nozzle...
Manual
Page 12
... • Move wet control switch down to The Hoover Company in place • Make sure tank is found by pushing down . Problem: Cleaner pushes a line of dry debris in place. • Filter is dirty • Clean filter • Nozzle not properly positioned • Ensure ...again, clean the brushes to remove debris. (Figs. 4-1 through 4-4) Service To obtain approved HOOVER service and genuine HOOVER parts, locate the nearest Hoover Factory Service Center or Authorized Hoover Warranty Service Dealer (Depot) by the complete model number when requesting information or ordering parts. ...
... • Move wet control switch down to The Hoover Company in place • Make sure tank is found by pushing down . Problem: Cleaner pushes a line of dry debris in place. • Filter is dirty • Clean filter • Nozzle not properly positioned • Ensure ...again, clean the brushes to remove debris. (Figs. 4-1 through 4-4) Service To obtain approved HOOVER service and genuine HOOVER parts, locate the nearest Hoover Factory Service Center or Authorized Hoover Warranty Service Dealer (Depot) by the complete model number when requesting information or ordering parts. ...


