Manual
Page 5
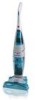
... for easy clean-up. 15. Handle release pedal 18. To transport To move your cleaner from room to release clean solution. 3. Recovery tank lid and filter 9. Brush release buttons: Remove brushes for easy clean-up to operating position. Continued 5 Wet/Dry indicators: Shows either wet or dry cleaning usage. 13. Squeegee...
... for easy clean-up. 15. Handle release pedal 18. To transport To move your cleaner from room to release clean solution. 3. Recovery tank lid and filter 9. Brush release buttons: Remove brushes for easy clean-up to operating position. Continued 5 Wet/Dry indicators: Shows either wet or dry cleaning usage. 13. Squeegee...

Manual
Page 8
... may also be rinsed for satisfactory performance, it is recommended that the recovery tank be refilled at this filter when suction is locked in the tank lid. Clean this time. 2-16 L To remove tank, press down firmly to secure the seal. 8 ... remove the tank lid (N). It may need to be emptied after dry vacuuming and before wet operation. The tank lid contains a washable, reusable filter. Remove filter lid (S), then remove filter. Although not necessary for additional cleaning. Allow filter to air dry between uses. How to Empty Turn cleaner off and disconnect from...
... may also be rinsed for satisfactory performance, it is recommended that the recovery tank be refilled at this filter when suction is locked in the tank lid. Clean this time. 2-16 L To remove tank, press down firmly to secure the seal. 8 ... remove the tank lid (N). It may need to be emptied after dry vacuuming and before wet operation. The tank lid contains a washable, reusable filter. Remove filter lid (S), then remove filter. Although not necessary for additional cleaning. Allow filter to air dry between uses. How to Empty Turn cleaner off and disconnect from...
Manual
Page 9
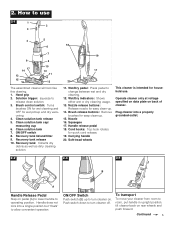
... "Wet Cleaning" operation. (See chart on the control switch and pedal. Set cleaner controls for complete instructions on page 9.) 5. Empty recovery tank or clean the filter when the motor sound becomes higher in your cleaner. 4. Wet Pickup reduces drying time of wax in pitch and there is not necessary to operating..., according to : 1. Empty Recovery Tank. (Figs. 2-16 through 212. Wet Clean the floor surface. Do not use pine or solvent based cleaning concentrates in your HOOVER 'FloorMate' Cleaner to instructions for each cleaning step. 3.
... "Wet Cleaning" operation. (See chart on the control switch and pedal. Set cleaner controls for complete instructions on page 9.) 5. Empty recovery tank or clean the filter when the motor sound becomes higher in your cleaner. 4. Wet Pickup reduces drying time of wax in pitch and there is not necessary to operating..., according to : 1. Empty Recovery Tank. (Figs. 2-16 through 212. Wet Clean the floor surface. Do not use pine or solvent based cleaning concentrates in your HOOVER 'FloorMate' Cleaner to instructions for each cleaning step. 3.
Manual
Page 10
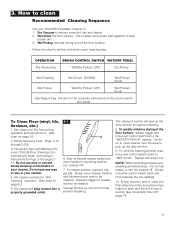
...or separated joints. NOTE: When switching between the two settings. 11. Do not use pine or solvent based detergents. Cleaning Sealed Wood Floors Your HOOVER 'FloorMate' Cleaner may also be removed for easy cleaning. 4-2 B A Push the two brush release buttons (A) at the same time. If ...Make sure all areas are completely dry. Ensure that contain pine or solvent based ingredients. 4. Empty the recovery tank or clean the filter when the motor sound becomes higher in to wood floors, follow the flooring manufacturer's cleaning recommendations. Do not use 'FloorMate' Cleaner ...
...or separated joints. NOTE: When switching between the two settings. 11. Do not use pine or solvent based detergents. Cleaning Sealed Wood Floors Your HOOVER 'FloorMate' Cleaner may also be removed for easy cleaning. 4-2 B A Push the two brush release buttons (A) at the same time. If ...Make sure all areas are completely dry. Ensure that contain pine or solvent based ingredients. 4. Empty the recovery tank or clean the filter when the motor sound becomes higher in to wood floors, follow the flooring manufacturer's cleaning recommendations. Do not use 'FloorMate' Cleaner ...
Manual
Page 11
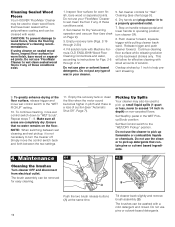
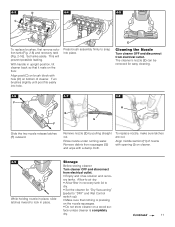
... latches (F) outward. Remove debris from squeegee (G) and wipe with hole (D) on brush block with a damp cloth. Set tanks aside. Allow to air dry. • Allow filter in recovery tank lid to dry. • Set the cleaner for easy cleaning. 4-6 4-7 4-8 F E H I ) on cleaner. 4-9 While holding nozzle in place, slide latches inward to "DRY...
... latches (F) outward. Remove debris from squeegee (G) and wipe with hole (D) on brush block with a damp cloth. Set tanks aside. Allow to air dry. • Allow filter in recovery tank lid to dry. • Set the cleaner for easy cleaning. 4-6 4-7 4-8 F E H I ) on cleaner. 4-9 While holding nozzle in place, slide latches inward to "DRY...
Manual
Page 12
...8226; Ensure that filter and filter lid are properly positioned in the recovery tank lid (Fig. 2-22) • Recovery tank and/or solution tank not positioned properly • Ensure that recovery tank is a low-foam formulation. In Canada, contact Hoover Canada, Burlington, ...OFF switch completely down to remove debris. (Figs. 4-1 through 4-4) Service To obtain approved HOOVER service and genuine HOOVER parts, locate the nearest Hoover Factory Service Center or Authorized Hoover Warranty Service Dealer (Depot) by the complete model number when requesting information or ordering parts...
...8226; Ensure that filter and filter lid are properly positioned in the recovery tank lid (Fig. 2-22) • Recovery tank and/or solution tank not positioned properly • Ensure that recovery tank is a low-foam formulation. In Canada, contact Hoover Canada, Burlington, ...OFF switch completely down to remove debris. (Figs. 4-1 through 4-4) Service To obtain approved HOOVER service and genuine HOOVER parts, locate the nearest Hoover Factory Service Center or Authorized Hoover Warranty Service Dealer (Depot) by the complete model number when requesting information or ordering parts...


