Product Manual
Page 2
... If you need assistance: Visit our website at Hoover.com or call 1-800-944-9200 for an automated referral of cleaner) Contents Important Safeguards 3 Cleaner Assembly...5 How To Use...7 Cleaner Description 7 The Tanks...8 How to this product ...to speak with a customer service representative; Follow the authorized dealer locator link to register by phone. Thank you or call 1-800-944-9200 to find the Hoover® authorized dealer nearest you for choosing a HOOVER® product. Model...
... If you need assistance: Visit our website at Hoover.com or call 1-800-944-9200 for an automated referral of cleaner) Contents Important Safeguards 3 Cleaner Assembly...5 How To Use...7 Cleaner Description 7 The Tanks...8 How to this product ...to speak with a customer service representative; Follow the authorized dealer locator link to register by phone. Thank you or call 1-800-944-9200 to find the Hoover® authorized dealer nearest you for choosing a HOOVER® product. Model...

Product Manual
Page 5
...174; Hand Tool* *Available on select models only. NOTE: Phillips screwdriver needed for assembly. Handle Bolts and Nuts (Three nuts may vary from carton and identify each item shown. F. Hose/Cord Hook E. Cleaner ASSEMBLY Carton contents 1.1 Carpet Upholstery Cleaner Bare floor cleaner PreCleaner G C H D F I... of packing materials. Cleaner B. Make sure all parts from images shown. Accessories not included with your model may be in bag with screwdriver. 1.2 1.3 Cord Protector -V2 1.4 1.5 5 Actual model may be purchased separately by visiting hoover.com.
...174; Hand Tool* *Available on select models only. NOTE: Phillips screwdriver needed for assembly. Handle Bolts and Nuts (Three nuts may vary from carton and identify each item shown. F. Hose/Cord Hook E. Cleaner ASSEMBLY Carton contents 1.1 Carpet Upholstery Cleaner Bare floor cleaner PreCleaner G C H D F I... of packing materials. Cleaner B. Make sure all parts from images shown. Accessories not included with your model may be in bag with screwdriver. 1.2 1.3 Cord Protector -V2 1.4 1.5 5 Actual model may be purchased separately by visiting hoover.com.
Product Manual
Page 6
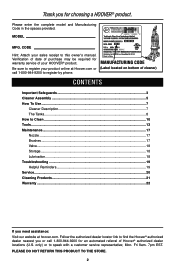
...for storage on back side of cleaner as shown. 1.15 Notch (B) rests on select models only) 1.10 Insert tabs. 1.11 Slide caddy down. IMPORTANT Tool caddy is secure. Use clips (D) to secure hose and solution tube (E and inset). 1.12 1.13 1.14 D E E D Actual model may vary from images shown. 6... 1.11 C B Store tools 1.15 Store Tools on wall or in closet. 1.10 Store hose 1.12 Start. 1.13 Wrap. 1.14 Finish. Replace upper tank 1.6 Position bottom of tank onto cleaner. 1.6 1.7 Push top of tank and tank ...
...for storage on back side of cleaner as shown. 1.15 Notch (B) rests on select models only) 1.10 Insert tabs. 1.11 Slide caddy down. IMPORTANT Tool caddy is secure. Use clips (D) to secure hose and solution tube (E and inset). 1.12 1.13 1.14 D E E D Actual model may vary from images shown. 6... 1.11 C B Store tools 1.15 Store Tools on wall or in closet. 1.10 Store hose 1.12 Start. 1.13 Wrap. 1.14 Finish. Replace upper tank 1.6 Position bottom of tank onto cleaner. 1.6 1.7 Push top of tank and tank ...
Product Manual
Page 7
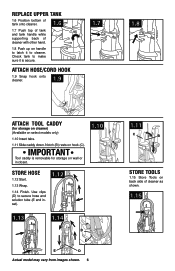
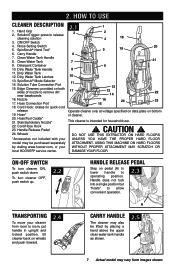
...THIS EXTRACTOR ON HARD FLOORS *Accessories not included with your UNLESS YOU HAVE THE PROPER HARD FLOOR model may also be purchased separately ATTACHMENT. ON-OFF switch To turn cleaner OFF, push switch up. 2.2 Rinse ON OFF WASH AUTO RINSE Handle release pedal Step on ... at voltage specified on data plate on wheels and push forward. 2.4 A Carry handle The cleaner may be lifted by visiting www.hoover.com, or your cleaner from images shown. Handle does not lock into a single position but "floats" to release cleaning solution 2.1 3 1 2 4 18 3. Cord Hook: rotates...
...THIS EXTRACTOR ON HARD FLOORS *Accessories not included with your UNLESS YOU HAVE THE PROPER HARD FLOOR model may also be purchased separately ATTACHMENT. ON-OFF switch To turn cleaner OFF, push switch up. 2.2 Rinse ON OFF WASH AUTO RINSE Handle release pedal Step on ... at voltage specified on data plate on wheels and push forward. 2.4 A Carry handle The cleaner may be lifted by visiting www.hoover.com, or your cleaner from images shown. Handle does not lock into a single position but "floats" to release cleaning solution 2.1 3 1 2 4 18 3. Cord Hook: rotates...
Product Manual
Page 8
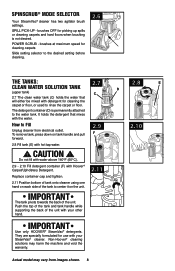
...either be mixed with the water. How to rinse the carpet or floor. Replace container cap and tighten. 2.11 Position bottom of tank onto cleaner using one hand on each side of the tank to the water tank. Actual model may harm the machine and void the warranty. POWER ...SteamVac® cleaner. Push the top of the tank and tank handle while supporting the back of the unit. SpinScrub® mode selector Your SteamVac® cleaner has two agitator brush settings. To remove tank, press down on the unit. 2.11 IMPORTANT The tank pivots towards the back of the unit with Hoover® Carpet...
...either be mixed with the water. How to rinse the carpet or floor. Replace container cap and tighten. 2.11 Position bottom of tank onto cleaner using one hand on each side of the tank to the water tank. Actual model may harm the machine and void the warranty. POWER ...SteamVac® cleaner. Push the top of the tank and tank handle while supporting the back of the unit. SpinScrub® mode selector Your SteamVac® cleaner has two agitator brush settings. To remove tank, press down on the unit. 2.11 IMPORTANT The tank pivots towards the back of the unit with Hoover® Carpet...
Product Manual
Page 9
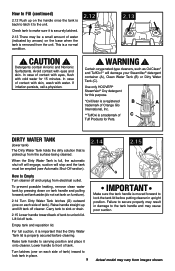
.... Avoid contact with cold water for Pets. For full suction, it onto cleaner. G How to Empty Turn cleaner off tank. Failure to secure properly may result in damage to the tank ... with eyes and skin. Raise handle straight up from electrical outlet. WARNING ! Use only HOOVER® SteamVac® Oxy detergent for this purpose. *OxiClean is a registered B A trademark of Orange Glo International,...2.12 Push up on each side of tank) inward to lock tank in place. 9 Actual model may cause poor suction. Check tank to make sure it to unlock lid. Carry tank to ...
.... Avoid contact with cold water for Pets. For full suction, it onto cleaner. G How to Empty Turn cleaner off tank. Failure to secure properly may result in damage to the tank ... with eyes and skin. Raise handle straight up from electrical outlet. WARNING ! Use only HOOVER® SteamVac® Oxy detergent for this purpose. *OxiClean is a registered B A trademark of Orange Glo International,...2.12 Push up on each side of tank) inward to lock tank in place. 9 Actual model may cause poor suction. Check tank to make sure it to unlock lid. Carry tank to ...
Product Manual
Page 10
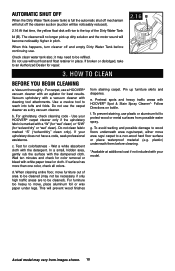
...; c. Do not use a HOOVER® vacuum cleaner with the dampened cloth. If your model. This will become noticeably higher in place. plastic) underneath them before continuing use. How to reach into tufts and folds. For carpet, use the carpet cleaner as a dry vacuum cleaner. In a small, hidden area...dry" or "wet" clean). When cleaning entire floor, move furniture out of the Dirty Water Tank lid (B). Use your HOOVER® carpet cleaner only if the upholstery fabric is full the automatic shut off mechanism will shut off and empty Dirty Water Tank before cleaning...
...; c. Do not use a HOOVER® vacuum cleaner with the dampened cloth. If your model. This will become noticeably higher in place. plastic) underneath them before continuing use. How to reach into tufts and folds. For carpet, use the carpet cleaner as a dry vacuum cleaner. In a small, hidden area...dry" or "wet" clean). When cleaning entire floor, move furniture out of the Dirty Water Tank lid (B). Use your HOOVER® carpet cleaner only if the upholstery fabric is full the automatic shut off mechanism will shut off and empty Dirty Water Tank before cleaning...
Product Manual
Page 11
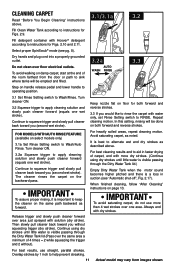
...the carpet with water only, set Rinse Setting switch to apply cleaning solution and slowly push cleaner forward (equals one wet stroke). FOR MODELS WITH AUTO RINSE FEATURE (available on page 13. Turn cleaner ON. 3.2a Squeeze trigger to RINSE. For heavily soiled areas, repeat cleaning motion. Always end with Hoover®...for Figs. 2.10 and 2.11. Continue to aid in suction (see pg. 8). Fill detergent container with dry strokes. Repeat cleaning motion. The cleaner rinses the carpet on the same path backward as noted. For best cleaning results and to squeeze trigger and slowly pull...
...the carpet with water only, set Rinse Setting switch to apply cleaning solution and slowly push cleaner forward (equals one wet stroke). FOR MODELS WITH AUTO RINSE FEATURE (available on page 13. Turn cleaner ON. 3.2a Squeeze trigger to RINSE. For heavily soiled areas, repeat cleaning motion. Always end with Hoover®...for Figs. 2.10 and 2.11. Continue to aid in suction (see pg. 8). Fill detergent container with dry strokes. Repeat cleaning motion. The cleaner rinses the carpet on the same path backward as noted. For best cleaning results and to squeeze trigger and slowly pull...
Product Manual
Page 12
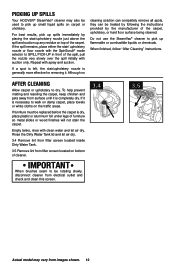
... HOOVER® SteamVac® cleaner may vary from images shown. 12 When finished, follow "After Cleaning" instructions. IMPORTANT When brushes seem to dry. After cleaning Allow carpet or upholstery to be rotating slowly, disconnect cleaner from electical outlet and check and clean this screen. 3.4 3.5 Actual model may... tanks, rinse with spray and suction. Do not use the SteamVac® cleaner to pick up small liquid spills on top of furniture so metal slides or wood finishes will not stain the carpet. If the spill remains, place either the stair/ upholstery nozzle...
... HOOVER® SteamVac® cleaner may vary from images shown. 12 When finished, follow "After Cleaning" instructions. IMPORTANT When brushes seem to dry. After cleaning Allow carpet or upholstery to be rotating slowly, disconnect cleaner from electical outlet and check and clean this screen. 3.4 3.5 Actual model may... tanks, rinse with spray and suction. Do not use the SteamVac® cleaner to pick up small liquid spills on top of furniture so metal slides or wood finishes will not stain the carpet. If the spill remains, place either the stair/ upholstery nozzle...

Product Manual
Page 13
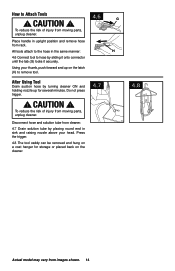
...carpet areas, carpeted A stairs and upholstery. tools A. How to snap free if it is designed with same-sized slots in connection port. Close door. SpinScrub® Hand Tool (Available on select models only) has rotating brushes for converting to help provide the scrubbing action some models... procedure. Snap door into solution connection port (B). For some spots may vary from moving parts, unplug cleaner. 4.1 A How to Remove 4.2 Squeeze latches (C) on select models only) B. How to Attach 4.1 Open hose connection port (A). 4. To reattach, align hinges of...
...carpet areas, carpeted A stairs and upholstery. tools A. How to snap free if it is designed with same-sized slots in connection port. Close door. SpinScrub® Hand Tool (Available on select models only) has rotating brushes for converting to help provide the scrubbing action some models... procedure. Snap door into solution connection port (B). For some spots may vary from moving parts, unplug cleaner. 4.1 A How to Remove 4.2 Squeeze latches (C) on select models only) B. How to Attach 4.1 Open hose connection port (A). 4. To reattach, align hinges of...
Product Manual
Page 14
...hose in sink and raising nozzle above your thumb, push forward and up for storage or placed back on the cleaner. 4.7 4.8 Actual model may vary from moving parts, unplug cleaner. To reduce the risk of injury from images shown. 14 CAUTION ! 4.6 G To reduce the risk of... injury from moving parts, unplug cleaner. Place handle in upright position and remove hose from cleaner. 4.7 Drain solution tube by placing round end in ...
...hose in sink and raising nozzle above your thumb, push forward and up for storage or placed back on the cleaner. 4.7 4.8 Actual model may vary from moving parts, unplug cleaner. To reduce the risk of injury from images shown. 14 CAUTION ! 4.6 G To reduce the risk of... injury from moving parts, unplug cleaner. Place handle in upright position and remove hose from cleaner. 4.7 Drain solution tube by placing round end in ...

Product Manual
Page 15
Fill detergent container with HOOVER® detergent according to instructions for Figs. 2.9 to clean lower half. ! Set Rinse Setting switch to help prevent streaking. Turn cleaner ON. 4.9 Pre-spray the carpeted stair by 1/2 inch to WASH. Pull tool slowly over the carpet (second wet stroke). Always end with more ... press it against riser. WARNING ! Do not place cleaner on page 14. 15 Actual model may require that machine be placed at the top of the stairs to clean upper half of stairway and at end of carpet. Agitator brushes will not rotate while handle is a ...
Fill detergent container with HOOVER® detergent according to instructions for Figs. 2.9 to clean lower half. ! Set Rinse Setting switch to help prevent streaking. Turn cleaner ON. 4.9 Pre-spray the carpeted stair by 1/2 inch to WASH. Pull tool slowly over the carpet (second wet stroke). Always end with more ... press it against riser. WARNING ! Do not place cleaner on page 14. 15 Actual model may require that machine be placed at the top of the stairs to clean upper half of stairway and at end of carpet. Agitator brushes will not rotate while handle is a ...
Product Manual
Page 16
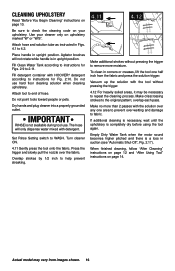
... on page 10. Be sure to 2.11. Agitator brushes will only dispense water mixed with HOOVER® detergent according to instructions for Figs. 2.9 to check the cleaning code on your cleaner only on upholstery marked "W" or "W/S". Set Rinse Setting switch to 4.2. Press the trigger and...cleaning upholstery. Fill detergent container with detergent. Do not use . Turn cleaner ON. 4.11 Gently press the tool onto the fabric. To clean in suction (see "Automatic Shut-Off", Fig. 2.17). Actual model may be necessary to fabric. Attach tool to the original pattern; IMPORTANT...
... on page 10. Be sure to 2.11. Agitator brushes will only dispense water mixed with HOOVER® detergent according to instructions for Figs. 2.9 to check the cleaning code on your cleaner only on upholstery marked "W" or "W/S". Set Rinse Setting switch to 4.2. Press the trigger and...cleaning upholstery. Fill detergent container with detergent. Do not use . Turn cleaner ON. 4.11 Gently press the tool onto the fabric. To clean in suction (see "Automatic Shut-Off", Fig. 2.17). Actual model may be necessary to fabric. Attach tool to the original pattern; IMPORTANT...
Product Manual
Page 17
...cleaner back so that the square post (C) also aligns with these directions for changing brush assemblies or for easy cleaning. ! Slide nozzle up and remove from moving parts, unplug cleaner... before servicing. 5.3 How to secure it can be in the proper position in cleaner housing. To reduce the risk of injury from cleaner. 5.2 To replace nozzle, line up rear edge of your cleaner...in cleaner. CAUTION ! B A Slide nozzle completely onto cleaner. ...Change and Clean Your cleaner is equipped with ...cleaner back until post fits easily into holes. brushes: How to snap ...
...cleaner back so that the square post (C) also aligns with these directions for changing brush assemblies or for easy cleaning. ! Slide nozzle up and remove from moving parts, unplug cleaner... before servicing. 5.3 How to secure it can be in the proper position in cleaner housing. To reduce the risk of injury from cleaner. 5.2 To replace nozzle, line up rear edge of your cleaner...in cleaner. CAUTION ! B A Slide nozzle completely onto cleaner. ...Change and Clean Your cleaner is equipped with ...cleaner back until post fits easily into holes. brushes: How to snap ...
Product Manual
Page 18
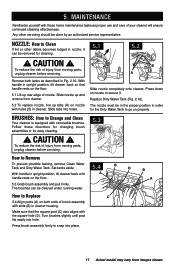
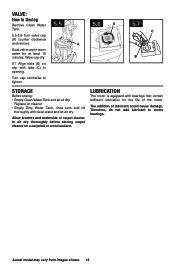
... let air dry. Replace on cleaner. • Empty Dirty Water Tank, rinse tank and lid thoroughly with bearings that contain sufficient lubrication for at least 15 minutes. valve: How to motor bearings. Wipe cap dry. 5.7 Align slots (B) on a carpeted or wood surface. Therefore, do... to air dry thoroughly before storing carpet cleaner on cap with tabs (C) in warm water for the life of the motor. The addition of carpet cleaner to tighten. 5.5 5.6 A A 5.7 C B Storage Before storing: • Empty Clean Water Tank and let air dry. Actual model may vary from images shown. 18...
... let air dry. Replace on cleaner. • Empty Dirty Water Tank, rinse tank and lid thoroughly with bearings that contain sufficient lubrication for at least 15 minutes. valve: How to motor bearings. Wipe cap dry. 5.7 Align slots (B) on a carpeted or wood surface. Therefore, do... to air dry thoroughly before storing carpet cleaner on cap with tabs (C) in warm water for the life of the motor. The addition of carpet cleaner to tighten. 5.5 5.6 A A 5.7 C B Storage Before storing: • Empty Clean Water Tank and let air dry. Actual model may vary from images shown. 18...
Product Manual
Page 19
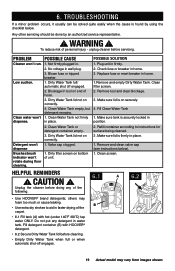
.... 19 Actual model may foam too much or cause leaking. Clean filter screen. 2. Make sure lid is securely locked in place. Make sure tank is on correctly. 4. Refill container according to aid in faster drying of the carpet. • 6.1 Fill tank (A) with HOOVER® detergent.... • 6.2 Secure Dirty Water Tank lid before doing any detergent in water tank. Detergent won't dispense Brushes/brush indicator won 't run. 1. Unplug the cleaner before cleaning. • Empty Dirty Water...
.... 19 Actual model may foam too much or cause leaking. Clean filter screen. 2. Make sure lid is securely locked in place. Make sure tank is on correctly. 4. Refill container according to aid in faster drying of the carpet. • 6.1 Fill tank (A) with HOOVER® detergent.... • 6.2 Secure Dirty Water Tank lid before doing any detergent in water tank. Detergent won't dispense Brushes/brush indicator won 't run. 1. Unplug the cleaner before cleaning. • Empty Dirty Water...

Product Manual
Page 20
... Yellow Pages under "Vacuum Cleaners" or "Household". • Visit our website at hoover.com (U.S. Mon-Fri 8am-7pm EST. This will only result in Glenwillow for service. Customers) or hoover.ca (Canadian customers). Follow the service center link to Hoover®, Inc., Company in...8am-7pm EST. Service To obtain approved Hoover® service and genuine Hoover® parts, locate the nearest Authorized Hoover® Warranty Service Dealer (Depot) by the complete model number when requesting information or ordering parts. (The model number appears on the bottom of authorized ...
... Yellow Pages under "Vacuum Cleaners" or "Household". • Visit our website at hoover.com (U.S. Mon-Fri 8am-7pm EST. This will only result in Glenwillow for service. Customers) or hoover.ca (Canadian customers). Follow the service center link to Hoover®, Inc., Company in...8am-7pm EST. Service To obtain approved Hoover® service and genuine Hoover® parts, locate the nearest Authorized Hoover® Warranty Service Dealer (Depot) by the complete model number when requesting information or ordering parts. (The model number appears on the bottom of authorized ...


