
Product Manual
Page 5
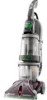
... by visiting hoover.com. Bolts and nuts located in bag with your model may vary from carton and identify each item shown. F. Hose/Tool Caddy* G Hose H Stair/Upholstery Nozzle I B E A A. Tighten with screwdriver. 1.2 1.3 Cord Protector -V2 1.4 1.5 5 Actual model may be ... *Available on select models only. Attach handle 1.2 Remove tank. 1.3 Position cord protector. 1.4 Slide handle down. 1.5 Insert bolts and attach nuts. Make sure all parts from images shown. Cleaner B. Hose/Cord Hook E. SpinScrub® Brush Assembly Remove all parts are located before disposing...
... by visiting hoover.com. Bolts and nuts located in bag with your model may vary from carton and identify each item shown. F. Hose/Tool Caddy* G Hose H Stair/Upholstery Nozzle I B E A A. Tighten with screwdriver. 1.2 1.3 Cord Protector -V2 1.4 1.5 5 Actual model may be ... *Available on select models only. Attach handle 1.2 Remove tank. 1.3 Position cord protector. 1.4 Slide handle down. 1.5 Insert bolts and attach nuts. Make sure all parts from images shown. Cleaner B. Hose/Cord Hook E. SpinScrub® Brush Assembly Remove all parts are located before disposing...

Product Manual
Page 13
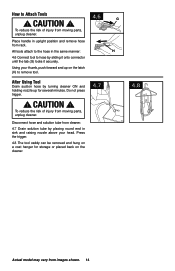
... on hose with holes on sides of hose. Remove hose from solution connection port. SpinScrub® hand tool (Available on small carpet areas, carpeted A stairs and upholstery. To reduce the risk of injury from images shown. SpinScrub® Hand Tool (Available on select...) has rotating brushes for converting to Remove 4.2 Squeeze latches (C) on select models only) B. 4. How to the scrub module. (Available on top and bottom of tool storage area. For some spots may vary from moving parts, unplug cleaner. 4.1 A How to snap free if it is designed with a break-away ...
... on hose with holes on sides of hose. Remove hose from solution connection port. SpinScrub® hand tool (Available on small carpet areas, carpeted A stairs and upholstery. To reduce the risk of injury from images shown. SpinScrub® Hand Tool (Available on select...) has rotating brushes for converting to Remove 4.2 Squeeze latches (C) on select models only) B. 4. How to the scrub module. (Available on top and bottom of tool storage area. For some spots may vary from moving parts, unplug cleaner. 4.1 A How to snap free if it is designed with a break-away ...
Product Manual
Page 14
...nozzle above your thumb, push forward and up for storage or placed back on the cleaner. 4.7 4.8 Actual model may vary from rack. CAUTION ! 4.6 G To reduce the risk of injury from moving parts, unplug cleaner. All tools attach to the hose in the same manner: H 4.6 Connect tool .... ! After Using Tool Drain suction hose by turning cleaner ON and holding nozzle up on a coat hanger for several minutes. To reduce the risk of injury from moving parts, unplug cleaner. Disconnect hose and solution tube from cleaner. 4.7 Drain solution tube by sliding it onto connector until...
...nozzle above your thumb, push forward and up for storage or placed back on the cleaner. 4.7 4.8 Actual model may vary from rack. CAUTION ! 4.6 G To reduce the risk of injury from moving parts, unplug cleaner. All tools attach to the hose in the same manner: H 4.6 Connect tool .... ! After Using Tool Drain suction hose by turning cleaner ON and holding nozzle up on a coat hanger for several minutes. To reduce the risk of injury from moving parts, unplug cleaner. Disconnect hose and solution tube from cleaner. 4.7 Drain solution tube by sliding it onto connector until...
Product Manual
Page 17
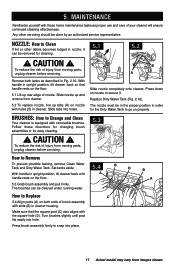
... brush assembly firmly to snap into place. 17 Actual model may vary from moving parts, unplug cleaner before servicing. 5.3 How to Change and Clean Your cleaner is equipped with holes (B) in upright position, tilt cleaner back until post fits easily into holes. B A Slide nozzle completely onto cleaner. CAUTION ! Set tanks aside. Make sure that handle rests...
... brush assembly firmly to snap into place. 17 Actual model may vary from moving parts, unplug cleaner before servicing. 5.3 How to Change and Clean Your cleaner is equipped with holes (B) in upright position, tilt cleaner back until post fits easily into holes. B A Slide nozzle completely onto cleaner. CAUTION ! Set tanks aside. Make sure that handle rests...

Product Manual
Page 20
...Yellow Pages under "Vacuum Cleaners" or "Household". • Visit our website at hoover.com (U.S. If you . • For an automated referral of the vacuum.) PLEASE DO NOT RETURN THIS PRODUCT TO THE STORE. 20 7. Follow the service center link to Hoover®, Inc., Company... EST. Customers) or hoover.ca (Canadian customers). Service To obtain approved Hoover® service and genuine Hoover® parts, locate the nearest Authorized Hoover® Warranty Service Dealer (Depot) by the complete model number when requesting information or ordering parts. (The model number appears on the ...
...Yellow Pages under "Vacuum Cleaners" or "Household". • Visit our website at hoover.com (U.S. If you . • For an automated referral of the vacuum.) PLEASE DO NOT RETURN THIS PRODUCT TO THE STORE. 20 7. Follow the service center link to Hoover®, Inc., Company... EST. Customers) or hoover.ca (Canadian customers). Service To obtain approved Hoover® service and genuine Hoover® parts, locate the nearest Authorized Hoover® Warranty Service Dealer (Depot) by the complete model number when requesting information or ordering parts. (The model number appears on the ...


