Product Manual
Page 1
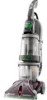
For assistance, please call Customer Service at 1-800-944-9200 Mon-Fri 8am-7pm EST. IF USED COMMERCIALLY WARRANTY IS VOID. ©2011 Techtronic Floor Care Technology Limited. PLEASE DO NOT RETURN THIS PRODUCT TO THE STORE. THIS PRODUCT IS INTENDED FOR HOUSEHOLD USE ONLY. All rights reserved. #56518217 ID100262-R2 Questions or concerns? Owner's Manual Operating and Servicing Instructions Español - página E1 www.hoover.com IMPORTANT: READ CAREFULLY BEFORE ASSEMBLY AND USE.
For assistance, please call Customer Service at 1-800-944-9200 Mon-Fri 8am-7pm EST. IF USED COMMERCIALLY WARRANTY IS VOID. ©2011 Techtronic Floor Care Technology Limited. PLEASE DO NOT RETURN THIS PRODUCT TO THE STORE. THIS PRODUCT IS INTENDED FOR HOUSEHOLD USE ONLY. All rights reserved. #56518217 ID100262-R2 Questions or concerns? Owner's Manual Operating and Servicing Instructions Español - página E1 www.hoover.com IMPORTANT: READ CAREFULLY BEFORE ASSEMBLY AND USE.
Product Manual
Page 2
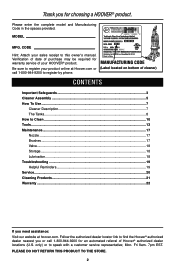
... not return this owner's manual. Verification of date of purchase may be required for warranty service of cleaner) Contents Important Safeguards 3 Cleaner Assembly...5 How To Use...7 Cleaner Description 7 The Tanks...8 How to the store. 2 only) or to register by phone. Fri 8am- 7pm EST. Be sure to register your sales receipt to this product to Clean...10 Tools...13 Maintenance...17 Nozzle...17 Brushes...17 Valve...
... not return this owner's manual. Verification of date of purchase may be required for warranty service of cleaner) Contents Important Safeguards 3 Cleaner Assembly...5 How To Use...7 Cleaner Description 7 The Tanks...8 How to the store. 2 only) or to register by phone. Fri 8am- 7pm EST. Be sure to register your sales receipt to this product to Clean...10 Tools...13 Maintenance...17 Nozzle...17 Brushes...17 Valve...
Product Manual
Page 3
.... (See Cleaning Products section of this manual.) • Use only on surfaces moistened by cord, use cord as a handle, close door on cord or pull cord around sharp edges or corners. Turn off all controls before unplugging. • Unplug before connecting the SpinScrub® hand tool. • Always disconnect cord from electrical outlet before servicing the carpet cleaner. • Do not unplug by Hoover®...
.... (See Cleaning Products section of this manual.) • Use only on surfaces moistened by cord, use cord as a handle, close door on cord or pull cord around sharp edges or corners. Turn off all controls before unplugging. • Unplug before connecting the SpinScrub® hand tool. • Always disconnect cord from electrical outlet before servicing the carpet cleaner. • Do not unplug by Hoover®...
Product Manual
Page 4
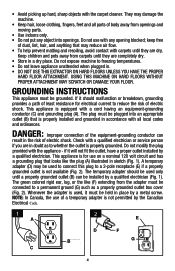
... HARD FLOORS UNLESS YOU HAVE THE PROPER HARD FLOOR ATTACHMENT. Keep children and pets away from carpets until they are dry. Grounding Instructions This appliance must be installed by the Canadian Electrical Code. 1 A 2 E D F BGROUNDING OUTLET BOX G C 4 keep free of electric shock. DANGER: Improper connection of body away from the adapter must be used only until they are in doubt as a properly grounded outlet box cover...
... HARD FLOORS UNLESS YOU HAVE THE PROPER HARD FLOOR ATTACHMENT. Keep children and pets away from carpets until they are dry. Grounding Instructions This appliance must be installed by the Canadian Electrical Code. 1 A 2 E D F BGROUNDING OUTLET BOX G C 4 keep free of electric shock. DANGER: Improper connection of body away from the adapter must be used only until they are in doubt as a properly grounded outlet box cover...

Product Manual
Page 5
...174; Hand Tool* *Available on select models only. F. Cleaner ASSEMBLY Carton contents 1.1 Carpet Upholstery Cleaner Bare floor cleaner PreCleaner G C H D F I . Cleaner B. SpinScrub® Brush Assembly Remove all parts are located before disposing of packing materials. Bolts and nuts located in bag but only two or need for assembly. NOTE: Phillips screwdriver needed for assembly. Upper Handle C. Attach handle 1.2 Remove tank. 1.3 Position cord protector. 1.4 Slide handle down. 1.5 Insert bolts and attach nuts. Hose/Tool Caddy* G Hose H Stair/Upholstery Nozzle...
...174; Hand Tool* *Available on select models only. F. Cleaner ASSEMBLY Carton contents 1.1 Carpet Upholstery Cleaner Bare floor cleaner PreCleaner G C H D F I . Cleaner B. SpinScrub® Brush Assembly Remove all parts are located before disposing of packing materials. Bolts and nuts located in bag but only two or need for assembly. NOTE: Phillips screwdriver needed for assembly. Upper Handle C. Attach handle 1.2 Remove tank. 1.3 Position cord protector. 1.4 Slide handle down. 1.5 Insert bolts and attach nuts. Hose/Tool Caddy* G Hose H Stair/Upholstery Nozzle...
Product Manual
Page 7
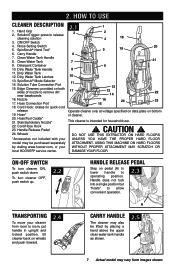
.... Clean Water Tank Handle 8. Hose Connection Port 16 24 23 15 18. Wheels DO NOT USE THIS EXTRACTOR ON HARD FLOORS *Accessories not included with your UNLESS YOU HAVE THE PROPER HARD FLOOR model may also be purchased separately ATTACHMENT. ON-OFF switch To turn cleaner OFF, push switch up. 2.2 Rinse ON OFF WASH AUTO RINSE Handle release pedal Step on bottom 19. SpinScrub® Hand Tool* 5 19 20 6. Hose/Tool Caddy* 21. Cord/Hose Hook 23. USING THIS MACHINE...
.... Clean Water Tank Handle 8. Hose Connection Port 16 24 23 15 18. Wheels DO NOT USE THIS EXTRACTOR ON HARD FLOORS *Accessories not included with your UNLESS YOU HAVE THE PROPER HARD FLOOR model may also be purchased separately ATTACHMENT. ON-OFF switch To turn cleaner OFF, push switch up. 2.2 Rinse ON OFF WASH AUTO RINSE Handle release pedal Step on bottom 19. SpinScrub® Hand Tool* 5 19 20 6. Hose/Tool Caddy* 21. Cord/Hose Hook 23. USING THIS MACHINE...
Product Manual
Page 8
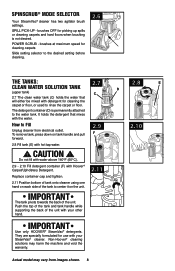
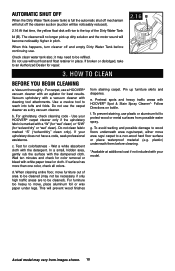
... outlet. POWER SCRUB - IMPORTANT Use only HOOVER® SteamVac® detergents. They are specially formulated for cleaning the carpet or floor, or used to Fill Unplug cleaner from images shown. 8 To remove tank, press down on the unit. 2.11 IMPORTANT The tank pivots towards the back of the tank to the water tank. Actual model may harm the machine and void the warranty. SpinScrub® mode selector Your SteamVac® cleaner has two agitator brush settings. It...
... outlet. POWER SCRUB - IMPORTANT Use only HOOVER® SteamVac® detergents. They are specially formulated for cleaning the carpet or floor, or used to Fill Unplug cleaner from images shown. 8 To remove tank, press down on the unit. 2.11 IMPORTANT The tank pivots towards the back of the tank to the water tank. Actual model may harm the machine and void the warranty. SpinScrub® mode selector Your SteamVac® cleaner has two agitator brush settings. It...
Product Manual
Page 9
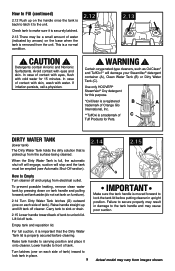
... Turn cleaner off and unplug from the surface being cleaned. 2.14 2.15 When the Dirty Water Tank is full, the automatic shut-off will engage, suction will damage your SteamVac® detergent container (A), Clean Water Tank (B) or Dirty Water Tank (C). Failure to secure properly may result in upright position. CAUTION ! WARNING ! To prevent possible leaking, remove clean water tank by arrows) on the base when the tank is removed from images shown. Empty tank...
... Turn cleaner off and unplug from the surface being cleaned. 2.14 2.15 When the Dirty Water Tank is full, the automatic shut-off will engage, suction will damage your SteamVac® detergent container (A), Clean Water Tank (B) or Dirty Water Tank (C). Failure to secure properly may result in upright position. CAUTION ! WARNING ! To prevent possible leaking, remove clean water tank by arrows) on the base when the tank is removed from images shown. Empty tank...
Product Manual
Page 10
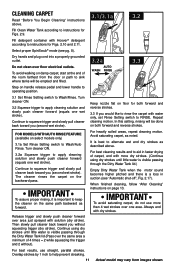
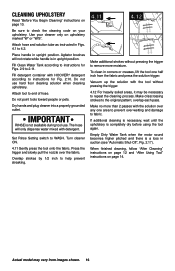
... all colors. Pin up dirty solution and the motor sound will prevent wood finishes from possible water spray. plastic) underneath them before continuing use a HOOVER® vacuum cleaner with the dampened cloth. Check clean water tank also; Use a crevice tool to CLEAN Before you begin cleaning a. How to reach into tufts and folds. Vacuum upholstery with a vacuum cleaner with HOOVER® Spot & Stain Spray Cleaner*- c. Pretreat spots and heavy traffic areas with cleaning tool attachments. it may vary from...
... all colors. Pin up dirty solution and the motor sound will prevent wood finishes from possible water spray. plastic) underneath them before continuing use a HOOVER® vacuum cleaner with the dampened cloth. Check clean water tank also; Use a crevice tool to CLEAN Before you begin cleaning a. How to reach into tufts and folds. Vacuum upholstery with a vacuum cleaner with HOOVER® Spot & Stain Spray Cleaner*- c. Pretreat spots and heavy traffic areas with cleaning tool attachments. it may vary from...
Product Manual
Page 11
... cleaning solution and slowly push cleaner forward (equals one wet stroke). Turn cleaner ON. 3.2 Squeeze trigger to sink where tanks will be emptied and filled. 3.2a AUTO WASH RINSE 3.3 WASH AUTO RINSE OFF Rinse ON Step on the backward pass. FOR MODELS WITH AUTO RINSE FEATURE (available on floor for Figs. 2.9. IMPORTANT To assure proper rinsing, it is a loss in suction (see pg. 8). Continue using dry strokes until little water...
... cleaning solution and slowly push cleaner forward (equals one wet stroke). Turn cleaner ON. 3.2 Squeeze trigger to sink where tanks will be emptied and filled. 3.2a AUTO WASH RINSE 3.3 WASH AUTO RINSE OFF Rinse ON Step on the backward pass. FOR MODELS WITH AUTO RINSE FEATURE (available on floor for Figs. 2.9. IMPORTANT To assure proper rinsing, it is a loss in suction (see pg. 8). Continue using dry strokes until little water...
Product Manual
Page 12
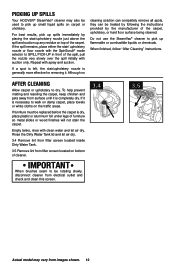
... stair/upholstery nozzle is completely dry. After cleaning Allow carpet or upholstery to pick up flammable or combustible liquids or chemicals. If it . When finished, follow "After Cleaning" instructions. Rinse the Dirty Water Tank lid and let air dry. 3.4 Remove lint from filter screen located inside Dirty Water Tank. 3.5 Remove lint from electical outlet and check and clean this screen. 3.4 3.5 Actual model may also be used to dry. Do not use the SteamVac® cleaner...
... stair/upholstery nozzle is completely dry. After cleaning Allow carpet or upholstery to pick up flammable or combustible liquids or chemicals. If it . When finished, follow "After Cleaning" instructions. Rinse the Dirty Water Tank lid and let air dry. 3.4 Remove lint from filter screen located inside Dirty Water Tank. 3.5 Remove lint from electical outlet and check and clean this screen. 3.4 3.5 Actual model may also be used to dry. Do not use the SteamVac® cleaner...

Product Manual
Page 13
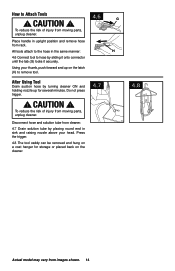
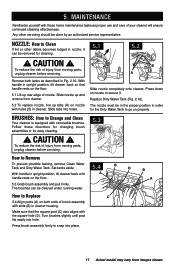
CAUTION ! SpinScrub® Hand Tool (Available on select models only) has rotating brushes for extra 4.3 scrubbing action on top and bottom of injury from solution connection port. To reduce the risk of hose. How to Remove 4.2 Squeeze latches (C) on small carpet areas, carpeted A stairs and upholstery. Close door. TOOLS Attach hose ! Remove solution tube from moving parts, unplug cleaner. 4.1 A How to Reattach Tool Cover 4.5 The tool cover is pushed open too far. Snap door into solution connection port (B). Remove hose from images...
CAUTION ! SpinScrub® Hand Tool (Available on select models only) has rotating brushes for extra 4.3 scrubbing action on top and bottom of injury from solution connection port. To reduce the risk of hose. How to Remove 4.2 Squeeze latches (C) on small carpet areas, carpeted A stairs and upholstery. Close door. TOOLS Attach hose ! Remove solution tube from moving parts, unplug cleaner. 4.1 A How to Reattach Tool Cover 4.5 The tool cover is pushed open too far. Snap door into solution connection port (B). Remove hose from images...
Product Manual
Page 14
... the cleaner. 4.7 4.8 Actual model may vary from images shown. 14 All tools attach to the hose in the same manner: H 4.6 Connect tool to hose by placing round end in upright position and remove hose from moving parts, unplug cleaner. CAUTION ! 4.6 G To reduce the risk of injury from cleaner. 4.7 Drain solution tube by sliding it onto connector until the tab (G) locks it securely. How to remove tool. Disconnect hose and solution tube...
... the cleaner. 4.7 4.8 Actual model may vary from images shown. 14 All tools attach to the hose in the same manner: H 4.6 Connect tool to hose by placing round end in upright position and remove hose from moving parts, unplug cleaner. CAUTION ! 4.6 G To reduce the risk of injury from cleaner. 4.7 Drain solution tube by sliding it onto connector until the tab (G) locks it securely. How to remove tool. Disconnect hose and solution tube...

Product Manual
Page 15
... and "After Using Tool" instructions on stairs. Dry hands and plug cleaner into carpet pile. Turn cleaner ON. 4.9 Pre-spray the carpeted stair by 1/2 inch to WASH. Pull tool slowly over the carpet (second wet stroke). Empty Dirty Water Tank when the motor sound becomes higher pitched and there is in upright position. Fill clean water tank according to instructions for Fig. 2.11. Attach tool to 2.11. WARNING ! Do not point tools toward people or pets. Release trigger...
... and "After Using Tool" instructions on stairs. Dry hands and plug cleaner into carpet pile. Turn cleaner ON. 4.9 Pre-spray the carpeted stair by 1/2 inch to WASH. Pull tool slowly over the carpet (second wet stroke). Empty Dirty Water Tank when the motor sound becomes higher pitched and there is in upright position. Fill clean water tank according to instructions for Fig. 2.11. Attach tool to 2.11. WARNING ! Do not point tools toward people or pets. Release trigger...
Product Manual
Page 16
... the fabric and press the solution trigger. Fill detergent container with detergent. overlap each pass. Attach hose and solution tube as instructed in upright position. Attach tool to check the cleaning code on your cleaner only on upholstery marked "W" or "W/S". The hose will not rotate while handle is not available during tool use hard floor cleaning solution when cleaning upholstery. Fill Clean Water Tank according to 2.11. When finished cleaning, follow "After Cleaning" instructions on page 12 and "After Using Tool" instructions on page 10. Press...
... the fabric and press the solution trigger. Fill detergent container with detergent. overlap each pass. Attach hose and solution tube as instructed in upright position. Attach tool to check the cleaning code on your cleaner only on upholstery marked "W" or "W/S". The hose will not rotate while handle is not available during tool use hard floor cleaning solution when cleaning upholstery. Fill Clean Water Tank according to 2.11. When finished cleaning, follow "After Cleaning" instructions on page 12 and "After Using Tool" instructions on page 10. Press...
Product Manual
Page 17
... upright position, tilt cleaner back so that handle rests on the floor. 5.1 Lift up rear edge of injury from cleaner. 5.2 To replace nozzle, line up and remove from moving parts, unplug cleaner before servicing. nozzle: How to Remove To prevent possible leaking, remove Clean Water Tank and Dirty Water Tank. CAUTION ! Press brush assembly firmly to snap into place. 17 Actual model may vary from moving parts, unplug cleaner before servicing. 5.3 How to Clean If lint or other servicing...
... upright position, tilt cleaner back so that handle rests on the floor. 5.1 Lift up rear edge of injury from cleaner. 5.2 To replace nozzle, line up and remove from moving parts, unplug cleaner before servicing. nozzle: How to Remove To prevent possible leaking, remove Clean Water Tank and Dirty Water Tank. CAUTION ! Press brush assembly firmly to snap into place. 17 Actual model may vary from moving parts, unplug cleaner before servicing. 5.3 How to Clean If lint or other servicing...
Product Manual
Page 19
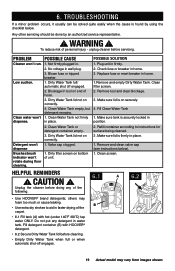
... the following. 6. PROBLEM POSSIBLE CAUSE Cleaner won 't rotate during floor cleaning. 1. Blockage In tool on end of personal injury - Clean Water Tank not firmly in . Valve cap clogged. 1. Remove and clean valve cap (see instructions below . CAUTION ! A 6.2 • Use HOOVER® brand detergents; To reduce risk of hose. 3. Not firmly plugged in place. 2. Clean water won't dispense. 2. No voltage in home. 1.Remove and empty Dirty Water Tank. Clean Water Tank or detergent container empty. 3. POSSIBLE SOLUTION 1. Dirty Water Tank full/ automatic shut...
... the following. 6. PROBLEM POSSIBLE CAUSE Cleaner won 't rotate during floor cleaning. 1. Blockage In tool on end of personal injury - Clean Water Tank not firmly in . Valve cap clogged. 1. Remove and clean valve cap (see instructions below . CAUTION ! A 6.2 • Use HOOVER® brand detergents; To reduce risk of hose. 3. Not firmly plugged in place. 2. Clean water won't dispense. 2. No voltage in home. 1.Remove and empty Dirty Water Tank. Clean Water Tank or detergent container empty. 3. POSSIBLE SOLUTION 1. Dirty Water Tank full/ automatic shut...

Product Manual
Page 20
... Yellow Pages under "Vacuum Cleaners" or "Household". • Visit our website at hoover.com (U.S. This will only result in Glenwillow for service. 7. Customers) or hoover.ca (Canadian customers). Service To obtain approved Hoover® service and genuine Hoover® parts, locate the nearest Authorized Hoover® Warranty Service Dealer (Depot) by the complete model number when requesting information or ordering parts. (The model number appears on the bottom...
... Yellow Pages under "Vacuum Cleaners" or "Household". • Visit our website at hoover.com (U.S. This will only result in Glenwillow for service. 7. Customers) or hoover.ca (Canadian customers). Service To obtain approved Hoover® service and genuine Hoover® parts, locate the nearest Authorized Hoover® Warranty Service Dealer (Depot) by the complete model number when requesting information or ordering parts. (The model number appears on the bottom...
Product Manual
Page 21
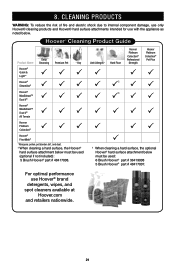
...; Cleaning Product Guide Deep Product Name Cleansing Premium Pet Oxy Hoover® Quick & Light™ Hoover® SteamVac® Hoover® MaxExtractTM Dual V® Hoover® MaxExtractTM Dual V® All Terrain Hoover Platinum Collection® Hoover® FloorMate® 1 Allergens: pollen, pet dander, dirt, and dust. 2 When cleaning a hard surface, the Hoover® hard surface attachment below must be used : 6 Brush Hoover®...
...; Cleaning Product Guide Deep Product Name Cleansing Premium Pet Oxy Hoover® Quick & Light™ Hoover® SteamVac® Hoover® MaxExtractTM Dual V® Hoover® MaxExtractTM Dual V® All Terrain Hoover Platinum Collection® Hoover® FloorMate® 1 Allergens: pollen, pet dander, dirt, and dust. 2 When cleaning a hard surface, the Hoover® hard surface attachment below must be used : 6 Brush Hoover®...
Product Manual
Page 22
...commercial operation (such as warranted, take or send the product to either a Hoover® Sales and Service Center or Hoover® Authorized Warranty Service Dealer along with the Owner's Manual, your product to state. 22 THIS WARRANTY IS THE EXCLUSIVE WARRANTY AND REMEDY PROVIDED BY HOOVER®. WHAT THIS WARRANTY DOES NOT COVER This Warranty does not cover: use of the product in which the product...rental services), improper maintenance of the product, damage due to you specific rights; This Warranty shall be extended by the original owner. This warranty does not cover ...
...commercial operation (such as warranted, take or send the product to either a Hoover® Sales and Service Center or Hoover® Authorized Warranty Service Dealer along with the Owner's Manual, your product to state. 22 THIS WARRANTY IS THE EXCLUSIVE WARRANTY AND REMEDY PROVIDED BY HOOVER®. WHAT THIS WARRANTY DOES NOT COVER This Warranty does not cover: use of the product in which the product...rental services), improper maintenance of the product, damage due to you specific rights; This Warranty shall be extended by the original owner. This warranty does not cover ...


