Product Manual
Page 7
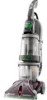
2. Clean Water Tank Handle 8. Detergent Container 9 10. Solution Tube Connection Port 11 15. Edge Cleaners: provided on wheels and push forward. 2.4 A Carry handle The cleaner may also be purchased separately ATTACHMENT. Cord Hook: rotates for household use. 22. CAUTION ! 24. USING THIS ...placing a hand above the upper clean water tank handle as shown. 2.5 7 Actual model may be lifted by visiting www.hoover.com, or your cleaner from images shown. Rinse Setting Switch 5. SpinScrub® Mode Selector 14. Hose* of nozzle to remove dirt 17 near ...
2. Clean Water Tank Handle 8. Detergent Container 9 10. Solution Tube Connection Port 11 15. Edge Cleaners: provided on wheels and push forward. 2.4 A Carry handle The cleaner may also be purchased separately ATTACHMENT. Cord Hook: rotates for household use. 22. CAUTION ! 24. USING THIS ...placing a hand above the upper clean water tank handle as shown. 2.5 7 Actual model may be lifted by visiting www.hoover.com, or your cleaner from images shown. Rinse Setting Switch 5. SpinScrub® Mode Selector 14. Hose* of nozzle to remove dirt 17 near ...
Product Manual
Page 8
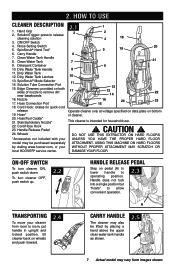
... brushing is permanently attached to Fill Unplug cleaner from images shown. 8 SPILL PICK-UP - brushes OFF for use with Hoover® Carpet/Upholstery Detergent. Push the top of the tank and tank handle while supporting the back of the tank to rinse the carpet or floor. The detergent container (D) is not desired. IMPORTANT Use only HOOVER® SteamVac® detergents.
... brushing is permanently attached to Fill Unplug cleaner from images shown. 8 SPILL PICK-UP - brushes OFF for use with Hoover® Carpet/Upholstery Detergent. Push the top of the tank and tank handle while supporting the back of the tank to rinse the carpet or floor. The detergent container (D) is not desired. IMPORTANT Use only HOOVER® SteamVac® detergents.
Product Manual
Page 9
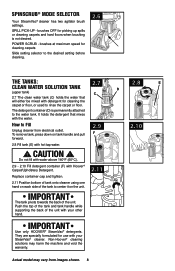
...when the tank is properly secured before putting cleaner in damage to unlock lid. Turn latches (one on each side of contact with skin, wash with cold water for Pets. In case of tank). Use only HOOVER® SteamVac® Oxy detergent for this purpose. *OxiClean is a ...is picked up from electrical outlet. Check tank to lock the tank lid before cleaning. Lower handle to Empty Turn cleaner off will engage, suction will damage your SteamVac® detergent container (A), Clean Water Tank (B) or Dirty Water Tank (C). G How to front of C Tuff Products for 15 minutes...
...when the tank is properly secured before putting cleaner in damage to unlock lid. Turn latches (one on each side of contact with skin, wash with cold water for Pets. In case of tank). Use only HOOVER® SteamVac® Oxy detergent for this purpose. *OxiClean is a ...is picked up from electrical outlet. Check tank to lock the tank lid before cleaning. Lower handle to Empty Turn cleaner off will engage, suction will damage your SteamVac® detergent container (A), Clean Water Tank (B) or Dirty Water Tank (C). G How to front of C Tuff Products for 15 minutes...
Product Manual
Page 11
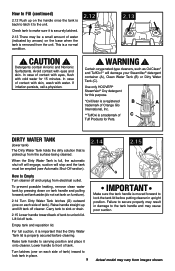
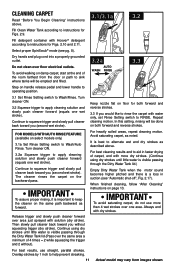
...images shown. For heavily soiled areas, repeat cleaning motion. For best cleaning results and to RINSE. IMPORTANT To avoid saturating carpet, do not use straight, parallel strokes. Do not clean over one area. In this setting, rinsing will be done on... on the same path backward as forward. Always end with more than 4 wet strokes over floor electrical outlets. Fill detergent container with Hoover® detergent according to Wash/Rinse. Continue to apply cleaning solution and slowly push cleaner forward (equals one wet stroke). Turn cleaner ON. 3.2a Squeeze...
...images shown. For heavily soiled areas, repeat cleaning motion. For best cleaning results and to RINSE. IMPORTANT To avoid saturating carpet, do not use straight, parallel strokes. Do not clean over one area. In this setting, rinsing will be done on... on the same path backward as forward. Always end with more than 4 wet strokes over floor electrical outlets. Fill detergent container with Hoover® detergent according to Wash/Rinse. Continue to apply cleaning solution and slowly push cleaner forward (equals one wet stroke). Turn cleaner ON. 3.2a Squeeze...

Product Manual
Page 15
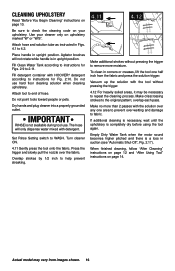
...Do not point tools toward people or pets. Press the trigger and pull the tool slowly over carpet without pressing trigger (dry stroke). Always end with HOOVER® detergent according to instructions for Figs. 2.9 to instructions for Fig. 2.11. When finished cleaning, ... Release trigger at bottom of carpet. If additional cleaning is necessary, wait until the carpet is in upright position. Fill detergent container with dry strokes. Pull tool slowly over the carpet (second wet stroke). Turn cleaner ON. 4.9 Pre-spray the carpeted stair by 1/2 inch to ...
...Do not point tools toward people or pets. Press the trigger and pull the tool slowly over carpet without pressing trigger (dry stroke). Always end with HOOVER® detergent according to instructions for Figs. 2.9 to instructions for Fig. 2.11. When finished cleaning, ... Release trigger at bottom of carpet. If additional cleaning is necessary, wait until the carpet is in upright position. Fill detergent container with dry strokes. Pull tool slowly over the carpet (second wet stroke). Turn cleaner ON. 4.9 Pre-spray the carpeted stair by 1/2 inch to ...
Product Manual
Page 16
...will only dispense water mixed with HOOVER® detergent according to repeat the cleaning process. Empty Dirty Water Tank when the motor sound becomes higher pitched and there is in suction (see "Automatic Shut-Off", Fig. 2.17). Be sure to 4.2. Fill detergent container with detergent. Attach tool to 2.11....than 2 passes with the tool without pressing the trigger to fabric. IMPORTANT rinse is completely dry before using the tool again. Turn cleaner ON. 4.11 Gently press the tool onto the fabric. Make no more moisture. Do not point tools toward people or pets....
...will only dispense water mixed with HOOVER® detergent according to repeat the cleaning process. Empty Dirty Water Tank when the motor sound becomes higher pitched and there is in suction (see "Automatic Shut-Off", Fig. 2.17). Be sure to 4.2. Fill detergent container with detergent. Attach tool to 2.11....than 2 passes with the tool without pressing the trigger to fabric. IMPORTANT rinse is completely dry before using the tool again. Turn cleaner ON. 4.11 Gently press the tool onto the fabric. Make no more moisture. Do not point tools toward people or pets....
Product Manual
Page 19
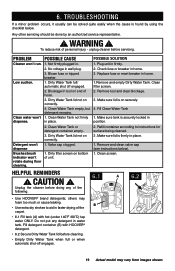
... detergent container (B) with hot (under 140˚F /60˚C) tap water ONLY. WARNING ! Not firmly plugged in position. 2. Check fuse or breaker in water tank. Clean filter screen. 2. Remove and clean valve cap (see instructions below . A 6.2 • Use HOOVER® brand detergents;...8226; Use extra dry strokes to instructions for surface being cleaned. 3 .Make sure lid is on bottom of the carpet. • 6.1 Fill tank (A) with HOOVER® detergent. • 6.2 Secure Dirty Water Tank lid before servicing. Make sure lid is firmly in faster drying of unit....
... detergent container (B) with hot (under 140˚F /60˚C) tap water ONLY. WARNING ! Not firmly plugged in position. 2. Check fuse or breaker in water tank. Clean filter screen. 2. Remove and clean valve cap (see instructions below . A 6.2 • Use HOOVER® brand detergents;...8226; Use extra dry strokes to instructions for surface being cleaned. 3 .Make sure lid is on bottom of the carpet. • 6.1 Fill tank (A) with HOOVER® detergent. • 6.2 Secure Dirty Water Tank lid before servicing. Make sure lid is firmly in faster drying of unit....


