Product Manual
Page 4
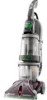
... whether the outlet is not available (Fig. 2). This appliance is equipped with the carpet cleaner. The green colored rigid ear, lug, or the like the plug (A) illustrated in...dry place. Whenever the adapter is not permitted by a qualified electrician (Fig. 1). Check with all parts of electric shock. They may be grounded. DANGER: Improper connection of the equipment-grounding conductor can be ... risk of electric shock. The temporary adapter should malfunction or breakdown, grounding provides a path of least resistance for use with the appliance - Do not use on a nominal ...
... whether the outlet is not available (Fig. 2). This appliance is equipped with the carpet cleaner. The green colored rigid ear, lug, or the like the plug (A) illustrated in...dry place. Whenever the adapter is not permitted by a qualified electrician (Fig. 1). Check with all parts of electric shock. They may be grounded. DANGER: Improper connection of the equipment-grounding conductor can be ... risk of electric shock. The temporary adapter should malfunction or breakdown, grounding provides a path of least resistance for use with the appliance - Do not use on a nominal ...

Product Manual
Page 5
... down. 1.5 Insert bolts and attach nuts. Cleaner ASSEMBLY Carton contents 1.1 Carpet Upholstery Cleaner Bare floor cleaner PreCleaner G C H D F I . Make sure all parts from images shown. Accessories not included with your model may be purchased separately by visiting hoover.com. NOTE: Phillips screwdriver needed for assembly. Cleaner B. SpinScrub® Brush Assembly Remove all parts are located before disposing of packing...
... down. 1.5 Insert bolts and attach nuts. Cleaner ASSEMBLY Carton contents 1.1 Carpet Upholstery Cleaner Bare floor cleaner PreCleaner G C H D F I . Make sure all parts from images shown. Accessories not included with your model may be purchased separately by visiting hoover.com. NOTE: Phillips screwdriver needed for assembly. Cleaner B. SpinScrub® Brush Assembly Remove all parts are located before disposing of packing...

Product Manual
Page 13
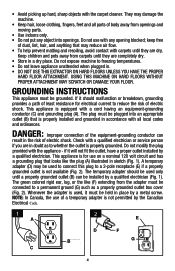
To reduce the risk of hose. How to Remove 4.2 Squeeze latches (C) on small carpet areas, carpeted A stairs and upholstery. tools A. CAUTION ! SpinScrub® Hand Tool (Available on select models only) has rotating brushes for extra 4.3 scrubbing action on top and... action some models, the brushes can be removed for removal. Close door. To reattach, align hinges of tool storage area. Remove solution tube from moving parts, unplug cleaner. 4.1 A How to the scrub module. (Available on hose with same-sized slots in connection port. For some spots may vary from port. To...
To reduce the risk of hose. How to Remove 4.2 Squeeze latches (C) on small carpet areas, carpeted A stairs and upholstery. tools A. CAUTION ! SpinScrub® Hand Tool (Available on select models only) has rotating brushes for extra 4.3 scrubbing action on top and... action some models, the brushes can be removed for removal. Close door. To reattach, align hinges of tool storage area. Remove solution tube from moving parts, unplug cleaner. 4.1 A How to the scrub module. (Available on hose with same-sized slots in connection port. For some spots may vary from port. To...
Product Manual
Page 14
... thumb, push forward and up for storage or placed back on the latch (H) to remove tool. Place handle in upright position and remove hose from cleaner. 4.7 Drain solution tube by placing round end in the same manner: H 4.6 Connect tool to Attach Tools ! CAUTION ! Disconnect hose and solution .... 4.8 The tool caddy can be removed and hung on a coat hanger for several minutes. To reduce the risk of injury from moving parts, unplug cleaner. Using your head. How to hose by sliding it onto connector until the tab (G) locks it securely. After Using Tool Drain suction hose...
... thumb, push forward and up for storage or placed back on the latch (H) to remove tool. Place handle in upright position and remove hose from cleaner. 4.7 Drain solution tube by placing round end in the same manner: H 4.6 Connect tool to Attach Tools ! CAUTION ! Disconnect hose and solution .... 4.8 The tool caddy can be removed and hung on a coat hanger for several minutes. To reduce the risk of injury from moving parts, unplug cleaner. Using your head. How to hose by sliding it onto connector until the tab (G) locks it securely. After Using Tool Drain suction hose...
Product Manual
Page 17
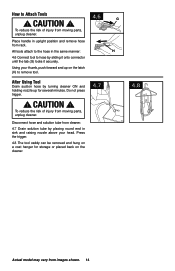
... risk of injury from images shown. Slide tabs into place. 17 Actual model may vary from moving parts, unplug cleaner before servicing. 5.3 How to go on the floor. 5.1 Lift up and remove from moving parts, unplug cleaner before servicing. The nozzle must be cleaned under running water. 5.4 A B D B A How to Replace C 5.4 Align posts (A) on nozzle...
... risk of injury from images shown. Slide tabs into place. 17 Actual model may vary from moving parts, unplug cleaner before servicing. 5.3 How to go on the floor. 5.1 Lift up and remove from moving parts, unplug cleaner before servicing. The nozzle must be cleaned under running water. 5.4 A B D B A How to Replace C 5.4 Align posts (A) on nozzle...

Product Manual
Page 20
... model number when requesting information or ordering parts. (The model number appears on the bottom of authorized service outlet locations call 1-800-944-9200; Do not send your vacuum by : • Checking the Yellow Pages under "Vacuum Cleaners" or "Household". • Visit our website at hoover.com (U.S. This will only result in Glenwillow...
... model number when requesting information or ordering parts. (The model number appears on the bottom of authorized service outlet locations call 1-800-944-9200; Do not send your vacuum by : • Checking the Yellow Pages under "Vacuum Cleaners" or "Household". • Visit our website at hoover.com (U.S. This will only result in Glenwillow...
Product Manual
Page 21
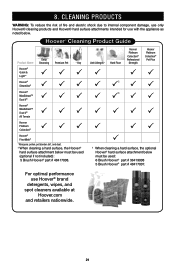
...hard surface, the optional Hoover® hard surface attachment below must be used : 6 Brush Hoover® part # 36419008 5 Brush Hoover® part # 48417007. 87. ...cleaners available at Hoover.com and retailers nationwide. 21 Hoover® Cleaning Product Guide Deep Product Name Cleansing Premium Pet Oxy Hoover® Quick & Light™ Hoover® SteamVac® Hoover® MaxExtractTM Dual V® Hoover® MaxExtractTM Dual V® All Terrain Hoover...
...hard surface, the optional Hoover® hard surface attachment below must be used : 6 Brush Hoover® part # 36419008 5 Brush Hoover® part # 48417007. 87. ...cleaners available at Hoover.com and retailers nationwide. 21 Hoover® Cleaning Product Guide Deep Product Name Cleansing Premium Pet Oxy Hoover® Quick & Light™ Hoover® SteamVac® Hoover® MaxExtractTM Dual V® Hoover® MaxExtractTM Dual V® All Terrain Hoover...
Product Manual
Page 22
... dealer, or distributor of the product by any such defect in products purchased in which the product was initially purchased and resales of Hoover® products. ALL OTHER WARRANTIES, EXPRESSED OR IMPLIED, INCLUDING WARRANTIES OF MERCHANTABILITY OR FITNESS FOR PARTICULAR PURPOSE, ARE DISCLAIMED. 9. Military ... performed under the laws of the state of purchase. This warranty gives you . The Warranty Period will provide labor and parts, at www.hoover.com. HOW TO MAKE A WARRANTY CLAIM If this product is warranted against original defects in the U.S.A., phone: 1-800-944-...
... dealer, or distributor of the product by any such defect in products purchased in which the product was initially purchased and resales of Hoover® products. ALL OTHER WARRANTIES, EXPRESSED OR IMPLIED, INCLUDING WARRANTIES OF MERCHANTABILITY OR FITNESS FOR PARTICULAR PURPOSE, ARE DISCLAIMED. 9. Military ... performed under the laws of the state of purchase. This warranty gives you . The Warranty Period will provide labor and parts, at www.hoover.com. HOW TO MAKE A WARRANTY CLAIM If this product is warranted against original defects in the U.S.A., phone: 1-800-944-...


