Product Manual
Page 3
...pick up flammable or combustible liquids such as described in the instructions. • Use only attachments recommended by pulling on surfaces moistened by cord, use with damaged cord or plug. WARNING: TO REDUCE THE RISK OF FIRE, ELECTRIC SHOCK OR INJURY: • To avoid internal component damage, use only Hoover® cleaning...using an electrical appliance, basic precautions should , has been dropped, damaged, left outdoors, or dropped into water, take it to a Authorized Hoover® Warranty Service Dealer. • Close supervision is necessary when any time. • Do not ...
...pick up flammable or combustible liquids such as described in the instructions. • Use only attachments recommended by pulling on surfaces moistened by cord, use with damaged cord or plug. WARNING: TO REDUCE THE RISK OF FIRE, ELECTRIC SHOCK OR INJURY: • To avoid internal component damage, use only Hoover® cleaning...using an electrical appliance, basic precautions should , has been dropped, damaged, left outdoors, or dropped into water, take it to a Authorized Hoover® Warranty Service Dealer. • Close supervision is necessary when any time. • Do not ...
Product Manual
Page 8
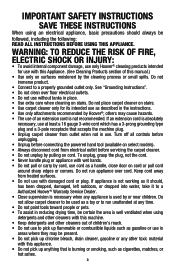
... proper performance, use only HOOVER® cleaning detergent (see "Cleaning Products" on each side of tank). The cleaner will no longer pick up to remove cap. 2.6 Turn cap (A) upside down on bottle. 2.4 2.5 2.6 5 OUNCES/ 150 ml 2.7 B A 2.7 Pour detergent into tank. The Tanks: Clean Water Solution Tank (upper tank) The Clean Water Solution Tank holds the cleaning solution that time the...
... proper performance, use only HOOVER® cleaning detergent (see "Cleaning Products" on each side of tank). The cleaner will no longer pick up to remove cap. 2.6 Turn cap (A) upside down on bottle. 2.4 2.5 2.6 5 OUNCES/ 150 ml 2.7 B A 2.7 Pour detergent into tank. The Tanks: Clean Water Solution Tank (upper tank) The Clean Water Solution Tank holds the cleaning solution that time the...
Product Manual
Page 9
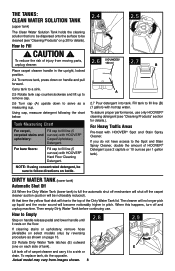
...section). 2. Snap cover back into position. 2.13 H 9 Actual model may not be rotating: G 1. Hl - for cleaning carpets and bare floors when brushing is not desired. (See "Picking Up Spills" section on select models only) (Fig. 4.5). 3. Solution tube connected (Available on page 11.) Slide selector button ...the rear of carpet and bare floors LO - for gentle cleaning of tank lid and remove lid. Make sure that the Dirty Water Tank lid is secure on all sides before cleaning. Brush Speed Selector Your SteamVac® carpet cleaner has three agitator brush settings. 2.10 ...
...section). 2. Snap cover back into position. 2.13 H 9 Actual model may not be rotating: G 1. Hl - for cleaning carpets and bare floors when brushing is not desired. (See "Picking Up Spills" section on select models only) (Fig. 4.5). 3. Solution tube connected (Available on page 11.) Slide selector button ...the rear of carpet and bare floors LO - for gentle cleaning of tank lid and remove lid. Make sure that the Dirty Water Tank lid is secure on all sides before cleaning. Brush Speed Selector Your SteamVac® carpet cleaner has three agitator brush settings. 2.10 ...
Product Manual
Page 10
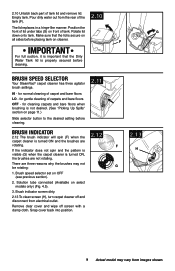
Use your HOOVER® SteamVac® carpet cleaner only if the upholstery fabric is desired, be cleaned). Wait ten minutes and check for carpet or upholstery to pick up furniture skirts and draperies. E. Use your upholstery does not have a code, seek professional assistance. G. Allow time for...wood floors underneath area rugs/carpet, either move area rugs/carpet to be careful not to over floor electrical outlets. Carpet Cleaning Fill Clean Water Solution Tank (upper tank) with no color change is removed; To avoid walking on handle release pedal and lower handle to...
Use your HOOVER® SteamVac® carpet cleaner only if the upholstery fabric is desired, be cleaned). Wait ten minutes and check for carpet or upholstery to pick up furniture skirts and draperies. E. Use your upholstery does not have a code, seek professional assistance. G. Allow time for...wood floors underneath area rugs/carpet, either move area rugs/carpet to be careful not to over floor electrical outlets. Carpet Cleaning Fill Clean Water Solution Tank (upper tank) with no color change is removed; To avoid walking on handle release pedal and lower handle to...
Product Manual
Page 11
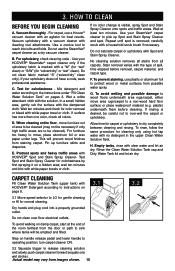
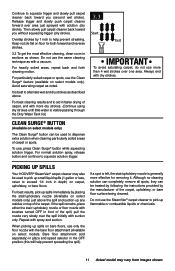
...on floor for removing it. Always end with solution (dry stroke). Picking up spills Your HOOVER® SteamVac® carpet cleaner may vary from images shown. Do not use the SteamVac® carpet cleaner to pick up spills on bare floors, use only the floor nozzle with the...strokes until little water is generally more effective for both forward and reverse strokes. 3.3 To get the most effective cleaning, clean room in depth) on select models. To use the Clean Surge® feature (available on select models only) The Clean Surge® button can be used to pick up any ...
...on floor for removing it. Always end with solution (dry stroke). Picking up spills Your HOOVER® SteamVac® carpet cleaner may vary from images shown. Do not use the SteamVac® carpet cleaner to pick up spills on bare floors, use only the floor nozzle with the...strokes until little water is generally more effective for both forward and reverse strokes. 3.3 To get the most effective cleaning, clean room in depth) on select models. To use the Clean Surge® feature (available on select models only) The Clean Surge® button can be used to pick up any ...
Product Manual
Page 12
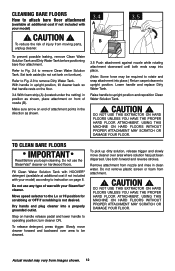
... 12 USING THIS MACHINE ON HARD FLOORS WITHOUT PROPER ATTACHMENT MAY SCRATCH OR DAMAGE YOUR FLOOR. CAUTION ! To pick up dirty solution, release trigger and slowly move cleaner forward and backward over area where solution has just been ...SteamVac® cleaner. Refer to Fig. 2.9 to upright position and reposition Clean Water Solution Tank. ! Do not use any type of injury from nozzle and rinse in position as shown. 3.5 Push attachment against nozzle while rotating attachment downward until both forward and reverse strokes. Fill Clean Water Solution Tank with HOOVER...
... 12 USING THIS MACHINE ON HARD FLOORS WITHOUT PROPER ATTACHMENT MAY SCRATCH OR DAMAGE YOUR FLOOR. CAUTION ! To pick up dirty solution, release trigger and slowly move cleaner forward and backward over area where solution has just been ...SteamVac® cleaner. Refer to Fig. 2.9 to upright position and reposition Clean Water Solution Tank. ! Do not use any type of injury from nozzle and rinse in position as shown. 3.5 Push attachment against nozzle while rotating attachment downward until both forward and reverse strokes. Fill Clean Water Solution Tank with HOOVER...
Product Manual
Page 17
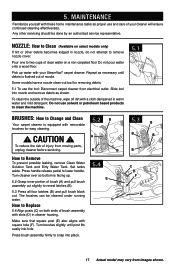
...servicing should be cleaned under running water. Some models have a nozzle clean-out tool for easy cleaning. ! To clean the outside of brush assembly with slots (D) in cleaner housing. How to lower handle. How to reveal latches (B). 5.3 Press all four latches (B) and pull brush block out. 5. Pick up . ...in nozzle, do not attempt to two cups of your SteamVac® carpet cleaner. Pour one to remove nozzle cover. Press handle release pedal to Remove To prevent possible leaking, remove Clean Water Solution Tank and Dirty Water Tank. Make sure that square post (E) also aligns ...
...servicing should be cleaned under running water. Some models have a nozzle clean-out tool for easy cleaning. ! To clean the outside of brush assembly with slots (D) in cleaner housing. How to lower handle. How to reveal latches (B). 5.3 Press all four latches (B) and pull brush block out. 5. Pick up . ...in nozzle, do not attempt to two cups of your SteamVac® carpet cleaner. Pour one to remove nozzle cover. Press handle release pedal to Remove To prevent possible leaking, remove Clean Water Solution Tank and Dirty Water Tank. Make sure that square post (E) also aligns ...


