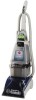
Product Manual
Page 2
... Indicator ...9 How To Clean...10 Before You Begin 10 Cleaning Carpet 10 Clean Surge® Button 11 Picking Up Spills 11 Cleaning Bare Floors 12 Tools...13 Using The Tools 13 How To Attach...14 Before Using Tool 14 Cleaning Carpeted Stairs 14 Cleaning Upholstery 15 After Using Tool...16 After Cleaning...16 Maintenance...17 Nozzle...17 Brushes...17...
... Indicator ...9 How To Clean...10 Before You Begin 10 Cleaning Carpet 10 Clean Surge® Button 11 Picking Up Spills 11 Cleaning Bare Floors 12 Tools...13 Using The Tools 13 How To Attach...14 Before Using Tool 14 Cleaning Carpeted Stairs 14 Cleaning Upholstery 15 After Using Tool...16 After Cleaning...16 Maintenance...17 Nozzle...17 Brushes...17...
Product Manual
Page 6
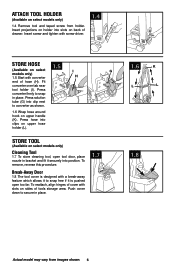
...holder (I G models only) 1.5 Start with a break-away feature which allows it to snap in place. Store Tool (Available on select models only) Cleaning Tool 1.7 To store cleaning tool, open too far. Push cover down to converter as shown. 1.6 Wrap hose around hook on select I ). Press solution tube (G) into clip ...procedure. Attach Tool holder (Available on sides of tools storage area. Break-Away Door 1.8 The tool cover is pushed open tool door, place nozzle in place. 1.7 1.6 K L L 1.8 Actual model may vary from holder. To reattach, align hinges of hose (H).
...holder (I G models only) 1.5 Start with a break-away feature which allows it to snap in place. Store Tool (Available on select models only) Cleaning Tool 1.7 To store cleaning tool, open too far. Push cover down to converter as shown. 1.6 Wrap hose around hook on select I ). Press solution tube (G) into clip ...procedure. Attach Tool holder (Available on sides of tools storage area. Break-Away Door 1.8 The tool cover is pushed open tool door, place nozzle in place. 1.7 1.6 K L L 1.8 Actual model may vary from holder. To reattach, align hinges of hose (H).
Product Manual
Page 7
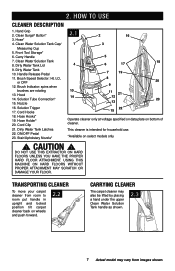
...Tank 10. Nozzle 16. ON/OFF Pedal 23. Hand Grip 2. Dirty Water Tank Lid 9. Solution Trigger 17. Hose Hooks* 19. This cleaner is intended for household use. *Available on select models only ! Clean Surge® Button* 3. Cord Hooks 18. Carry Handle 7. Clean Water Solution Tank... 8. Brush Speed Selector: HI, LO, or OFF 12. Solution Tube Connection* 15. Clean Water Solution Tank Cap/ Measuring Cup 5. Front Tool Storage* 6....
...Tank 10. Nozzle 16. ON/OFF Pedal 23. Hand Grip 2. Dirty Water Tank Lid 9. Solution Trigger 17. Hose Hooks* 19. This cleaner is intended for household use. *Available on select models only ! Clean Surge® Button* 3. Cord Hooks 18. Carry Handle 7. Clean Water Solution Tank... 8. Brush Speed Selector: HI, LO, or OFF 12. Solution Tube Connection* 15. Clean Water Solution Tank Cap/ Measuring Cup 5. Front Tool Storage* 6....
Product Manual
Page 11
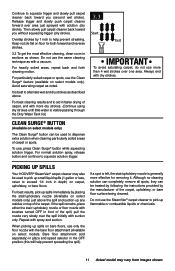
... on bare floors, use the same cleaning technique as described above the spill and suction up flammable or combustible liquids or chemicals. 11 Actual model may also be used to pick up spills Your HOOVER® SteamVac® carpet cleaner may vary from ...Clean Surge® Button (Available on floor for removing it. For best results, pick up spills immediately by placing the stair/upholstery nozzle (Available on select models. Avoid saturating carpet as shown. Continue to squeeze trigger and slowly pull carpet cleaner back toward you (second wet stroke). To use the SteamVac...
... on bare floors, use the same cleaning technique as described above the spill and suction up flammable or combustible liquids or chemicals. 11 Actual model may also be used to pick up spills Your HOOVER® SteamVac® carpet cleaner may vary from ...Clean Surge® Button (Available on floor for removing it. For best results, pick up spills immediately by placing the stair/upholstery nozzle (Available on select models. Avoid saturating carpet as shown. Continue to squeeze trigger and slowly pull carpet cleaner back toward you (second wet stroke). To use the SteamVac...
Product Manual
Page 12
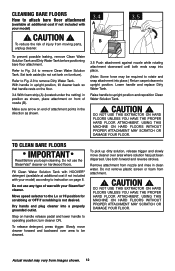
... HAVE THE PROPER HARD FLOOR ATTACHMENT. To reduce the risk of wax with your SteamVac® cleaner. Lower handle and replace Dirty Water Tank. Do not use the SteamVac® cleaner on furniture). Dry hands and plug cleaner into place.) Return carpet ...) in position as shown. 3.5 Push attachment against nozzle while rotating attachment downward until both forward and reverse strokes. Make sure arrow on front of attachment points in clean water. CAUTION ! Fill Clean Water Solution Tank with HOOVER® detergent (available at additional cost if not included...
... HAVE THE PROPER HARD FLOOR ATTACHMENT. To reduce the risk of wax with your SteamVac® cleaner. Lower handle and replace Dirty Water Tank. Do not use the SteamVac® cleaner on furniture). Dry hands and plug cleaner into place.) Return carpet ...) in position as shown. 3.5 Push attachment against nozzle while rotating attachment downward until both forward and reverse strokes. Make sure arrow on front of attachment points in clean water. CAUTION ! Fill Clean Water Solution Tank with HOOVER® detergent (available at additional cost if not included...
Product Manual
Page 13
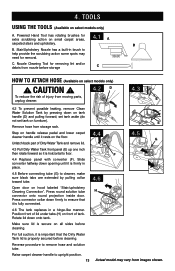
...lid. 4.4 4.5 G 4.3 Pull Dirty Water Tank front panel (E) up one inch then rotate forward so it is properly secured before cleaning. 4. B B. Stair/Upholstery Nozzle has a built-in a hinge-like manner. Unlatch back part of lid under tabs (H) on select models only) A. For full ...tools (Available on front of injury from storage rack. F 4.4 Replace panel with converter (F). Slide converter halfway down onto tank. Nozzle Cleaning Tool for removal. Press round solution tube H connector onto round projection inside door. Make sure lid is secure on furniture). Powered ...
...lid. 4.4 4.5 G 4.3 Pull Dirty Water Tank front panel (E) up one inch then rotate forward so it is properly secured before cleaning. 4. B B. Stair/Upholstery Nozzle has a built-in a hinge-like manner. Unlatch back part of lid under tabs (H) on select models only) A. For full ...tools (Available on front of injury from storage rack. F 4.4 Replace panel with converter (F). Slide converter halfway down onto tank. Nozzle Cleaning Tool for removal. Press round solution tube H connector onto round projection inside door. Make sure lid is secure on furniture). Powered ...

Product Manual
Page 15
... original pattern; Dry hands and plug carpet cleaner into a properly grounded outlet. Cleaning upholstery (Tool available on select models only) 4.10 Be sure to check the cleaning code on your HOOVER® SteamVac® carpet cleaner only on upholstery marked "W" or "W/S". Agitator brushes will not... rotate while handle Is In upright position. Press the trigger and slowly pull the nozzle over -wetting and damage to instructions ...
... original pattern; Dry hands and plug carpet cleaner into a properly grounded outlet. Cleaning upholstery (Tool available on select models only) 4.10 Be sure to check the cleaning code on your HOOVER® SteamVac® carpet cleaner only on upholstery marked "W" or "W/S". Agitator brushes will not... rotate while handle Is In upright position. Press the trigger and slowly pull the nozzle over -wetting and damage to instructions ...
Product Manual
Page 16
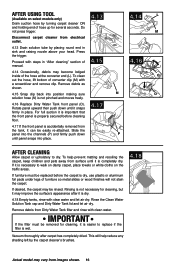
... or wood finishes will help prevent matting and resoiling the carpet, keep children and pets away from surface until it can be replaced before cleaning floor. 4.17 If the front panel is accidentally removed from images shown. 16 Disconnect carpet cleaner from electrical outlet. 4.13 Drain solution .... 4.18 Actual model may be removed for several seconds. Rotate panel upward then push down until it snaps firmly in sink and raising nozzle above your head. If furniture must be rinsed. IMPORTANT If the filter must be easily re-attached. To help reduce any shading left by...
... or wood finishes will help prevent matting and resoiling the carpet, keep children and pets away from surface until it can be replaced before cleaning floor. 4.17 If the front panel is accidentally removed from images shown. 16 Disconnect carpet cleaner from electrical outlet. 4.13 Drain solution .... 4.18 Actual model may be removed for several seconds. Rotate panel upward then push down until it snaps firmly in sink and raising nozzle above your head. If furniture must be rinsed. IMPORTANT If the filter must be easily re-attached. To help reduce any shading left by...
Product Manual
Page 17
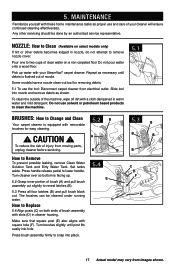
... or other servicing should be cleaned under running water. Repeat as shown. Slide tool into hole. Set tanks aside. Press handle release pedal to remove nozzle cover. How to Change and Clean Your carpet cleaner is flushed out of your SteamVac® carpet cleaner. Turn brushes... slightly until post fits easily into nozzle and remove debris as necessary until debris is equipped with ...
... or other servicing should be cleaned under running water. Repeat as shown. Slide tool into hole. Set tanks aside. Press handle release pedal to remove nozzle cover. How to Change and Clean Your carpet cleaner is flushed out of your SteamVac® carpet cleaner. Turn brushes... slightly until post fits easily into nozzle and remove debris as necessary until debris is equipped with ...


