Product Manual
Page 1
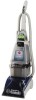
página E1 www.hoover.com IMPORTANT: READ CAREFULLY BEFORE ASSEMBLY AND USE. Questions or concerns? For assistance, please call Customer Service at 1-800-944-9200 Mon-Fri 8am-7pm EST before returning this product to the store. IF USED COMMERCIALLY WARRANTY IS VOID. ©2011 Techtronic Floor Care Technology Limited. THIS PRODUCT IS INTENDED FOR HOUSEHOLD USE ONLY. All rights reserved. #961151012 ID103222-R0 Owner's Manual Operating and Servicing Instructions Español -
página E1 www.hoover.com IMPORTANT: READ CAREFULLY BEFORE ASSEMBLY AND USE. Questions or concerns? For assistance, please call Customer Service at 1-800-944-9200 Mon-Fri 8am-7pm EST before returning this product to the store. IF USED COMMERCIALLY WARRANTY IS VOID. ©2011 Techtronic Floor Care Technology Limited. THIS PRODUCT IS INTENDED FOR HOUSEHOLD USE ONLY. All rights reserved. #961151012 ID103222-R0 Owner's Manual Operating and Servicing Instructions Español -
Product Manual
Page 2
... Be sure to the store. 2 Manufacturing code (Label located on bottom of Hoover® authorized dealer locations (U.S. Fri 8am- 7pm EST. Mon- Verification of date of purchase may be required for warranty service of your product online at hoover.com. only) or to... your HOOVER® product. Thank you for an automated referral of cleaner) Contents Important Safety Instructions 3 Cleaner Assembly...5 How To Use...7 Cleaner Description 7 The Tanks ...8 Brush Speed Selector 9 Brush Indicator ...9 How To Clean...10 Before You Begin 10 Cleaning Carpet 10 Clean Surge®...
... Be sure to the store. 2 Manufacturing code (Label located on bottom of Hoover® authorized dealer locations (U.S. Fri 8am- 7pm EST. Mon- Verification of date of purchase may be required for warranty service of your product online at hoover.com. only) or to... your HOOVER® product. Thank you for an automated referral of cleaner) Contents Important Safety Instructions 3 Cleaner Assembly...5 How To Use...7 Cleaner Description 7 The Tanks ...8 Brush Speed Selector 9 Brush Indicator ...9 How To Clean...10 Before You Begin 10 Cleaning Carpet 10 Clean Surge®...
Product Manual
Page 4
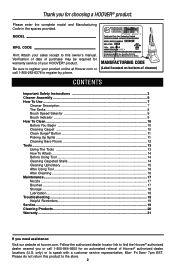
... a metal screw. This appliance is properly installed and grounded in a dry place. Check with a qualified electrician or service person if you are completely dry. • Store in accordance with any object into an appropriate outlet (B) that is equipped with the appliance - A temporary adapter (D) may be grounded. keep free of dust, lint...
... a metal screw. This appliance is properly installed and grounded in a dry place. Check with a qualified electrician or service person if you are completely dry. • Store in accordance with any object into an appropriate outlet (B) that is equipped with the appliance - A temporary adapter (D) may be grounded. keep free of dust, lint...
Product Manual
Page 6
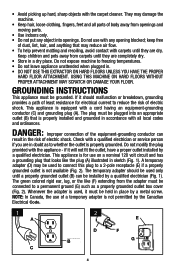
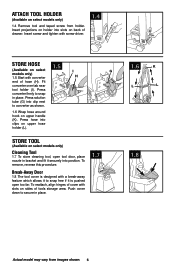
... Attach Tool holder (Available on select models only) 1.4 Remove tool and taped screw from images shown. 6 Insert screw and tighten with screw driver. 1.4 Store Hose 1.5 (Available on select I ). Press converter firmly to snap in bracket and fit it securely into clip next to converter as shown. 1.6 Wrap ...1.7 1.6 K L L 1.8 Actual model may vary from holder. Fit converter over tab near tool holder (I G models only) 1.5 Start with slots on select models only) Cleaning Tool 1.7 To store cleaning tool, open too far. Press solution tube (G) into position.
... Attach Tool holder (Available on select models only) 1.4 Remove tool and taped screw from images shown. 6 Insert screw and tighten with screw driver. 1.4 Store Hose 1.5 (Available on select I ). Press converter firmly to snap in bracket and fit it securely into clip next to converter as shown. 1.6 Wrap ...1.7 1.6 K L L 1.8 Actual model may vary from holder. Fit converter over tab near tool holder (I G models only) 1.5 Start with slots on select models only) Cleaning Tool 1.7 To store cleaning tool, open too far. Press solution tube (G) into position.

Product Manual
Page 18
...Blockage In tool on end of lubricant could cause damage. Clean Water Solution Tank won 't run. Clean Water Solution Tank empty. 3. Indicator screen dirty. 2. Storage Before storing: • Empty Clean Water Solution Tank and rinse thoroughly with a full Clean Water Solution Tank in . 2. The addition of hose. ...and push carpet cleaner forward and back several times to be done by using tool). 1. Do not store carpet cleaner with clean water. • Replace empty Clean Water Solution Tank and turn carpet cleaner ON. Any other servicing should be "primed" (when using...
...Blockage In tool on end of lubricant could cause damage. Clean Water Solution Tank won 't run. Clean Water Solution Tank empty. 3. Indicator screen dirty. 2. Storage Before storing: • Empty Clean Water Solution Tank and rinse thoroughly with a full Clean Water Solution Tank in . 2. The addition of hose. ...and push carpet cleaner forward and back several times to be done by using tool). 1. Do not store carpet cleaner with clean water. • Replace empty Clean Water Solution Tank and turn carpet cleaner ON. Any other servicing should be "primed" (when using...
Product Manual
Page 19
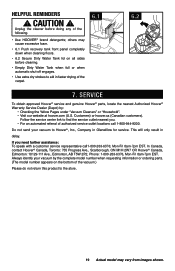
... center link to aid in faster drying of the following. • Use HOOVER® brand detergents; Helpful Reminders ! Always identify your vacuum to the store. 19 Actual model may cause excessive foam. • 6.1 Push recovery tank front panel completely down when cleaning floors. • 6.2 Secure Dirty Water Tank lid on the bottom of...
... center link to aid in faster drying of the following. • Use HOOVER® brand detergents; Helpful Reminders ! Always identify your vacuum to the store. 19 Actual model may cause excessive foam. • 6.1 Push recovery tank front panel completely down when cleaning floors. • 6.2 Secure Dirty Water Tank lid on the bottom of...
