
Owner's Manual
Page 1
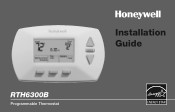
RTH6300B Programmable Thermostat Installation Guide
RTH6300B Programmable Thermostat Installation Guide
Owner's Manual
Page 4
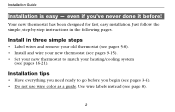
... not use wire color as a guide. Install in the following pages. Installation tips • Have everything you begin (see pages 9-15). • Set your new thermostat to go before ! even if you've never done it before you need ready to match your heating/cooling system (see page 8). 2 Installation Guide Installation is easy - Your new thermostat...
... not use wire color as a guide. Install in the following pages. Installation tips • Have everything you begin (see pages 9-15). • Set your new thermostat to go before ! even if you've never done it before you need ready to match your heating/cooling system (see page 8). 2 Installation Guide Installation is easy - Your new thermostat...
Owner's Manual
Page 6
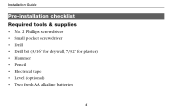
Installation Guide Pre-installation checklist Required tools & supplies • No. 2 Phillips screwdriver • Small pocket screwdriver • Drill • Drill bit (3/16" for drywall, 7/32" for plaster) • Hammer • Pencil • Electrical tape • Level (optional) • Two fresh AA alkaline batteries 4
Installation Guide Pre-installation checklist Required tools & supplies • No. 2 Phillips screwdriver • Small pocket screwdriver • Drill • Drill bit (3/16" for drywall, 7/32" for plaster) • Hammer • Pencil • Electrical tape • Level (optional) • Two fresh AA alkaline batteries 4
Owner's Manual
Page 8
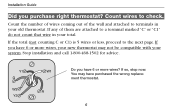
Do you have purchased the wrong replacement thermostat. 6 Installation Guide Did you have 6 or more wires, your new thermostat may have 6 or more wires? If any of the wall and attached to a terminal marked "C" or "... out of them are attached to terminals in your system. If the total (not counting C or C1) is 5 wires or less, proceed to check. Stop installation and call 1-800-468-1502 for advice. If so, stop now. You may not be compatible with your total. If you purchase right thermostat? Count...
Do you have purchased the wrong replacement thermostat. 6 Installation Guide Did you have 6 or more wires, your new thermostat may have 6 or more wires? If any of the wall and attached to a terminal marked "C" or "... out of them are attached to terminals in your system. If the total (not counting C or C1) is 5 wires or less, proceed to check. Stop installation and call 1-800-468-1502 for advice. If so, stop now. You may not be compatible with your total. If you purchase right thermostat? Count...
Owner's Manual
Page 10
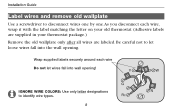
Wrap supplied labels securely around each wire, wrap it with the label matching the letter on your old thermostat. (Adhesive labels are supplied in your thermostat package.) Remove the old wallplate only after all wires are labeled. Be careful not to let loose wires fall into the wall opening ! Installation Guide Label wires and remove old wallplate Use a screwdriver to disconnect wires one by one.As you disconnect each wire Do not let wires fall into wall opening . IGNORE WIRE COLORS: Use only letter designations to identify wire types. 8
Wrap supplied labels securely around each wire, wrap it with the label matching the letter on your old thermostat. (Adhesive labels are supplied in your thermostat package.) Remove the old wallplate only after all wires are labeled. Be careful not to let loose wires fall into the wall opening ! Installation Guide Label wires and remove old wallplate Use a screwdriver to disconnect wires one by one.As you disconnect each wire Do not let wires fall into wall opening . IGNORE WIRE COLORS: Use only letter designations to identify wire types. 8
Owner's Manual
Page 12
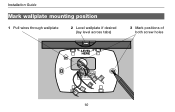
Installation Guide Mark wallplate mounting position 1 Pull wires through wallplate 2 Level wallplate if desired (lay level across tabs) 3 Mark positions of both screw holes 10
Installation Guide Mark wallplate mounting position 1 Pull wires through wallplate 2 Level wallplate if desired (lay level across tabs) 3 Mark positions of both screw holes 10
Owner's Manual
Page 14
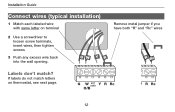
Installation Guide Connect wires (typical installation) 1 Match each labeled wire with same letter on thermostat, see next page. Remove metal jumper if you have both "R" and "Rc" wires 12 If labels do not match letters on terminal 2 Use a screwdriver to loosen screw terminals, insert wires, then tighten screws 3 Push any excess wire back into the wall opening. Labels don't match?
Installation Guide Connect wires (typical installation) 1 Match each labeled wire with same letter on thermostat, see next page. Remove metal jumper if you have both "R" and "Rc" wires 12 If labels do not match letters on terminal 2 Use a screwdriver to loosen screw terminals, insert wires, then tighten screws 3 Push any excess wire back into the wall opening. Labels don't match?
Owner's Manual
Page 16
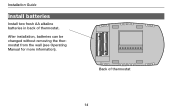
After installation, batteries can be changed without removing the thermostat from the wall (see Operating Manual for more information). Back of thermostat. Installation Guide Install batteries Install two fresh AA alkaline batteries in back of thermostat 14
After installation, batteries can be changed without removing the thermostat from the wall (see Operating Manual for more information). Back of thermostat. Installation Guide Install batteries Install two fresh AA alkaline batteries in back of thermostat 14
Owner's Manual
Page 18
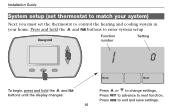
Press and hold the and FAN Press or to change settings. Function number Setting 10 Done Next To begin, press and hold the and FAN buttons to control the heating and cooling system in your system) Next, you must set the thermostat to enter system setup. buttons until the display changes: Press NEXT to advance to exit and save settings. 16 Press DONE to next function. Installation Guide System setup (set thermostat to match your home.
Press and hold the and FAN Press or to change settings. Function number Setting 10 Done Next To begin, press and hold the and FAN buttons to control the heating and cooling system in your system) Next, you must set the thermostat to enter system setup. buttons until the display changes: Press NEXT to advance to exit and save settings. 16 Press DONE to next function. Installation Guide System setup (set thermostat to match your home.
Owner's Manual
Page 20
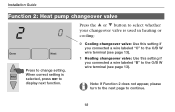
Note: If Function 2 does not appear, please turn to the next page to change setting. Installation Guide Function 2: Heat pump changeover valve 20 Done Next Press to continue. 18 Press the or button to select whether your changeover valve is selected, press ...
Note: If Function 2 does not appear, please turn to the next page to change setting. Installation Guide Function 2: Heat pump changeover valve 20 Done Next Press to continue. 18 Press the or button to select whether your changeover valve is selected, press ...
Owner's Manual
Page 22
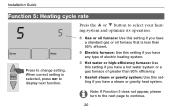
Press the or button to display next function. Note: If Function 5 does not appear, please turn to the next page to change setting. Installation Guide Function 5: Heating cycle rate 55 Done Next Press to continue. 20 When correct setting is less than 90% efficient. 9 Electric furnace: Use this setting if ...
Press the or button to display next function. Note: If Function 5 does not appear, please turn to the next page to change setting. Installation Guide Function 5: Heating cycle rate 55 Done Next Press to continue. 20 When correct setting is less than 90% efficient. 9 Electric furnace: Use this setting if ...
Owner's Manual
Page 24
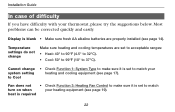
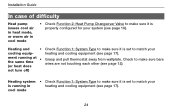
... change Make sure heating and cooling temperatures are set to make sure it is blank • Make sure fresh AA alkaline batteries are properly installed (see page 19). Installation Guide In case of difficulty If you have difficulty with your heating equipment (see page 14). Temperature settings do not change • Check Function...
... change Make sure heating and cooling temperatures are set to make sure it is blank • Make sure fresh AA alkaline batteries are properly installed (see page 19). Installation Guide In case of difficulty If you have difficulty with your heating equipment (see page 14). Temperature settings do not change • Check Function...
Owner's Manual
Page 26
... heat does not turn off) Heating system • Check Function 1: System Type to make sure it is set to match your system (see page 18). Installation Guide In case of difficulty Heat pump issues cool air in heat mode, or warm air in cool mode • Check Function 2: Heat Pump Changeover Valve...
... heat does not turn off) Heating system • Check Function 1: System Type to make sure it is set to match your system (see page 18). Installation Guide In case of difficulty Heat pump issues cool air in heat mode, or warm air in cool mode • Check Function 2: Heat Pump Changeover Valve...
Owner's Manual
Page 28
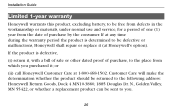
... the place from the date of one (1) year from which you . 26 If the product is determined to be sent to you purchased it; Installation Guide Limited 1-year warranty Honeywell warrants this product, excluding battery, to be free from defects in the workmanship or materials, under normal use and service, for a period of...
... the place from the date of one (1) year from which you . 26 If the product is determined to be sent to you purchased it; Installation Guide Limited 1-year warranty Honeywell warrants this product, excluding battery, to be free from defects in the workmanship or materials, under normal use and service, for a period of...

Owner's Manual
Page 30
... you may not apply to state. In Canada, write Retail Products ON15-02H, Honeywell Limited/ Honeywell Limitée, 35 Dynamic Drive, Scarborough, Ontario M1V4Z9. 28 Installation Guide Limited 1-year warranty THIS WARRANTY IS THE ONLY EXPRESS WARRANTY HONEYWELL MAKES ON THIS PRODUCT.THE DURATION OF ANY IMPLIED WARRANTIES, INCLUDING THE WARRANTIES OF MERCHANTABILITY..., so the above limitation may have other rights which vary from state to you have any questions concerning this warranty, please write Honeywell Customer Relations, 1985 Douglas Dr, Golden Valley, MN 55422 or call 1-800-4681502.
... you may not apply to state. In Canada, write Retail Products ON15-02H, Honeywell Limited/ Honeywell Limitée, 35 Dynamic Drive, Scarborough, Ontario M1V4Z9. 28 Installation Guide Limited 1-year warranty THIS WARRANTY IS THE ONLY EXPRESS WARRANTY HONEYWELL MAKES ON THIS PRODUCT.THE DURATION OF ANY IMPLIED WARRANTIES, INCLUDING THE WARRANTIES OF MERCHANTABILITY..., so the above limitation may have other rights which vary from state to you have any questions concerning this warranty, please write Honeywell Customer Relations, 1985 Douglas Dr, Golden Valley, MN 55422 or call 1-800-4681502.


