
Owner's Manual
Page 1
RTH6300B Programmable Thermostat Installation Guide
RTH6300B Programmable Thermostat Installation Guide
Owner's Manual
Page 3
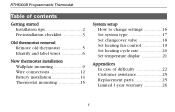
RTH6300B Programmable Thermostat Table of contents Getting started Installation tips 2 Pre-installation checklist 3 Old thermostat removal Remove old thermostat 5 Identify and label wires 6 New thermostat installation Wallplate mounting 9 Wire connections 12 Battery installation 14 Thermostat mounting 15 System setup How to change settings 16 Set system type 17 Set changeover valve 18 Set heating fan control 19 Set heating cycle rate 20 Set temperature display 21 Appendices In case of difficulty 22 Customer assistance 25 Replacement parts 25 Limited 1-year warranty 26 1
RTH6300B Programmable Thermostat Table of contents Getting started Installation tips 2 Pre-installation checklist 3 Old thermostat removal Remove old thermostat 5 Identify and label wires 6 New thermostat installation Wallplate mounting 9 Wire connections 12 Battery installation 14 Thermostat mounting 15 System setup How to change settings 16 Set system type 17 Set changeover valve 18 Set heating fan control 19 Set heating cycle rate 20 Set temperature display 21 Appendices In case of difficulty 22 Customer assistance 25 Replacement parts 25 Limited 1-year warranty 26 1
Owner's Manual
Page 5
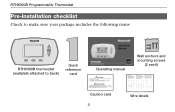
RTH6300B Programmable Thermostat Pre-installation checklist Check to make sure your package includes the following items: RTH6300B thermostat (wallplate attached to back) Quick reference card Operating manual Wall anchors and mounting screws (2 each) Caution card 3 Wire labels
RTH6300B Programmable Thermostat Pre-installation checklist Check to make sure your package includes the following items: RTH6300B thermostat (wallplate attached to back) Quick reference card Operating manual Wall anchors and mounting screws (2 each) Caution card 3 Wire labels
Owner's Manual
Page 7
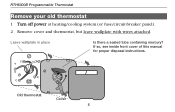
Old thermostat Cover 5 RTH6300B Programmable Thermostat Remove your old thermostat 1 Turn off power at heating/cooling system (or fuse/circuit-breaker panel). 2 Remove cover and thermostat, but leave wallplate with wires attached. If so, see inside front cover of this manual for proper disposal instructions. Leave wallplate in place Is there a sealed tube containing mercury?
Old thermostat Cover 5 RTH6300B Programmable Thermostat Remove your old thermostat 1 Turn off power at heating/cooling system (or fuse/circuit-breaker panel). 2 Remove cover and thermostat, but leave wallplate with wires attached. If so, see inside front cover of this manual for proper disposal instructions. Leave wallplate in place Is there a sealed tube containing mercury?
Owner's Manual
Page 9
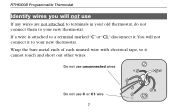
RTH6300B Programmable Thermostat Identify wires you will not connect it cannot touch and short out other wires. Do not use unconnected wires Do not use If any wires are not attached to terminals in your old thermostat, do not connect them to your new thermostat. If a wire is attached to your new thermostat. Wrap the bare metal ends of each unused wire with electrical tape, so it to a terminal marked "C" or "C1," disconnect it.You will not use C or C1 wire 7
RTH6300B Programmable Thermostat Identify wires you will not connect it cannot touch and short out other wires. Do not use unconnected wires Do not use If any wires are not attached to terminals in your old thermostat, do not connect them to your new thermostat. If a wire is attached to your new thermostat. Wrap the bare metal ends of each unused wire with electrical tape, so it to a terminal marked "C" or "C1," disconnect it.You will not use C or C1 wire 7
Owner's Manual
Page 11
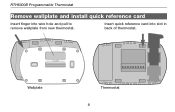
Insert quick reference card into wire hole and pull to remove wallplate from new thermostat. Wallplate Thermostat 9 RTH6300B Programmable Thermostat Remove wallplate and install quick reference card Insert finger into slot in back of thermostat.
Insert quick reference card into wire hole and pull to remove wallplate from new thermostat. Wallplate Thermostat 9 RTH6300B Programmable Thermostat Remove wallplate and install quick reference card Insert finger into slot in back of thermostat.

Owner's Manual
Page 13
Check level if desired, then tighten screws. 11 RTH6300B Programmable Thermostat Mount wallplate 1 Drill holes at pencil-marked locations 3/16" holes for drywall 7/32" holes for plaster 2 Use hammer to tap anchors into holes until flush with wall 3 Place wallplate over anchors and insert screws.
Check level if desired, then tighten screws. 11 RTH6300B Programmable Thermostat Mount wallplate 1 Drill holes at pencil-marked locations 3/16" holes for drywall 7/32" holes for plaster 2 Use hammer to tap anchors into holes until flush with wall 3 Place wallplate over anchors and insert screws.
Owner's Manual
Page 15
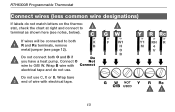
Connect O wire to both O and B if you have a heat pump. Wrap B wire with electrical tape. 13 If wires will be connected to O/B W. Wrap bare end of wire with electrical tape and do not match letters on the thermostat, check the chart at right and connect to terminal as shown here (see page 12). RTH6300B Programmable Thermostat Connect wires (less common wire designations) If labels do not use C, X or B. Do not connect both R and Rc terminals, remove metal jumper (see notes, below). Do not use .
Connect O wire to both O and B if you have a heat pump. Wrap B wire with electrical tape. 13 If wires will be connected to O/B W. Wrap bare end of wire with electrical tape and do not match letters on the thermostat, check the chart at right and connect to terminal as shown here (see page 12). RTH6300B Programmable Thermostat Connect wires (less common wire designations) If labels do not use C, X or B. Do not connect both R and Rc terminals, remove metal jumper (see notes, below). Do not use .
Owner's Manual
Page 17
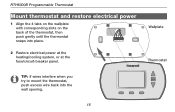
Wallplate Thermostat TIP: If wires interfere when you try to mount the thermostat, push excess wire back into place. 2 Restore electrical power at the heating/cooling system, or at the fuse/circuit-breaker panel. RTH6300B Programmable Thermostat Mount thermostat and restore electrical power 1 Align the 4 tabs on the wallplate with corresponding slots on the back of the thermostat, then push gently until the thermostat snaps into the wall opening. 15
Wallplate Thermostat TIP: If wires interfere when you try to mount the thermostat, push excess wire back into place. 2 Restore electrical power at the heating/cooling system, or at the fuse/circuit-breaker panel. RTH6300B Programmable Thermostat Mount thermostat and restore electrical power 1 Align the 4 tabs on the wallplate with corresponding slots on the back of the thermostat, then push gently until the thermostat snaps into the wall opening. 15
Owner's Manual
Page 19
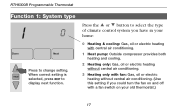
... or electric heating without central air conditioning. (Use this setting if you could turn the fan on and off with a fan switch on your old thermostat.) 17 Press the or button to display next function. RTH6300B Programmable Thermostat Function 1: System type 10 Done Next Press to change setting.
... or electric heating without central air conditioning. (Use this setting if you could turn the fan on and off with a fan switch on your old thermostat.) 17 Press the or button to display next function. RTH6300B Programmable Thermostat Function 1: System type 10 Done Next Press to change setting.
Owner's Manual
Page 21
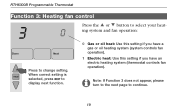
When correct setting is selected, press NEXT to continue. 19 Note: If Function 3 does not appear, please turn to the next page to display next function. 0 Gas or oil heat: Use this setting if you have a gas or oil heating system (system controls fan operation). 1 Electric heat: Use this setting if you have an electric heating system (thermostat controls fan operation). RTH6300B Programmable Thermostat Function 3: Heating fan control Press the or button to select your heat- 3 0 ing system and fan operation: Done Next Press to change setting.
When correct setting is selected, press NEXT to continue. 19 Note: If Function 3 does not appear, please turn to the next page to display next function. 0 Gas or oil heat: Use this setting if you have a gas or oil heating system (system controls fan operation). 1 Electric heat: Use this setting if you have an electric heating system (thermostat controls fan operation). RTH6300B Programmable Thermostat Function 3: Heating fan control Press the or button to select your heat- 3 0 ing system and fan operation: Done Next Press to change setting.
Owner's Manual
Page 23
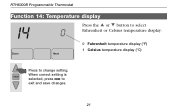
RTH6300B Programmable Thermostat Function 14: Temperature display 14 Press the or button to select 0 Fahrenheit or Celsius temperature display: 0 Fahrenheit temperature display (°F) 1 Celsius temperature display (°C) Done Next Press to exit and save changes. 21 When correct setting is selected, press DONE to change setting.
RTH6300B Programmable Thermostat Function 14: Temperature display 14 Press the or button to select 0 Fahrenheit or Celsius temperature display: 0 Fahrenheit temperature display (°F) 1 Celsius temperature display (°C) Done Next Press to exit and save changes. 21 When correct setting is selected, press DONE to change setting.

Owner's Manual
Page 25
Make sure the temperature is set lower than the Inside temperature. RTH6300B Programmable Thermostat In case of difficulty Heating or • cooling system does not respond • Press SYSTEM button to set system to Cool. Press SYSTEM button to ...
Make sure the temperature is set lower than the Inside temperature. RTH6300B Programmable Thermostat In case of difficulty Heating or • cooling system does not respond • Press SYSTEM button to set system to Cool. Press SYSTEM button to ...
Owner's Manual
Page 27
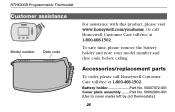
To save time, please remove the battery holder and note your model number and date code before calling. Or call Honeywell Customer Care toll-free at 1-800-468-1502. Battery holder Part No. 50007072-001 Cover plate assembly ........Part No. 50002883-001 (Use to cover marks left by old thermostats.) 25 RTH6300B Programmable Thermostat Customer assistance Model number xxxxxxx Date code xxxxxxx For assistance with this product, please visit www.honeywell.com/yourhome. Accessories/replacement parts To order, please call Honeywell Customer Care toll-free at 1-800-468-1502.
To save time, please remove the battery holder and note your model number and date code before calling. Or call Honeywell Customer Care toll-free at 1-800-468-1502. Battery holder Part No. 50007072-001 Cover plate assembly ........Part No. 50002883-001 (Use to cover marks left by old thermostats.) 25 RTH6300B Programmable Thermostat Customer assistance Model number xxxxxxx Date code xxxxxxx For assistance with this product, please visit www.honeywell.com/yourhome. Accessories/replacement parts To order, please call Honeywell Customer Care toll-free at 1-800-468-1502.
Owner's Manual
Page 29
... BREACH OF ANY WARRANTY, EXPRESS OR IMPLIED, OR ANY OTHER FAILURE OF THIS PRODUCT. RTH6300B Programmable Thermostat Limited 1-year warranty This warranty does not cover removal or reinstallation costs.This warranty shall not apply if it is shown by Honeywell that the defect or malfunction was caused by damage which occurred while the product...
... BREACH OF ANY WARRANTY, EXPRESS OR IMPLIED, OR ANY OTHER FAILURE OF THIS PRODUCT. RTH6300B Programmable Thermostat Limited 1-year warranty This warranty does not cover removal or reinstallation costs.This warranty shall not apply if it is shown by Honeywell that the defect or malfunction was caused by damage which occurred while the product...


