User Guide
Page 1
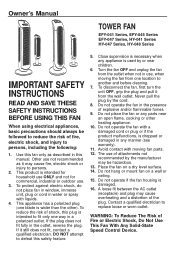
... water or spray with liquids. 4. WARNING: To Reduce The Risk of fire, electric shock, and injury to another and before cleaning. 7. Owner's Manual TOWER FAN EFY-041 Series, EFY-045 Series EFY-047 Series, HY-041 Series HY-047 Series, HY-048 Series IMPORTANT SAFETY INSTRUCTIONS READ AND SAVE THESE SAFETY INSTRUCTIONS BEFORE USING THIS...
... water or spray with liquids. 4. WARNING: To Reduce The Risk of fire, electric shock, and injury to another and before cleaning. 7. Owner's Manual TOWER FAN EFY-041 Series, EFY-045 Series EFY-047 Series, HY-041 Series HY-047 Series, HY-048 Series IMPORTANT SAFETY INSTRUCTIONS READ AND SAVE THESE SAFETY INSTRUCTIONS BEFORE USING THIS...
User Guide
Page 2
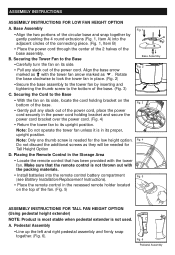
...the power cord through the center of the 2 halves of the power cord. Rotate the base clockwise to lock the tower fan in place. (Fig. 2) •Secure the base assembly to the tower fan by gently pushing the 4 round extrusions (Fig. 1, Item A) into the remote control battery compartment Fig. 5 (see... the Storage Area • Locate the remote control that the remote control is not used. Make sure that has been provided with the tower fan arrow marked as . Base Assembly •Align the two portions of the circular base and snap together by inserting and tightening the thumb...
...the power cord through the center of the 2 halves of the power cord. Rotate the base clockwise to lock the tower fan in place. (Fig. 2) •Secure the base assembly to the tower fan by gently pushing the 4 round extrusions (Fig. 1, Item A) into the remote control battery compartment Fig. 5 (see... the Storage Area • Locate the remote control that the remote control is not used. Make sure that has been provided with the tower fan arrow marked as . Base Assembly •Align the two portions of the circular base and snap together by inserting and tightening the thumb...
User Guide
Page 3
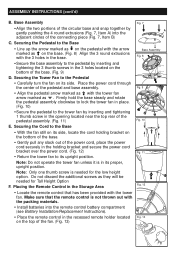
...the 3 holes located on the top of the connecting piece (Fig. 7, Item B) C. Fig. 9 • Align the pedestal arrow marked as with the tower fan arrow marked as on the base. (Fig. 8) Align the 3 round extrusions with the arrow marked as . Firmly hold the base steady and rotate the pedestal... the Cord to its side. Base Assembly Fig. 7 •Align the two portions of the pedestal assembly. (Fig. 11) Fig. 10 E. Securing the Tower Fan to the Base A B • Line up the arrow marked as on the pedestal with the 3 holes in the Storage Area Fig. 12 • Locate...
...the 3 holes located on the top of the connecting piece (Fig. 7, Item B) C. Fig. 9 • Align the pedestal arrow marked as with the tower fan arrow marked as on the base. (Fig. 8) Align the 3 round extrusions with the arrow marked as . Firmly hold the base steady and rotate the pedestal... the Cord to its side. Base Assembly Fig. 7 •Align the two portions of the pedestal assembly. (Fig. 11) Fig. 10 E. Securing the Tower Fan to the Base A B • Line up the arrow marked as on the pedestal with the 3 holes in the Storage Area Fig. 12 • Locate...
User Guide
Page 5
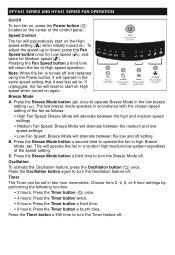
... ( ), and twice for Medium speed ( ). The low breeze mode operates in high Breeze Mode ( ). Press the Breeze Mode button ( ) once to turn the Oscillation feature off . FEAFNY-0O4P1ESREARTIIEOSNAND HY-041 SERIES FAN OPERATION On/Off To turn fan on, press the Power button ( ) located on . C.... Press the Oscillation button again to operate Breeze Mode in two hour increments. Press the Timer button a fifth time...
... ( ), and twice for Medium speed ( ). The low breeze mode operates in high Breeze Mode ( ). Press the Breeze Mode button ( ) once to turn the Oscillation feature off . FEAFNY-0O4P1ESREARTIIEOSNAND HY-041 SERIES FAN OPERATION On/Off To turn fan on, press the Power button ( ) located on . C.... Press the Oscillation button again to operate Breeze Mode in two hour increments. Press the Timer button a fifth time...
User Guide
Page 6
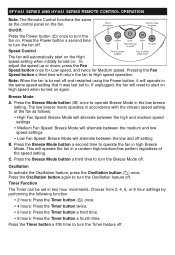
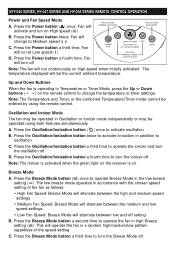
...start on the High speed setting when initially turned on . If unplugged, the fan will reset to turn the Breeze Mode off. Breeze Mode A. This will return the fan to operate Breeze Mode in the low breeze setting. Oscillation To activate the Oscillation feature, press the Oscillation button ( ) ...functions the same as follows: • High Fan Speed: Breeze Mode will alternate between the high and medium speed settings • Medium Fan Speed: Breeze Mode will alternate between the medium and low speed settings • Low Fan Speed: Breeze Mode will alternate between the low and off ...
...start on the High speed setting when initially turned on . If unplugged, the fan will reset to turn the Breeze Mode off. Breeze Mode A. This will return the fan to operate Breeze Mode in the low breeze setting. Oscillation To activate the Oscillation feature, press the Oscillation button ( ) ...functions the same as follows: • High Fan Speed: Breeze Mode will alternate between the high and medium speed settings • Medium Fan Speed: Breeze Mode will alternate between the medium and low speed settings • Low Fan Speed: Breeze Mode will alternate between the low and off ...
User Guide
Page 7
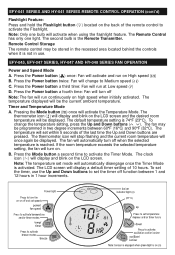
... second bulb is 74°F (23°C). The clock icon ( ) will display a default timer setting of 10 hours. EFY-045, EFY-047 SERIES, HY-047 AND HY-048 SERIES FAN OPERATION Power and Speed Mode A. B. The LCD screen will display and blink on the LCD screen. Remote Control Storage The remote control may...
... second bulb is 74°F (23°C). The clock icon ( ) will display a default timer setting of 10 hours. EFY-045, EFY-047 SERIES, HY-047 AND HY-048 SERIES FAN OPERATION Power and Speed Mode A. B. The LCD screen will display and blink on the LCD screen. Remote Control Storage The remote control may...
User Guide
Page 8
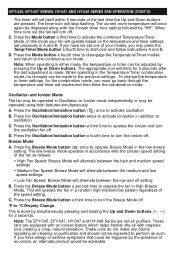
...to the previous settings. Oscillation and Ionizer Mode The fan may be made . Press the Oscillation/Ionization button twice to operate the ionizer and turn the Breeze Mode off . Note: The EFY-045, EFY-047, HY-047 and HY-048 Series are equipped with an ionizer feature which ...activate ionization in the low breeze setting. Press the Breeze Mode button a second time to activate oscillation B. If you may be advisable. Press the Oscillation/Ionization button ( ) once to operate the fan in high Breeze Mode. EFY-045, EFY-047 SERIES, HY-047 AND HY-048 SERIES FAN OPERATION (CONT'D) The ...
...to the previous settings. Oscillation and Ionizer Mode The fan may be made . Press the Oscillation/Ionization button twice to operate the ionizer and turn the Breeze Mode off . Note: The EFY-045, EFY-047, HY-047 and HY-048 Series are equipped with an ionizer feature which ...activate ionization in the low breeze setting. Press the Breeze Mode button a second time to activate oscillation B. If you may be advisable. Press the Oscillation/Ionization button ( ) once to operate the fan in high Breeze Mode. EFY-045, EFY-047 SERIES, HY-047 AND HY-048 SERIES FAN OPERATION (CONT'D) The ...
User Guide
Page 9
... between the high and medium speed settings • Medium Fan Speed: Breeze Mode will alternate between low and off . Press the Breeze Mode button a second time to operate Breeze Mode in accordance with the chosen speed setting of the speed setting. EFY-045 SERIES, HY-047 SERIES AND HY-048 SERIES REMOTE CONTROL OPERATION Power and...
... between the high and medium speed settings • Medium Fan Speed: Breeze Mode will alternate between low and off . Press the Breeze Mode button a second time to operate Breeze Mode in accordance with the chosen speed setting of the speed setting. EFY-045 SERIES, HY-047 SERIES AND HY-048 SERIES REMOTE CONTROL OPERATION Power and...
User Guide
Page 10
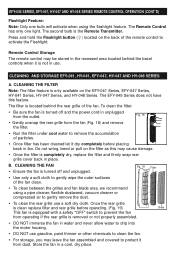
..., bend or pull on the filter as this feature. EFY-045 SERIES, EFY-047, HY-047 AND HY-048 SERIES REMOTE CONTROL OPERATION (CONT'D) Flashlight Feature: Note: Only one light. CLEANING THE FAN • Ensure the fan is not in unplugged from dust. Fig. 19 Filter • Use only a soft ...located on the EFY-041 Series, EFY-047 Series, HY-041 Series, HY-047 Series, and HY-048 Series. The filter is located behind the bezel controls when it from the outlet. The EFY-045 Series does not have this may leave the fan assembled and covered to remove the accumulation of the...
..., bend or pull on the filter as this feature. EFY-045 SERIES, EFY-047, HY-047 AND HY-048 SERIES REMOTE CONTROL OPERATION (CONT'D) Flashlight Feature: Note: Only one light. CLEANING THE FAN • Ensure the fan is not in unplugged from dust. Fig. 19 Filter • Use only a soft ...located on the EFY-041 Series, EFY-047 Series, HY-041 Series, HY-047 Series, and HY-048 Series. The filter is located behind the bezel controls when it from the outlet. The EFY-045 Series does not have this may leave the fan assembled and covered to remove the accumulation of the...

User Guide
Page 11
... never allow water to drip into the motor housing. • DO NOT use gasoline, paint thinner or other chemicals to clean the fan. • For storage, you may leave the fan assembled and covered to protect it from the outlet. • Use only a soft, damp cloth to gently wipe the outer surfaces... of the fan clean. • To clean between the grilles, we recommend using a pipe cleaner, flexible dustwand, vacuum cleaner or compressed air to gently remove the dust. • ...
... never allow water to drip into the motor housing. • DO NOT use gasoline, paint thinner or other chemicals to clean the fan. • For storage, you may leave the fan assembled and covered to protect it from the outlet. • Use only a soft, damp cloth to gently wipe the outer surfaces... of the fan clean. • To clean between the grilles, we recommend using a pipe cleaner, flexible dustwand, vacuum cleaner or compressed air to gently remove the dust. • ...
User Guide
Page 12
... defective in material or workmanship. DO NOT ATTEMPT TO OPEN THE MOTOR HOUSING YOURSELF, DOING SO MAY VOID YOUR WARRANTY AND CAUSE DAMAGE TO THE FAN OR PERSONAL INJURY. 5 YEAR LIMITED WARRANTY You should be considered manufacturing defects under this product if it is found to be sure to specify a model...
... defective in material or workmanship. DO NOT ATTEMPT TO OPEN THE MOTOR HOUSING YOURSELF, DOING SO MAY VOID YOUR WARRANTY AND CAUSE DAMAGE TO THE FAN OR PERSONAL INJURY. 5 YEAR LIMITED WARRANTY You should be considered manufacturing defects under this product if it is found to be sure to specify a model...


