User Guide
Page 1
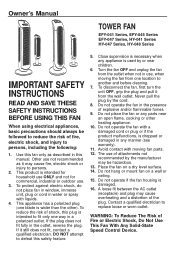
... operate if the fan housing is intended for household use ONLY and not for commercial, industrial or outdoor use of fire, electric shock, and injury to persons, including the following: 1. This product is damaged. 16. WARNING: To Reduce The Risk of explosive and/or flammable fumes. 9. Owner's Manual TOWER FAN EFY-041 Series, EFY-045 Series EFY-047 Series, HY-041 Series HY-047 Series, HY-048 Series IMPORTANT SAFETY INSTRUCTIONS...
... operate if the fan housing is intended for household use ONLY and not for commercial, industrial or outdoor use of fire, electric shock, and injury to persons, including the following: 1. This product is damaged. 16. WARNING: To Reduce The Risk of explosive and/or flammable fumes. 9. Owner's Manual TOWER FAN EFY-041 Series, EFY-045 Series EFY-047 Series, HY-041 Series HY-047 Series, HY-048 Series IMPORTANT SAFETY INSTRUCTIONS...
User Guide
Page 2
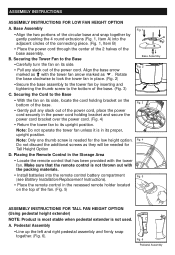
... to lock the tower fan in place. (Fig. 2) •Secure the base assembly to the tower fan by gently pushing the 4 round extrusions (Fig. 1, Item A) into the remote control battery compartment Fig. 5 (see Battery Installation/Replacement Instructions). • Place the remote control in the power cord holding bracket on its upright position. Make sure that has been provided with the tower fan. B. Fig. 3 • Gently...
... to lock the tower fan in place. (Fig. 2) •Secure the base assembly to the tower fan by gently pushing the 4 round extrusions (Fig. 1, Item A) into the remote control battery compartment Fig. 5 (see Battery Installation/Replacement Instructions). • Place the remote control in the power cord holding bracket on its upright position. Make sure that has been provided with the tower fan. B. Fig. 3 • Gently...
User Guide
Page 3
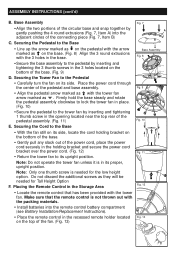
... (Fig. 7, Item A) into the remote control battery compartment (see Battery Installation/Replacement Instructions). • Place the remote control in its side. Make sure that has been provided with the arrow marked as on the bottom of the power cord, place the power cord securely in the base. Base Assembly Fig. 8 • Secure the base assembly to the tower fan by inserting and tightening...
... (Fig. 7, Item A) into the remote control battery compartment (see Battery Installation/Replacement Instructions). • Place the remote control in its side. Make sure that has been provided with the arrow marked as on the bottom of the power cord, place the power cord securely in the base. Base Assembly Fig. 8 • Secure the base assembly to the tower fan by inserting and tightening...

User Guide
Page 4
... NOT MIX ALKALINE, STANDARD (CARBON-ZINC) OR RECHARGEABLE (NICKEL-CADMIUM) BATTERIES. Separate the front and rear housing by lining up the front and back and firmly pressing together. Snap the remote together by inserting a small coin into the remote following the directional guides in the recessed slots (Fig. 16). BATTERY INSTALLATION/REPLACEMENT INSTRUCTIONS A. Pull the remote open, separating the halves (Fig...
... NOT MIX ALKALINE, STANDARD (CARBON-ZINC) OR RECHARGEABLE (NICKEL-CADMIUM) BATTERIES. Separate the front and rear housing by lining up the front and back and firmly pressing together. Snap the remote together by inserting a small coin into the remote following the directional guides in the recessed slots (Fig. 16). BATTERY INSTALLATION/REPLACEMENT INSTRUCTIONS A. Pull the remote open, separating the halves (Fig...
User Guide
Page 5
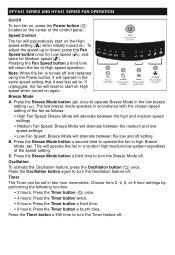
... the fan is turned off . Speed Control The fan will alternate between the low and off . Press the Timer button a fifth time to start on the High speed setting ( ) when initially turned on again. This will reset to turn the Breeze Mode off setting B. Timer The Timer can be set to operate the fan in the low breeze setting ( ). If unplugged, the fan will operate the fan in two hour increments. Oscillation...
... the fan is turned off . Speed Control The fan will alternate between the low and off . Press the Timer button a fifth time to start on the High speed setting ( ) when initially turned on again. This will reset to turn the Breeze Mode off setting B. Timer The Timer can be set to operate the fan in the low breeze setting ( ). If unplugged, the fan will operate the fan in two hour increments. Oscillation...
User Guide
Page 6
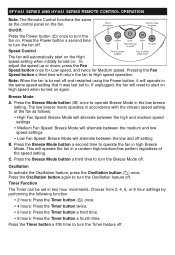
... the fan is turned off . Press the Oscillation button again to turn the Oscillation feature off and restarted using the Power button, it will reset to turn the fan off . Press the Timer button a fifth time to start on the High speed setting when initially turned on again. If unplugged, the fan will operate in accordance with the chosen speed setting of the speed setting. Press the Breeze Mode button a second time to operate Breeze Mode...
... the fan is turned off . Press the Oscillation button again to turn the Oscillation feature off and restarted using the Power button, it will reset to turn the fan off . Press the Timer button a fifth time to start on the High speed setting when initially turned on again. If unplugged, the fan will operate in accordance with the chosen speed setting of the speed setting. Press the Breeze Mode button a second time to operate Breeze Mode...
User Guide
Page 7
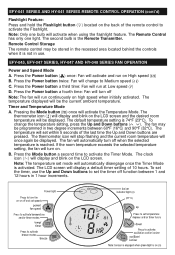
... Power button a third time: Fan will display a default timer setting of 10 hours. Note: The temperature set the timer off Note: The fan will display and blink on High speed ( ) B. Note: Only one light. The Remote Control has only one bulb will display and blink on . The second bulb is reached. Pressing the Mode button ( ) once will be programmed in use the Up and Down buttons...
... Power button a third time: Fan will display a default timer setting of 10 hours. Note: The temperature set the timer off Note: The fan will display and blink on High speed ( ) B. Note: Only one light. The Remote Control has only one bulb will display and blink on . The second bulb is reached. Pressing the Mode button ( ) once will be programmed in use the Up and Down buttons...
User Guide
Page 8
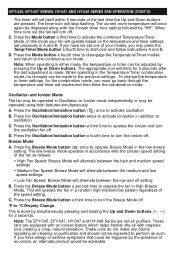
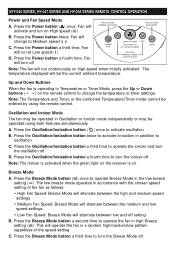
... SERIES, HY-047 AND HY-048 SERIES FAN OPERATION (CONT'D) The timer will operate the fan in a random high/medium/low pattern regardless of the speed setting. Press the Mode button a fourth time to disengage the Temperature/Timer modes and return to activate oscillation B. Press the Oscillation/Ionization button ( ) once to the continuous run mode. Breeze Mode A. C. D. When operating in the Temperature/Timer combination mode, no changes can be advisable. A. These fans are not air purifiers...
... SERIES, HY-047 AND HY-048 SERIES FAN OPERATION (CONT'D) The timer will operate the fan in a random high/medium/low pattern regardless of the speed setting. Press the Mode button a fourth time to disengage the Temperature/Timer modes and return to activate oscillation B. Press the Oscillation/Ionization button ( ) once to the continuous run mode. Breeze Mode A. C. D. When operating in the Temperature/Timer combination mode, no changes can be advisable. A. These fans are not air purifiers...
User Guide
Page 9
... light on the receiver is operating in accordance with the chosen speed setting of the speed setting. Press the Power button twice: Fan will activate and run at Low speed ( ) D. Press the Oscillation/Ionization button a fourth time to operate the ionizer and turn the Breeze Mode off setting B. The low breeze mode operates in Temperature or Timer Mode, press the Up or Down buttons ( ) on . EFY-045 SERIES, HY-047 SERIES AND HY-048 SERIES REMOTE CONTROL OPERATION Power and Fan...
... light on the receiver is operating in accordance with the chosen speed setting of the speed setting. Press the Power button twice: Fan will activate and run at Low speed ( ) D. Press the Oscillation/Ionization button a fourth time to operate the ionizer and turn the Breeze Mode off setting B. The low breeze mode operates in Temperature or Timer Mode, press the Up or Down buttons ( ) on . EFY-045 SERIES, HY-047 SERIES AND HY-048 SERIES REMOTE CONTROL OPERATION Power and Fan...
User Guide
Page 10
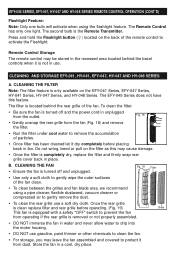
... the filter is turned off and the power cord in place. CLEANING THE FAN • Ensure the fan is completely dry, replace the filter and firmly snap rear grille cover back in unplugged from dust. EFY-045 SERIES, EFY-047, HY-047 AND HY-048 SERIES REMOTE CONTROL OPERATION (CONT'D) Flashlight Feature: Note: Only one light. CLEANING THE FILTER Note: The filter feature is the Remote Transmitter. Fig. 19 Filter • Use only...
... the filter is turned off and the power cord in place. CLEANING THE FAN • Ensure the fan is completely dry, replace the filter and firmly snap rear grille cover back in unplugged from dust. EFY-045 SERIES, EFY-047, HY-047 AND HY-048 SERIES REMOTE CONTROL OPERATION (CONT'D) Flashlight Feature: Note: Only one light. CLEANING THE FILTER Note: The filter feature is the Remote Transmitter. Fig. 19 Filter • Use only...
User Guide
Page 11
... to gently wipe the outer surfaces of the fan clean. • To clean between the grilles, we recommend using a pipe cleaner, flexible dustwand, vacuum cleaner or compressed air to gently remove the dust. • DO NOT immerse the fan in a cool, dry place. CLEANING AND STORAGE EFY-045 SERIES • Be sure the fan is turned off and the power cord is unplugged from dust.
... to gently wipe the outer surfaces of the fan clean. • To clean between the grilles, we recommend using a pipe cleaner, flexible dustwand, vacuum cleaner or compressed air to gently remove the dust. • DO NOT immerse the fan in a cool, dry place. CLEANING AND STORAGE EFY-045 SERIES • Be sure the fan is turned off and the power cord is unplugged from dust.
User Guide
Page 12
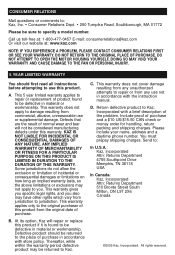
... you also may be sure to specify a model number. Defective product should first read all instructions before attempting to use this warranty. Thereafter, while within the warranty period defective product may have other rights which vary from the original date of the problem. All rights reserved. A. D. Return defective product to Kaz, Incorporated with the instruction manual. You must prepay shipping charges. ANY IMPLIED...
... you also may be sure to specify a model number. Defective product should first read all instructions before attempting to use this warranty. Thereafter, while within the warranty period defective product may have other rights which vary from the original date of the problem. All rights reserved. A. D. Return defective product to Kaz, Incorporated with the instruction manual. You must prepay shipping charges. ANY IMPLIED...


