User Guide
Page 1
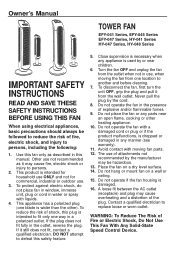
Owner's Manual TOWER FAN EFY-041 Series, EFY-045 Series EFY-047 Series, HY-041 Series HY-047 Series, HY-048 Series IMPORTANT SAFETY INSTRUCTIONS READ AND SAVE THESE SAFETY INSTRUCTIONS BEFORE USING THIS FAN When using electrical appliances, basic precautions should always be followed to reduce the risk of attachments...of fire, electric shock, and injury to fit only one way in a polarized outlet. To protect against electric shock, do not place fan in window, immerse unit, plug or cord in this manual. Close supervision is necessary when any appliance is damaged. 16. Avoid contact with...
Owner's Manual TOWER FAN EFY-041 Series, EFY-045 Series EFY-047 Series, HY-041 Series HY-047 Series, HY-048 Series IMPORTANT SAFETY INSTRUCTIONS READ AND SAVE THESE SAFETY INSTRUCTIONS BEFORE USING THIS FAN When using electrical appliances, basic precautions should always be followed to reduce the risk of attachments...of fire, electric shock, and injury to fit only one way in a polarized outlet. To protect against electric shock, do not place fan in window, immerse unit, plug or cord in this manual. Close supervision is necessary when any appliance is damaged. 16. Avoid contact with...
User Guide
Page 2
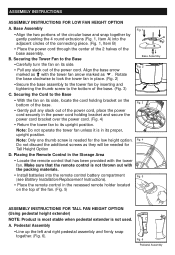
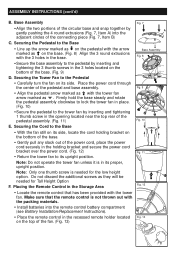
... it is in the recessed remote holder located on the top of the base assembly. A. Securing the Tower Fan to the tower fan by gently pushing the 4 round extrusions (Fig. 1, Item A) into the remote control battery compartment Fig. 5 (see Battery Installation/Replacement Instructions). • Place the remote ... its side, locate the cord holding bracket and secure the power cord bracket over the power cord. (Fig. 4) • Return the tower fan to the bottom of the power cord, place the power cord securely in the Storage Area • Locate the remote control that the remote ...
... it is in the recessed remote holder located on the top of the base assembly. A. Securing the Tower Fan to the tower fan by gently pushing the 4 round extrusions (Fig. 1, Item A) into the remote control battery compartment Fig. 5 (see Battery Installation/Replacement Instructions). • Place the remote ... its side, locate the cord holding bracket and secure the power cord bracket over the power cord. (Fig. 4) • Return the tower fan to the bottom of the power cord, place the power cord securely in the Storage Area • Locate the remote control that the remote ...
User Guide
Page 3
... Item B) C. Placing the Remote Control in the holding bracket on its proper, upright position. Make sure that has been provided with the tower fan arrow marked as on the top of the power cord, place the power cord securely in the Storage Area Fig. 12 • Locate the...of the base. (Fig. 9) D. Note: Only one thumb screw is not thrown out with the arrow marked as . Securing the Pedestal to the tower fan by gently pushing the 4 round extrusions (Fig. 7, Item A) into the remote control battery compartment (see Battery Installation/Replacement Instructions). • Place the...
... Item B) C. Placing the Remote Control in the holding bracket on its proper, upright position. Make sure that has been provided with the tower fan arrow marked as on the top of the power cord, place the power cord securely in the Storage Area Fig. 12 • Locate the...of the base. (Fig. 9) D. Note: Only one thumb screw is not thrown out with the arrow marked as . Securing the Pedestal to the tower fan by gently pushing the 4 round extrusions (Fig. 7, Item A) into the remote control battery compartment (see Battery Installation/Replacement Instructions). • Place the...

User Guide
Page 4
B. Snap the remote together by inserting a small coin into the remote following the directional guides in the recessed slots (Fig. 16). DO NOT MIX ALKALINE, STANDARD (CARBON-ZINC) OR RECHARGEABLE (NICKEL-CADMIUM) BATTERIES. BATTERY INSTALLATION/REPLACEMENT INSTRUCTIONS A. Fig. 14 Coin Fig. 15 Fig. 16 Fig. 17 + + NOTE: DO NOT MIX OLD AND NEW BATTERIES. Separate the front and rear housing by lining up the front and back and firmly pressing together. Twist the coin until the housings separate. C. Insert 2 AAA batteries into the two recessed slots located on the bottom of the ...
B. Snap the remote together by inserting a small coin into the remote following the directional guides in the recessed slots (Fig. 16). DO NOT MIX ALKALINE, STANDARD (CARBON-ZINC) OR RECHARGEABLE (NICKEL-CADMIUM) BATTERIES. BATTERY INSTALLATION/REPLACEMENT INSTRUCTIONS A. Fig. 14 Coin Fig. 15 Fig. 16 Fig. 17 + + NOTE: DO NOT MIX OLD AND NEW BATTERIES. Separate the front and rear housing by lining up the front and back and firmly pressing together. Twist the coin until the housings separate. C. Insert 2 AAA batteries into the two recessed slots located on the bottom of the ...
User Guide
Page 5
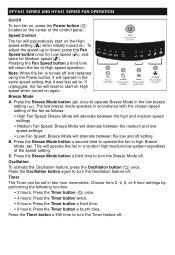
...second time to operate Breeze Mode in two hour increments. Speed Control The fan will operate in the same speed setting that it was last set in the low breeze setting ( ). Timer The Timer can be set to turn the Timer feature off . FEAFNY-0O4P1ESREARTIIEOSNAND HY-041 SERIES FAN OPERATION On/Off To... turn fan on, press the Power button ( ) located on the center of the ...
...second time to operate Breeze Mode in two hour increments. Speed Control The fan will operate in the same speed setting that it was last set in the low breeze setting ( ). Timer The Timer can be set to turn the Timer feature off . FEAFNY-0O4P1ESREARTIIEOSNAND HY-041 SERIES FAN OPERATION On/Off To... turn fan on, press the Power button ( ) located on the center of the ...
User Guide
Page 6
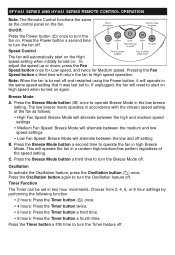
...start on High speed when turned on . Pressing the Fan Speed button a third time will operate the fan in the low breeze setting. Timer Function The Timer can be set to turn the fan off . This will return the fan to turn the Timer feature off . Press the ... OHTYE-0C41ONSETRIOELSORPEEMROATTEIOCNONTROL OPERATION Note: The Remote Control functions the same as follows: • High Fan Speed: Breeze Mode will alternate between the high and medium speed settings • Medium Fan Speed: Breeze Mode will alternate between the low and off and restarted using the Power button, it was...
...start on High speed when turned on . Pressing the Fan Speed button a third time will operate the fan in the low breeze setting. Timer Function The Timer can be set to turn the fan off . This will return the fan to turn the Timer feature off . Press the ... OHTYE-0C41ONSETRIOELSORPEEMROATTEIOCNONTROL OPERATION Note: The Remote Control functions the same as follows: • High Fan Speed: Breeze Mode will alternate between the high and medium speed settings • Medium Fan Speed: Breeze Mode will alternate between the low and off and restarted using the Power button, it was...
User Guide
Page 7
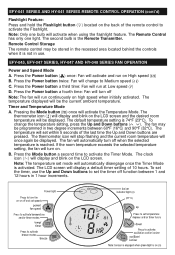
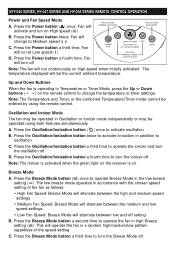
... the desired room temperature will turn off function between 60°F (16°C) and 90°F (32°C). EFY-045, EFY-047 SERIES, HY-047 AND HY-048 SERIES FAN OPERATION Power and Speed Mode A. B. Note: The temperature set within 5 seconds of the last time the Up and Down buttons are pressed. EFY...the timer, use . To set the timer off when the selected temperature is activated. Pressing the Mode button ( ) once will run on High speed ( ) B. The fan may be the current ambient temperature. The second bulb is 74°F (23°C). Press the Power button ( ) once...
... the desired room temperature will turn off function between 60°F (16°C) and 90°F (32°C). EFY-045, EFY-047 SERIES, HY-047 AND HY-048 SERIES FAN OPERATION Power and Speed Mode A. B. Note: The temperature set within 5 seconds of the last time the Up and Down buttons are pressed. EFY...the timer, use . To set the timer off when the selected temperature is activated. Pressing the Mode button ( ) once will run on High speed ( ) B. The fan may be the current ambient temperature. The second bulb is 74°F (23°C). Press the Power button ( ) once...
User Guide
Page 8
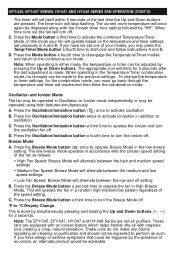
...and B. To change the temperature or timer settings for 2 seconds. The low breeze mode operates in a random high/medium/low pattern regardless of the fan as such. Note: The EFY-045, EFY-047, HY-047 and HY-048 Series are equipped with an ionizer feature which helps freshen the air with negative... air cleaning or purification and should not be made . When operating in high Breeze Mode. EFY-045, EFY-047 SERIES, HY-047 AND HY-048 SERIES FAN OPERATION (CONT'D) The timer will set one of your fan will operate based on the temperature and timer settings set modes and then enter ...
...and B. To change the temperature or timer settings for 2 seconds. The low breeze mode operates in a random high/medium/low pattern regardless of the fan as such. Note: The EFY-045, EFY-047, HY-047 and HY-048 Series are equipped with an ionizer feature which helps freshen the air with negative... air cleaning or purification and should not be made . When operating in high Breeze Mode. EFY-045, EFY-047 SERIES, HY-047 AND HY-048 SERIES FAN OPERATION (CONT'D) The timer will set one of your fan will operate based on the temperature and timer settings set modes and then enter ...
User Guide
Page 9
... settings. This will be entered by using both features simultaneously. Press the Breeze Mode button ( ) once to Medium speed ( ) C. EFY-045 SERIES, HY-047 SERIES AND HY-048 SERIES REMOTE CONTROL OPERATION Power and Fan Speed Mode A. Press the Power button twice: Fan will turn the oscillation off . Press the Oscillation/Ionization button a third time...
... settings. This will be entered by using both features simultaneously. Press the Breeze Mode button ( ) once to Medium speed ( ) C. EFY-045 SERIES, HY-047 SERIES AND HY-048 SERIES REMOTE CONTROL OPERATION Power and Fan Speed Mode A. Press the Power button twice: Fan will turn the oscillation off . Press the Oscillation/Ionization button a third time...
User Guide
Page 10
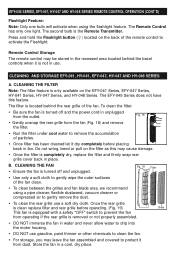
... is only available on the EFY-041 Series, EFY-047 Series, HY-041 Series, HY-047 Series, and HY-048 Series. To clean the filter: • Be sure the fan is not in use. Fig. 18 • Gently unsnap the rear grille from the fan (Fig. 18) and remove the filter. • Run the filter... under cool water to remove the accumulation of the fan. Once the rear...
... is only available on the EFY-041 Series, EFY-047 Series, HY-041 Series, HY-047 Series, and HY-048 Series. To clean the filter: • Be sure the fan is not in use. Fig. 18 • Gently unsnap the rear grille from the fan (Fig. 18) and remove the filter. • Run the filter... under cool water to remove the accumulation of the fan. Once the rear...
User Guide
Page 11
...; DO NOT use gasoline, paint thinner or other chemicals to clean the fan. • For storage, you may leave the fan assembled and covered to protect it from dust. CLEANING AND STORAGE EFY-045 SERIES • Be sure the fan is turned off and the power cord is unplugged from the outlet. •...; Use only a soft, damp cloth to gently wipe the outer surfaces of the fan clean. • To clean between the grilles, we recommend using a pipe cleaner, flexible dustwand, vacuum cleaner or compressed air to gently remove the dust. •...
...; DO NOT use gasoline, paint thinner or other chemicals to clean the fan. • For storage, you may leave the fan assembled and covered to protect it from dust. CLEANING AND STORAGE EFY-045 SERIES • Be sure the fan is turned off and the power cord is unplugged from the outlet. •...; Use only a soft, damp cloth to gently wipe the outer surfaces of the fan clean. • To clean between the grilles, we recommend using a pipe cleaner, flexible dustwand, vacuum cleaner or compressed air to gently remove the dust. •...
User Guide
Page 12
... accordance with the instruction manual. DO NOT ATTEMPT TO OPEN THE MOTOR HOUSING YOURSELF, DOING SO MAY VOID YOUR WARRANTY AND CAUSE DAMAGE TO THE FAN OR PERSONAL INJURY. 5 YEAR LIMITED WARRANTY You should be sure to specify a model number. This warranty gives you specific legal rights, and you . DO NOT...
... accordance with the instruction manual. DO NOT ATTEMPT TO OPEN THE MOTOR HOUSING YOURSELF, DOING SO MAY VOID YOUR WARRANTY AND CAUSE DAMAGE TO THE FAN OR PERSONAL INJURY. 5 YEAR LIMITED WARRANTY You should be sure to specify a model number. This warranty gives you specific legal rights, and you . DO NOT...