User Guide
Page 1
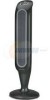
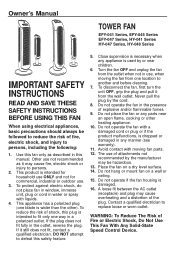
... fire, electric shock, and injury to persons, including the following: 1. Owner's Manual TOWER FAN EFY-041 Series, EFY-045 Series EFY-047 Series, HY-041 Series HY-047 Series, HY-048 Series IMPORTANT SAFETY INSTRUCTIONS READ AND SAVE THESE SAFETY INSTRUCTIONS BEFORE USING THIS FAN When using electrical appliances, basic precautions should always be hazardous. 13. This product...
... fire, electric shock, and injury to persons, including the following: 1. Owner's Manual TOWER FAN EFY-041 Series, EFY-045 Series EFY-047 Series, HY-041 Series HY-047 Series, HY-048 Series IMPORTANT SAFETY INSTRUCTIONS READ AND SAVE THESE SAFETY INSTRUCTIONS BEFORE USING THIS FAN When using electrical appliances, basic precautions should always be hazardous. 13. This product...
User Guide
Page 2
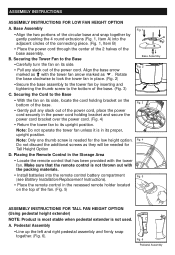
.... 6). Fig. 6 Pedestal Assembly B. Fig. 2 • Pull any slack out of the fan. (Fig. 5) ASSEMBLY INSTRUCTIONS FOR TALL FAN HEIGHT OPTION (Using pedestal height extender) NOTE: Product is most stable when pedestal extender is needed for the low height option. A. Securing the Tower Fan to its side, locate the cord holding bracket and secure the power...
.... 6). Fig. 6 Pedestal Assembly B. Fig. 2 • Pull any slack out of the fan. (Fig. 5) ASSEMBLY INSTRUCTIONS FOR TALL FAN HEIGHT OPTION (Using pedestal height extender) NOTE: Product is most stable when pedestal extender is needed for the low height option. A. Securing the Tower Fan to its side, locate the cord holding bracket and secure the power...
User Guide
Page 3
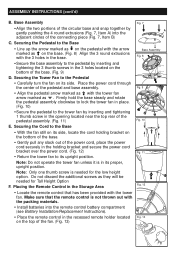
...position. Note: Only one thumb screw is in the opening located near the top rear of the fan. (Fig. 13) ASSEMBLY INSTRUCTIONS (cont'd) B. Fig. 11 Note: Do not operate the tower fan unless it is needed for the low height option. Do not discard the additional screws as they ...control battery compartment (see Battery Installation/Replacement Instructions). • Place the remote control in the holding bracket and secure the power cord bracket over the power cord. (Fig. 12) • Return the tower fan to the Pedestal • Carefully turn the fan on its side, locate the cord ...
...position. Note: Only one thumb screw is in the opening located near the top rear of the fan. (Fig. 13) ASSEMBLY INSTRUCTIONS (cont'd) B. Fig. 11 Note: Do not operate the tower fan unless it is needed for the low height option. Do not discard the additional screws as they ...control battery compartment (see Battery Installation/Replacement Instructions). • Place the remote control in the holding bracket and secure the power cord bracket over the power cord. (Fig. 12) • Return the tower fan to the Pedestal • Carefully turn the fan on its side, locate the cord ...

User Guide
Page 4
... following the directional guides in the recessed slots (Fig. 16). DO NOT MIX ALKALINE, STANDARD (CARBON-ZINC) OR RECHARGEABLE (NICKEL-CADMIUM) BATTERIES. BATTERY INSTALLATION/REPLACEMENT INSTRUCTIONS A. Pull the remote open, separating the halves (Fig. 15). Fig. 14 Coin Fig. 15 Fig. 16 Fig. 17 + + NOTE: DO NOT MIX OLD AND NEW...
... following the directional guides in the recessed slots (Fig. 16). DO NOT MIX ALKALINE, STANDARD (CARBON-ZINC) OR RECHARGEABLE (NICKEL-CADMIUM) BATTERIES. BATTERY INSTALLATION/REPLACEMENT INSTRUCTIONS A. Pull the remote open, separating the halves (Fig. 15). Fig. 14 Coin Fig. 15 Fig. 16 Fig. 17 + + NOTE: DO NOT MIX OLD AND NEW...
User Guide
Page 8
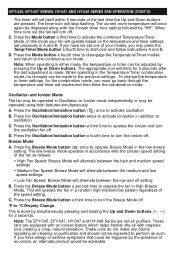
... off setting B. Press the Oscillation/Ionization button a fourth time to activate oscillation B. Note: The EFY-045, EFY-047, HY-047 and HY-048 Series are equipped with an ionizer feature which helps freshen the air with the chosen timer hour setting followed by simultaneously pressing...start over and follow instructions A and B. When time runs out the fan will operate based on the temperature and timer settings set modes and then enter the combination mode. Breeze Mode A. Press the Breeze Mode button ( ) once to the previous settings. Press the Breeze Mode button a ...
... off setting B. Press the Oscillation/Ionization button a fourth time to activate oscillation B. Note: The EFY-045, EFY-047, HY-047 and HY-048 Series are equipped with an ionizer feature which helps freshen the air with the chosen timer hour setting followed by simultaneously pressing...start over and follow instructions A and B. When time runs out the fan will operate based on the temperature and timer settings set modes and then enter the combination mode. Breeze Mode A. Press the Breeze Mode button ( ) once to the previous settings. Press the Breeze Mode button a ...
User Guide
Page 12
... shipping charges. DO NOT ATTEMPT TO OPEN THE MOTOR HOUSING YOURSELF, DOING SO MAY VOID YOUR WARRANTY AND CAUSE DAMAGE TO THE FAN OR PERSONAL INJURY. 5 YEAR LIMITED WARRANTY You should be returned to the original purchaser of purchase in material or workmanship. This ... abusive, unreasonable use or supplemental damage. This warranty does not cover damage resulting from any unauthorized attempts to Kaz, Incorporated with the instruction manual. Please include your name, address and a daytime phone number. Return defective product to repair or from any use not in material...
... shipping charges. DO NOT ATTEMPT TO OPEN THE MOTOR HOUSING YOURSELF, DOING SO MAY VOID YOUR WARRANTY AND CAUSE DAMAGE TO THE FAN OR PERSONAL INJURY. 5 YEAR LIMITED WARRANTY You should be returned to the original purchaser of purchase in material or workmanship. This ... abusive, unreasonable use or supplemental damage. This warranty does not cover damage resulting from any unauthorized attempts to Kaz, Incorporated with the instruction manual. Please include your name, address and a daytime phone number. Return defective product to repair or from any use not in material...