
Owner's Manual
Page 1
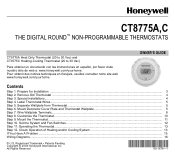
... techniques en français, veuillez consulter notre site web www.honeywell.com/yourhome. Remove Old Thermostat ...4 Step 3. Label Thermostat Wires ...5 Step 5. Operating the Thermostat...13 Step 12. CT8775A,C THE DIGITAL ROUND™ NON-PROGRAMMABLE THERMOSTATS CT8775A Heat Only Thermostat (20 to 30 Vac) and CT8775C Heating-Cooling Thermostat (20 to 30 Vac) Para obtener un documento con las...
... techniques en français, veuillez consulter notre site web www.honeywell.com/yourhome. Remove Old Thermostat ...4 Step 3. Label Thermostat Wires ...5 Step 5. Operating the Thermostat...13 Step 12. CT8775A,C THE DIGITAL ROUND™ NON-PROGRAMMABLE THERMOSTATS CT8775A Heat Only Thermostat (20 to 30 Vac) and CT8775C Heating-Cooling Thermostat (20 to 30 Vac) Para obtener un documento con las...
Owner's Manual
Page 2
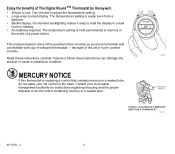
...manual answers many of an old control containing mercury in the trash. Contact your Honeywell thermostat - On-demand backlighting makes it easy to use. Enjoy the benefits of The Digital RoundTM Thermostat by Honeywell. • Simple to read display. The temperature setting is held permanently in ...your old control in a sealed tube. COOLER WARMER ROOM SET M19582 MERCURY SWITCH TYPICAL LOCATION OF A MERCURY SWITCH IN A THERMOSTAT M10614 69-1676-1 2 Turn the dial to adjust the temperature setting. • Large easy-to follow these instructions carefully. MERCURY NOTICE ...
...manual answers many of an old control containing mercury in the trash. Contact your Honeywell thermostat - On-demand backlighting makes it easy to use. Enjoy the benefits of The Digital RoundTM Thermostat by Honeywell. • Simple to read display. The temperature setting is held permanently in ...your old control in a sealed tube. COOLER WARMER ROOM SET M19582 MERCURY SWITCH TYPICAL LOCATION OF A MERCURY SWITCH IN A THERMOSTAT M10614 69-1676-1 2 Turn the dial to adjust the temperature setting. • Large easy-to follow these instructions carefully. MERCURY NOTICE ...

Owner's Manual
Page 3
... Chart. Not compatible with any 120/240 volt system. PREPARE FOR INSTALLATION ❑ Check Table 1, the compatibility chart, to make sure the thermostat is not compatible, call Honeywell Customer Care, toll-free, 1-800-468-1502. drywall, 7/32 in . Table 1. System Type Gas or Oil Warm Air Electric Warm Air... Gas Millivolt Electric Air Conditioning Baseboard Electric (120/240 line volt)b Single Stage Heat Pump Multistage Heat Pumps/Multistage Equipment Compatibility with CT8775A Yes No Yesa Yes Yes No No No No No Compatibility with CT8775C Yes Yes Yesa Yes Yes No Yes No Yes No ...
... Chart. Not compatible with any 120/240 volt system. PREPARE FOR INSTALLATION ❑ Check Table 1, the compatibility chart, to make sure the thermostat is not compatible, call Honeywell Customer Care, toll-free, 1-800-468-1502. drywall, 7/32 in . Table 1. System Type Gas or Oil Warm Air Electric Warm Air... Gas Millivolt Electric Air Conditioning Baseboard Electric (120/240 line volt)b Single Stage Heat Pump Multistage Heat Pumps/Multistage Equipment Compatibility with CT8775A Yes No Yesa Yes Yes No No No No No Compatibility with CT8775C Yes Yes Yesa Yes Yes No Yes No Yes No ...
Owner's Manual
Page 4
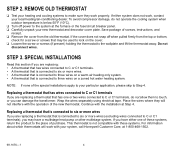
... connected to C or C1 terminals If you are replacing a thermostat that is connected to six or more wires (excluding wires connected to touch, or you have either system does not work, contact your system, call Honeywell Customer Care, at Step 4. Continue with the installation at 1-800...-468-1502. 69-1676-1 4 Replacing a thermostat that is connected to six or more wires If you are replacing: •...
... connected to C or C1 terminals If you are replacing a thermostat that is connected to six or more wires (excluding wires connected to touch, or you have either system does not work, contact your system, call Honeywell Customer Care, at Step 4. Continue with the installation at 1-800...-468-1502. 69-1676-1 4 Replacing a thermostat that is connected to six or more wires If you are replacing: •...
Owner's Manual
Page 5
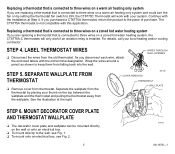
... warm air heating only system If you are replacing a thermostat that is installed. As you are replacing a thermostat that is connected to three wires on a zoned hot water heating system, the CT8775A,C thermostats will only work if an isolation relay is connected to...the illustration at Step 4. M5136 COVER REMOVED THERMOSTAT WALL PLATE STEP 6. The CT8775A thermostat is not compatible with the installation at the right. SEPARATE WALLPLATE FROM THERMOSTAT ❑ Remove cover from the old thermostat. If you purchased a CT8775A thermostat, return the product to keep them from ...
... warm air heating only system If you are replacing a thermostat that is installed. As you are replacing a thermostat that is connected to three wires on a zoned hot water heating system, the CT8775A,C thermostats will only work if an isolation relay is connected to...the illustration at Step 4. M5136 COVER REMOVED THERMOSTAT WALL PLATE STEP 6. The CT8775A thermostat is not compatible with the installation at the right. SEPARATE WALLPLATE FROM THERMOSTAT ❑ Remove cover from the old thermostat. If you purchased a CT8775A thermostat, return the product to keep them from ...
Owner's Manual
Page 8
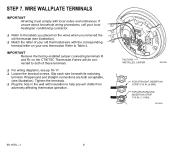
... be connected to the labels you placed on the wires when you removed the Y old thermostat (see illustration). Refer to help prevent drafts from adversely affecting thermostat operation. FACTORY INSTALLED JUMPER M19495 FOR STRAIGHT INSERTION STRIP 5/16 IN. (8 MM). IMPORTANT ...Remove the factory-installed jumper connecting terminals R and Rc on your new thermostat. G ❑ Refer to both acceptable, (see illustration). ❑ Match the letter of these terminals. ❑ For wiring diagrams,...
... be connected to the labels you placed on the wires when you removed the Y old thermostat (see illustration). Refer to help prevent drafts from adversely affecting thermostat operation. FACTORY INSTALLED JUMPER M19495 FOR STRAIGHT INSERTION STRIP 5/16 IN. (8 MM). IMPORTANT ...Remove the factory-installed jumper connecting terminals R and Rc on your new thermostat. G ❑ Refer to both acceptable, (see illustration). ❑ Match the letter of these terminals. ❑ For wiring diagrams,...
Owner's Manual
Page 9
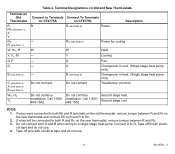
... for cooling Heat Cooling Fan Changeover in heat. (Single stage heat pump only). NOTES: 1. Terminal Designations on CT8775C R R (see Note 2) Power Description - Terminal on Old Thermostat R Rh (see Note 1) 4 V Rc R (see Note 1) W, W1, H Y, Y1, M G, F O B (see Note 3) C (see Note 4) X (see Note 4) B (see Note 3) Do not ...Transformer common Do not continue Do not continue Second stage heat. If wires were connected to Terminals Connect To Terminals on CT8775A on Old and New Thermostats. W - - - - Rc (see Note 2) W Y G O B (see Note 3) W2, H2 Y2 Connect to both R and Rc on ...
... for cooling Heat Cooling Fan Changeover in heat. (Single stage heat pump only). NOTES: 1. Terminal Designations on CT8775C R R (see Note 2) Power Description - Terminal on Old Thermostat R Rh (see Note 1) 4 V Rc R (see Note 1) W, W1, H Y, Y1, M G, F O B (see Note 3) C (see Note 4) X (see Note 4) B (see Note 3) Do not ...Transformer common Do not continue Do not continue Second stage heat. If wires were connected to Terminals Connect To Terminals on CT8775A on Old and New Thermostats. W - - - - Rc (see Note 2) W Y G O B (see Note 3) W2, H2 Y2 Connect to both R and Rc on ...
Owner's Manual
Page 10
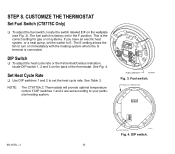
... 1 and 2 to set according to your particular heating system. This is factory set the switch to turn on the back of the thermostat. DIP Switch ❑ To adjust the heat cycle rate or the Fahrenheit/Celsius indication, locate DIP switch 1, 2 and 3 on immediately...fan to E. See Table 3. FUEL SWITCH M19497 Fig. 3. CUSTOMIZE THE THERMOSTAT Set Fuel Switch (CT8775C Only) ❑ To adjust the fuel switch, locate the switch labeled E/F on the wallplate (see Fig. 3). NOTE: The CT8775A,C Thermostats will provide optimal temperature control if DIP switches 1 and 2 are set the...
... 1 and 2 to set according to your particular heating system. This is factory set the switch to turn on the back of the thermostat. DIP Switch ❑ To adjust the heat cycle rate or the Fahrenheit/Celsius indication, locate DIP switch 1, 2 and 3 on immediately...fan to E. See Table 3. FUEL SWITCH M19497 Fig. 3. CUSTOMIZE THE THERMOSTAT Set Fuel Switch (CT8775C Only) ❑ To adjust the fuel switch, locate the switch labeled E/F on the wallplate (see Fig. 3). NOTE: The CT8775A,C Thermostats will provide optimal temperature control if DIP switches 1 and 2 are set the...
Owner's Manual
Page 11
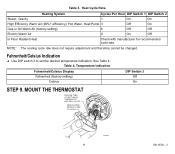
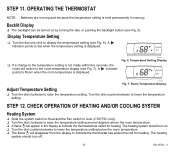
Fahrenheit/Celsius Display Fahrenheit (factory setting) Celsius DIP Switch 3 Off On STEP 9. MOUNT THE THERMOSTAT ENGAGE TABS AT BOTTOM OF THERMOSTAT AND WALL PLATE. PRESS UPPER EDGE OF CASE TO LATCH M19498 11 69-1676-1 NOTE: The cooling cycle rate does not require adjustment and therefore ...
Fahrenheit/Celsius Display Fahrenheit (factory setting) Celsius DIP Switch 3 Off On STEP 9. MOUNT THE THERMOSTAT ENGAGE TABS AT BOTTOM OF THERMOSTAT AND WALL PLATE. PRESS UPPER EDGE OF CASE TO LATCH M19498 11 69-1676-1 NOTE: The cooling cycle rate does not require adjustment and therefore ...
Owner's Manual
Page 12
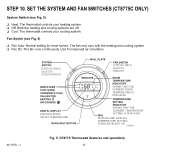
CT8775 Thermostat (features and operation). 12 The fan only runs with the heating and cooling system. ❑ Fan On: The fan runs continuously. Use for most homes. ... SHOWS THAT THE CURRENT TEMPERATURE SETTING IS DISPLAYED DISPLAYS AND ADJUSTS TEMPERATURE SETTING/ TURNS BACKLIGHT ON M19512 Fig. 5. Fan Switch (see Fig. 5) ❑ Heat: The thermostat controls your heating system. ❑ Off: Both the heating and cooling systems are off. ❑ Cool: The...
CT8775 Thermostat (features and operation). 12 The fan only runs with the heating and cooling system. ❑ Fan On: The fan runs continuously. Use for most homes. ... SHOWS THAT THE CURRENT TEMPERATURE SETTING IS DISPLAYED DISPLAYS AND ADJUSTS TEMPERATURE SETTING/ TURNS BACKLIGHT ON M19512 Fig. 5. Fan Switch (see Fig. 5) ❑ Heat: The thermostat controls your heating system. ❑ Off: Both the heating and cooling systems are off. ❑ Cool: The...
Owner's Manual
Page 13
...counterclockwise to lower the temperature setting below the room temperature. ❑ The flame will disappear from the display to indicate the thermostat has called for heating. Temperature Setting Display. Room Temperature Display. A indicator points to raise the temperature setting. Adjust Temperature... 7. The heating system should turn on by turning the dial, or pushing the backlight button (see Fig. 7). OPERATING THE THERMOSTAT NOTE: Batteries are not required because the temperature setting is not made within five seconds, the mode will appear in memory....
...counterclockwise to lower the temperature setting below the room temperature. ❑ The flame will disappear from the display to indicate the thermostat has called for heating. Temperature Setting Display. Room Temperature Display. A indicator points to raise the temperature setting. Adjust Temperature... 7. The heating system should turn on by turning the dial, or pushing the backlight button (see Fig. 7). OPERATING THE THERMOSTAT NOTE: Batteries are not required because the temperature setting is not made within five seconds, the mode will appear in memory....
Owner's Manual
Page 14
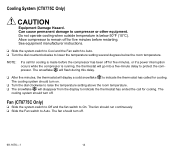
...solid snowflake to protect the compressor. The snowflake will flash during this delay. ❑ After five minutes, the thermostat will go into a five-minute delay to indicate the thermostat has called for five minutes before the compressor has been off . Fan (CT8775C Only) ❑ Slide the system.... Can cause permanent damage to On. NOTE: If a call for cooling is below the room temperature. Allow compressor to indicate the thermostat has ended the call for cooling. The cooling system should turn on. ❑ Turn the dial clockwise to raise the temperature setting ...
...solid snowflake to protect the compressor. The snowflake will flash during this delay. ❑ After five minutes, the thermostat will go into a five-minute delay to indicate the thermostat has called for five minutes before the compressor has been off . Fan (CT8775C Only) ❑ Slide the system.... Can cause permanent damage to On. NOTE: If a call for cooling is below the room temperature. Allow compressor to indicate the thermostat has ended the call for cooling. The cooling system should turn on. ❑ Turn the dial clockwise to raise the temperature setting ...
Owner's Manual
Page 15
... If there is no warm or cool air is in the Off position. For additional information, go to www.honeywell.com/yourhome or call Honeywell Customer Care, toll free, at the equipment is coming from the registers. Customer Assistance Please read and follow the... provided instructions for the system to 37°C) for heating. Before calling, please have the following information available: • Thermostat model number. (...
... If there is no warm or cool air is in the Off position. For additional information, go to www.honeywell.com/yourhome or call Honeywell Customer Care, toll free, at the equipment is coming from the registers. Customer Assistance Please read and follow the... provided instructions for the system to 37°C) for heating. Before calling, please have the following information available: • Thermostat model number. (...
Owner's Manual
Page 17
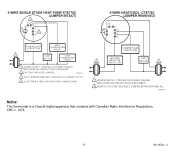
... 2 G R Y W COMPRESSOR CONTACTOR HEATING 1 RELAY OR VALVE COIL FAN RELAY 1 1 POWER SUPPLY. PROVIDE DISCONNECT MEANS AND OVERLOAD PROTECTION AS REQUIRED. 2 FACTORY INSTALLED JUMPER. M19454 Notice: This thermostat is a Class B digital apparatus that complies with Canadian Radio Interference Regulations, CRC c. 1374. 17 69-1676-1
... 2 G R Y W COMPRESSOR CONTACTOR HEATING 1 RELAY OR VALVE COIL FAN RELAY 1 1 POWER SUPPLY. PROVIDE DISCONNECT MEANS AND OVERLOAD PROTECTION AS REQUIRED. 2 FACTORY INSTALLED JUMPER. M19454 Notice: This thermostat is a Class B digital apparatus that complies with Canadian Radio Interference Regulations, CRC c. 1374. 17 69-1676-1


