Operating Guide
Page 2
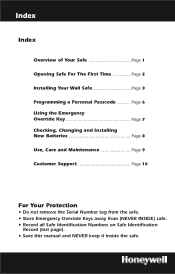
Index Index Overview of Your Safe Page 1 Opening Safe For The First Time Page 2 Installing Your Wall Safe Page 3 Programming a Personal Passcode Page 6 Using the Emergency Override Key Page 7 Checking, Changing and Installing New Batteries Page 8 Use, Care and ...Maintenance Page 9 Customer Support Page 10 For Your Protection • Do not remove the Serial Number tag from the safe. • Store ...
Index Index Overview of Your Safe Page 1 Opening Safe For The First Time Page 2 Installing Your Wall Safe Page 3 Programming a Personal Passcode Page 6 Using the Emergency Override Key Page 7 Checking, Changing and Installing New Batteries Page 8 Use, Care and ...Maintenance Page 9 Customer Support Page 10 For Your Protection • Do not remove the Serial Number tag from the safe. • Store ...
Operating Guide
Page 3
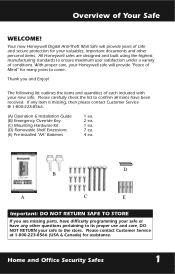
... ensure maximum user satisfaction under a variety of conditions. With proper care, your safe or have been received. Your new Honeywell Digital Anti-Theft Wall Safe will provide "Peace of safe and secure protection for your valuables, important documents and other personal items. All Honeywell safes are missing parts, have difficulty programming your Honeywell safe will provide years of Mind" for assistance.
... ensure maximum user satisfaction under a variety of conditions. With proper care, your safe or have been received. Your new Honeywell Digital Anti-Theft Wall Safe will provide "Peace of safe and secure protection for your valuables, important documents and other personal items. All Honeywell safes are missing parts, have difficulty programming your Honeywell safe will provide years of Mind" for assistance.
Operating Guide
Page 5
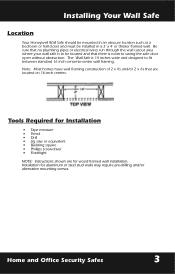
... 16 inch center-to swing the safe door open without obstruction. Installation for wood framed wall installation. Note: Most homes have wall framing construction of 2 x 4's and/or 2 x 6's that are for aluminum or steel stud walls may require pre-drilling and/or alternative mounting screws. Installing Your Wall Safe Location Your Honeywell Wall Safe should be mounted in an obscure...
... 16 inch center-to swing the safe door open without obstruction. Installation for wood framed wall installation. Note: Most homes have wall framing construction of 2 x 4's and/or 2 x 6's that are for aluminum or steel stud walls may require pre-drilling and/or alternative mounting screws. Installing Your Wall Safe Location Your Honeywell Wall Safe should be mounted in an obscure...
Operating Guide
Page 6
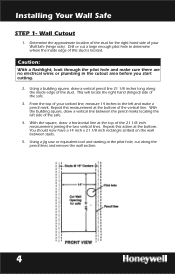
Drill or cut along the inside edge of this action at the top of the safe. 3. Using a building square, draw a vertical pencil line 21 1/8 inches long along the pencil lines and remove the wall section. 4 This will locate the right hand (hinged) side of the 21 1/8 inch measurement ... to the left side of the stud. Using a jig saw or equivalent tool and starting at the bottom of your Wall Safe (hinge side). Installing Your Wall Safe STEP 1- Wall Cutout 1. Determine the approximate location of the stud for the right hand side of your scribed line, measure 14 inches ...
Drill or cut along the inside edge of this action at the top of the safe. 3. Using a building square, draw a vertical pencil line 21 1/8 inches long along the pencil lines and remove the wall section. 4 This will locate the right hand (hinged) side of the 21 1/8 inch measurement ... to the left side of the stud. Using a jig saw or equivalent tool and starting at the bottom of your Wall Safe (hinge side). Installing Your Wall Safe STEP 1- Wall Cutout 1. Determine the approximate location of the stud for the right hand side of your scribed line, measure 14 inches ...
Operating Guide
Page 7
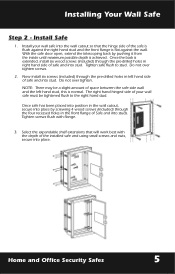
... safe and into place. Once safe has been placed into position in the wall cutout, secure into place by pushing it from the inside until maximum possible depth is flat against the right hand stud and the front flange is achieved. Once the back is normal. Do not over tighten screws. 2. Select the expandable...
... safe and into place. Once safe has been placed into position in the wall cutout, secure into place by pushing it from the inside until maximum possible depth is flat against the right hand stud and the front flange is achieved. Once the back is normal. Do not over tighten screws. 2. Select the expandable...


