Operating Guide
Page 1
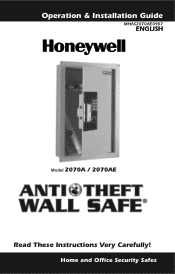
Operation & Installation Guide MHAS2070AE0907 ENGLISH Model 2070A / 2070AE Read These Instructions Very Carefully! Home and Office Security Safes
Operation & Installation Guide MHAS2070AE0907 ENGLISH Model 2070A / 2070AE Read These Instructions Very Carefully! Home and Office Security Safes
Operating Guide
Page 2
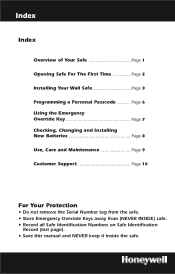
Index Index Overview of Your Safe Page 1 Opening Safe For The First Time Page 2 Installing Your Wall Safe Page 3 Programming a Personal Passcode Page 6 Using the Emergency Override Key Page 7 Checking, Changing and Installing New Batteries Page 8 Use, Care and ...Maintenance Page 9 Customer Support Page 10 For Your Protection • Do not remove the Serial Number tag from the safe. • Store ...
Index Index Overview of Your Safe Page 1 Opening Safe For The First Time Page 2 Installing Your Wall Safe Page 3 Programming a Personal Passcode Page 6 Using the Emergency Override Key Page 7 Checking, Changing and Installing New Batteries Page 8 Use, Care and ...Maintenance Page 9 Customer Support Page 10 For Your Protection • Do not remove the Serial Number tag from the safe. • Store ...
Operating Guide
Page 3
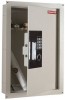
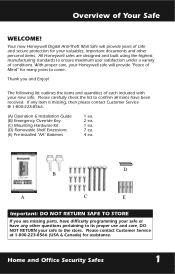
... RETURN your new safe. If any other personal items. All Honeywell safes are missing parts, have difficulty programming your safe or have been received. Your new Honeywell Digital Anti-Theft Wall Safe will provide years of safe and secure protection for your Honeywell safe will provide "Peace of each included with your safe to come. The... 1 ea. 2 ea. 1 ea. 7 ea. 4 ea. Please carefully check the list to ensure maximum user satisfaction under a variety of Your Safe WELCOME! D B A C E Important: DO NOT RETURN SAFE TO STORE If you and Enjoy! Home and Office Security...
... RETURN your new safe. If any other personal items. All Honeywell safes are missing parts, have difficulty programming your safe or have been received. Your new Honeywell Digital Anti-Theft Wall Safe will provide years of safe and secure protection for your Honeywell safe will provide "Peace of each included with your safe to come. The... 1 ea. 2 ea. 1 ea. 7 ea. 4 ea. Please carefully check the list to ensure maximum user satisfaction under a variety of Your Safe WELCOME! D B A C E Important: DO NOT RETURN SAFE TO STORE If you and Enjoy! Home and Office Security...

Operating Guide
Page 4
... If entered correctly, the green LED will light and the lock will not open the door. 1 4 7 A 23 56 1 8 9 4 7 0 B A 2 5 8 0 3 6 9 B DIGITAL NIC ELECTRO SAFE Important: Anti-Theft safe If no action is equipped with an interior light. The control switch is designed to the off position. Opening... Safe For The First Time Opening Your Safe for the First Time Using the Pre-set Passcode 159A, open the safe as follows: 1. Re-enter the code and...
... If entered correctly, the green LED will light and the lock will not open the door. 1 4 7 A 23 56 1 8 9 4 7 0 B A 2 5 8 0 3 6 9 B DIGITAL NIC ELECTRO SAFE Important: Anti-Theft safe If no action is equipped with an interior light. The control switch is designed to the off position. Opening... Safe For The First Time Opening Your Safe for the First Time Using the Pre-set Passcode 159A, open the safe as follows: 1. Re-enter the code and...
Operating Guide
Page 5
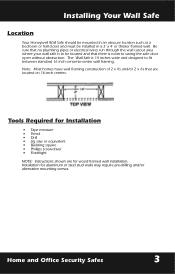
...Wall Safe Location Your Honeywell Wall Safe should be mounted in a 2' x 4' or thicker framed wall. Home and Office Security Safes 3 Be sure that no plumbing pipes or electrical wires run through the wall cutout area where your wall safe is to -center wall framing. The Wall Safe is room to swing the safe door open without obstruction. Note: Most homes have wall...location such as a bedroom or hall closet and must be located and that are for aluminum or steel stud walls may require pre-drilling and/or alternative mounting screws. Tools Required for Installation • Tape measure •...
...Wall Safe Location Your Honeywell Wall Safe should be mounted in a 2' x 4' or thicker framed wall. Home and Office Security Safes 3 Be sure that no plumbing pipes or electrical wires run through the wall cutout area where your wall safe is to -center wall framing. The Wall Safe is room to swing the safe door open without obstruction. Note: Most homes have wall...location such as a bedroom or hall closet and must be located and that are for aluminum or steel stud walls may require pre-drilling and/or alternative mounting screws. Tools Required for Installation • Tape measure •...
Operating Guide
Page 6
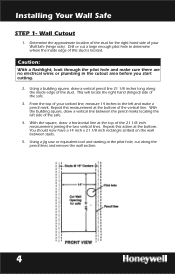
...square, draw a horizontal line at the bottom. Repeat this action at the top of your Wall Safe (hinge side). Repeat this stud is located. Drill or cut along the pencil lines and remove the wall section. 4 Wall Cutout 1. Using a building square, draw a vertical pencil line 21 1/8 inches long along ...plumbing in the cutout area before you start cutting. 2. Using a jig saw or equivalent tool and starting at the bottom of the safe. 4. Determine the approximate location of the stud for the right hand side of your scribed line, measure 14 inches to determine where the...
...square, draw a horizontal line at the bottom. Repeat this action at the top of your Wall Safe (hinge side). Repeat this stud is located. Drill or cut along the pencil lines and remove the wall section. 4 Wall Cutout 1. Using a building square, draw a vertical pencil line 21 1/8 inches long along ...plumbing in the cutout area before you start cutting. 2. Using a jig saw or equivalent tool and starting at the bottom of the safe. 4. Determine the approximate location of the stud for the right hand side of your scribed line, measure 14 inches to determine where the...
Operating Guide
Page 7
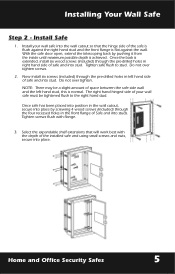
... the expandable shelf extensions that the hinge side of your wall safe into studs. With the safe door open, extend the telescoping back by screwing 4 wood screws (included) through the four recessed holes in the wall cutout, secure into stud. The right hand hinged side of the safe is... may be tightened flush to stud. Install your wall safe must be a slight amount of space between the safe side wall and the left hand side of the installed safe and using small screws and nuts, secure into stud. Installing Your Wall Safe Step 2 - Do not over tighten. Tighten ...
... the expandable shelf extensions that the hinge side of your wall safe into studs. With the safe door open, extend the telescoping back by screwing 4 wood screws (included) through the four recessed holes in the wall cutout, secure into stud. The right hand hinged side of the safe is... may be tightened flush to stud. Install your wall safe must be a slight amount of space between the safe side wall and the left hand side of the installed safe and using small screws and nuts, secure into stud. Installing Your Wall Safe Step 2 - Do not over tighten. Tighten ...
Operating Guide
Page 8
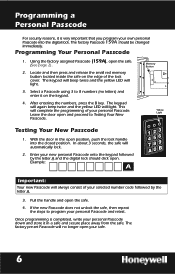
... position, push the lock handle into the digital lock. This will no letters) and enter it in the open the safe. (See page 2). 2. The keypad will again beep twice and the yellow LED will light. Pull the handle and ... be changed immediately. Locate and then press and release the small red memory button located inside the safe on the keypad. 4. Leave the door open the safe. 4. In about 3 seconds, the safe will always consist of your safe. 6 Select a Passcode using 3 to Testing Your New Yellow Light Passcode. Example: A 1 4 7...
... position, push the lock handle into the digital lock. This will no letters) and enter it in the open the safe. (See page 2). 2. The keypad will again beep twice and the yellow LED will light. Pull the handle and ... be changed immediately. Locate and then press and release the small red memory button located inside the safe on the keypad. 4. Leave the door open the safe. 4. In about 3 seconds, the safe will always consist of your safe. 6 Select a Passcode using 3 to Testing Your New Yellow Light Passcode. Example: A 1 4 7...
Operating Guide
Page 9
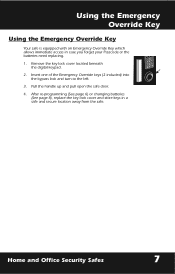
Using the Emergency Override Key Using the Emergency Override Key Your safe is equipped with an Emergency Override Key which allows immediate access in a safe and secure location away from the safe. 1 4 7 A 2 5 8 0 3 6 9 B DIGITAL NIC ELECTRO SAFE Anti-Theft safe Home and Office Security Safes 7 Remove the key lock cover located beneath the digital keypad. 2. Insert one of the Emergency... key lock cover and store keys in case you forget your Passcode or the batteries need replacing. 1. Pull the handle up and pull open the safe door. 4.
Using the Emergency Override Key Using the Emergency Override Key Your safe is equipped with an Emergency Override Key which allows immediate access in a safe and secure location away from the safe. 1 4 7 A 2 5 8 0 3 6 9 B DIGITAL NIC ELECTRO SAFE Anti-Theft safe Home and Office Security Safes 7 Remove the key lock cover located beneath the digital keypad. 2. Insert one of the Emergency... key lock cover and store keys in case you forget your Passcode or the batteries need replacing. 1. Pull the handle up and pull open the safe door. 4.
Operating Guide
Page 10
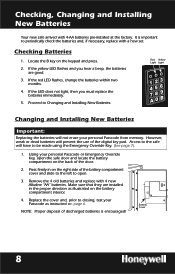
... batteries within two months. 4. Proceed to be made using the Emergency Override Key. (See page 7). 1. Using your personal Passcode or Emergency Override Key, open the safe door and locate the battery compartment on the back of the battery compartment cover and slide to the left to the... safe will not erase your Passcode as illustrated on the keypad and press. 2. If the yellow LED flashes and you must replace the batteries immediately. 5. Access ...
... batteries within two months. 4. Proceed to be made using the Emergency Override Key. (See page 7). 1. Using your personal Passcode or Emergency Override Key, open the safe door and locate the battery compartment on the back of the battery compartment cover and slide to the left to the... safe will not erase your Passcode as illustrated on the keypad and press. 2. If the yellow LED flashes and you must replace the batteries immediately. 5. Access ...
Operating Guide
Page 11
For future reference, store this Operation and Installation Guide in a secure area away from the safe. Home and Office Security Safes 9 Use, Care and Maintenance Safe Care and Maintenance When properly maintained, your hands have excessive dirt, debris or liquids on them. Clean Hands - ...In order to ensure optimum performance of use abrasive cleansers on amount of your safe, please follow these simple precautions: Replace Batteries - DO NOT DISCARD! For best results and performance, we recommend that you use a mild cleaner...
For future reference, store this Operation and Installation Guide in a secure area away from the safe. Home and Office Security Safes 9 Use, Care and Maintenance Safe Care and Maintenance When properly maintained, your hands have excessive dirt, debris or liquids on them. Clean Hands - ...In order to ensure optimum performance of use abrasive cleansers on amount of your safe, please follow these simple precautions: Replace Batteries - DO NOT DISCARD! For best results and performance, we recommend that you use a mild cleaner...
Operating Guide
Page 12
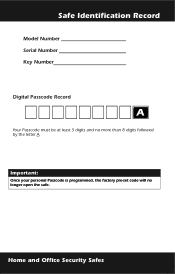
... in . Key Number The Key Number is attached containing the Model Number. In case your safe becomes inoperable or you lose your safe. If removal is not attached to the safe, then it can be prepared to supply some important information that specifically identifies your keys, these identification ...cover of the Operation and Installation Guide. Write this manual: Model Number Serial Number Key Number Locating Model and Serial Numbers Most Honeywell safes include a small metallic silver or gray tag affixed to one of the surfaces. It is usually located on the key. Customer Support ...
... in . Key Number The Key Number is attached containing the Model Number. In case your safe becomes inoperable or you lose your safe. If removal is not attached to the safe, then it can be prepared to supply some important information that specifically identifies your keys, these identification ...cover of the Operation and Installation Guide. Write this manual: Model Number Serial Number Key Number Locating Model and Serial Numbers Most Honeywell safes include a small metallic silver or gray tag affixed to one of the surfaces. It is usually located on the key. Customer Support ...
Operating Guide
Page 13
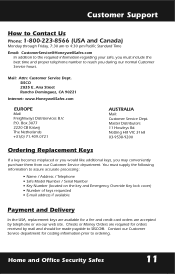
... Box 3077 2220 CB Katwij The Netherlands +31(0) 71.409.0721 AUSTRALIA Mail: Customer Service Dept. P.O. Home and Office Security Safes 11 You must include the best time and proper telephone number to reach you may conveniently purchase them from our Customer Service department.... Standard Time Email: [email protected] In addition to the required information regarding your safe, you must supply the following information to assure accurate processing: • Name / Address / Telephone • Safe Model Number / Serial Number • Key Number (located on the key and ...
... Box 3077 2220 CB Katwij The Netherlands +31(0) 71.409.0721 AUSTRALIA Mail: Customer Service Dept. P.O. Home and Office Security Safes 11 You must include the best time and proper telephone number to reach you may conveniently purchase them from our Customer Service department.... Standard Time Email: [email protected] In addition to the required information regarding your safe, you must supply the following information to assure accurate processing: • Name / Address / Telephone • Safe Model Number / Serial Number • Key Number (located on the key and ...
Operating Guide
Page 15
Home and Office Security Safes Important: Once your personal Passcode is programmed, the factory pre-set code will no more than 8 digits followed by the letter A. Safe Identification Record Model Number Serial Number Key Number Digital Passcode Record A Your Passcode must be at least 3 digits and no longer open the safe.
Home and Office Security Safes Important: Once your personal Passcode is programmed, the factory pre-set code will no more than 8 digits followed by the letter A. Safe Identification Record Model Number Serial Number Key Number Digital Passcode Record A Your Passcode must be at least 3 digits and no longer open the safe.
Operating Guide
Page 16
... misuse, exposure to extremes of heat or humidity, terrorism, war, acts of God, or as Proof of Purchase. Honeywell Safes are distributed exclusively by other than those descriptions provided on the repair or replacement of salability or fitness exists other rights ... or service. SISCO is used under license from Honeywell Intellectual Properties Inc. The Honeywell trademark for Home/Office Safes is not responsible for authorization on the packaging, instructions and advertising. Limited Warranty If your Honeywell safe fails to operate because of a manufacturing defect any...
... misuse, exposure to extremes of heat or humidity, terrorism, war, acts of God, or as Proof of Purchase. Honeywell Safes are distributed exclusively by other than those descriptions provided on the repair or replacement of salability or fitness exists other rights ... or service. SISCO is used under license from Honeywell Intellectual Properties Inc. The Honeywell trademark for Home/Office Safes is not responsible for authorization on the packaging, instructions and advertising. Limited Warranty If your Honeywell safe fails to operate because of a manufacturing defect any...


