Operating Guide
Page 1
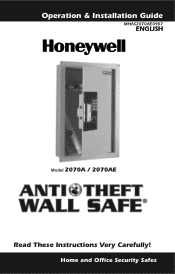
Operation & Installation Guide MHAS2070AE0907 ENGLISH Model 2070A / 2070AE Read These Instructions Very Carefully! Home and Office Security Safes
Operation & Installation Guide MHAS2070AE0907 ENGLISH Model 2070A / 2070AE Read These Instructions Very Carefully! Home and Office Security Safes
Operating Guide
Page 2
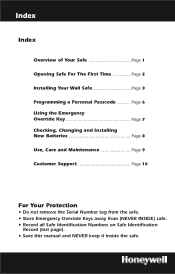
... Your Safe Page 1 Opening Safe For The First Time Page 2 Installing Your Wall Safe Page 3 Programming a Personal Passcode Page 6 Using the Emergency Override Key Page 7 Checking, Changing and Installing New Batteries Page 8 Use, Care and Maintenance Page 9 Customer Support Page 10 For Your Protection • Do not remove the Serial Number tag from the safe. • Store Emergency Override Keys away from (NEVER INSIDE) safe. • Record all Safe Identification Numbers on Safe Identification...
... Your Safe Page 1 Opening Safe For The First Time Page 2 Installing Your Wall Safe Page 3 Programming a Personal Passcode Page 6 Using the Emergency Override Key Page 7 Checking, Changing and Installing New Batteries Page 8 Use, Care and Maintenance Page 9 Customer Support Page 10 For Your Protection • Do not remove the Serial Number tag from the safe. • Store Emergency Override Keys away from (NEVER INSIDE) safe. • Record all Safe Identification Numbers on Safe Identification...
Operating Guide
Page 3
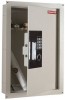
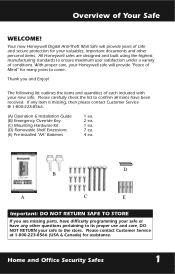
... please contact Customer Service @ 1-800-223-8566. (A) Operation & Installation Guide (B) Emergency Override Key (C) Mounting Hardware Kit (D) Removable Shelf Extensions (E) Pre-installed "AA" Batteries 1 ea. 2 ea. 1 ea. 7 ea. 4 ea. The following list outlines the items and quantities of conditions. D B A C E Important: DO NOT RETURN SAFE TO STORE If you and Enjoy! Please carefully check the list to the store. Your new Honeywell Digital Anti-Theft Wall Safe will provide...
... please contact Customer Service @ 1-800-223-8566. (A) Operation & Installation Guide (B) Emergency Override Key (C) Mounting Hardware Kit (D) Removable Shelf Extensions (E) Pre-installed "AA" Batteries 1 ea. 2 ea. 1 ea. 7 ea. 4 ea. The following list outlines the items and quantities of conditions. D B A C E Important: DO NOT RETURN SAFE TO STORE If you and Enjoy! Please carefully check the list to the store. Your new Honeywell Digital Anti-Theft Wall Safe will provide...

Operating Guide
Page 4
... batteries of power and the safe will not open when the digital key pad is en147Ate25r80ed369B • 7+ errors: 1 hour lock-out. Make sure nothing inside door panel. Opening Safe For The First Time Opening Your Safe for the First Time Using the Pre-set Passcode 159A, open the door. 1 4 7 A 23 56 1 8 9 4 7 0 B A 2 5 8 0 3 6 9 B DIGITAL NIC ELECTRO SAFE Important: Anti-Theft safe If no action is equipped with an interior light. Using the factory pre-set Factory Code. Red 3. Re-enter the code and try again. Security...
... batteries of power and the safe will not open when the digital key pad is en147Ate25r80ed369B • 7+ errors: 1 hour lock-out. Make sure nothing inside door panel. Opening Safe For The First Time Opening Your Safe for the First Time Using the Pre-set Passcode 159A, open the door. 1 4 7 A 23 56 1 8 9 4 7 0 B A 2 5 8 0 3 6 9 B DIGITAL NIC ELECTRO SAFE Important: Anti-Theft safe If no action is equipped with an interior light. Using the factory pre-set Factory Code. Red 3. Re-enter the code and try again. Security...
Operating Guide
Page 5
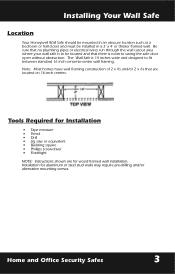
... equivalent • Building square • Phillips screwdriver • Flashlight NOTE: Instructions shown are located on 16-inch centers. Home and Office Security Safes 3 Installation for wood framed wall installation. Be sure that no plumbing pipes or electrical wires run through the wall cutout area where your wall safe is to be installed in an obscure location such as a bedroom or hall closet and...
... equivalent • Building square • Phillips screwdriver • Flashlight NOTE: Instructions shown are located on 16-inch centers. Home and Office Security Safes 3 Installation for wood framed wall installation. Be sure that no plumbing pipes or electrical wires run through the wall cutout area where your wall safe is to be installed in an obscure location such as a bedroom or hall closet and...
Operating Guide
Page 6
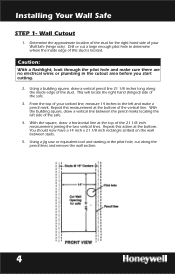
.... Using a building square, draw a vertical pencil line 21 1/8 inches long along the pencil lines and remove the wall section. 4 From the top of your Wall Safe (hinge side). Repeat this stud is located. You should now have a 14 inch x 21 1/8 inch rectangle scribed on the wall between the pencil marks locating the left and make sure there are no electrical wires...
.... Using a building square, draw a vertical pencil line 21 1/8 inches long along the pencil lines and remove the wall section. 4 From the top of your Wall Safe (hinge side). Repeat this stud is located. You should now have a 14 inch x 21 1/8 inch rectangle scribed on the wall between the pencil marks locating the left and make sure there are no electrical wires...
Operating Guide
Page 7
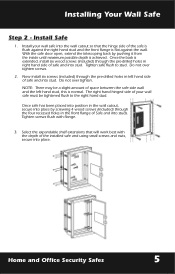
... safe door open, extend the telescoping back by screwing 4 wood screws (included) through the pre-drilled holes in the front flange of the installed safe and using small screws and nuts, secure into place. NOTE: There may be tightened flush to stud. Do not over tighten screws. 2. The right hand hinged side of safe and into studs. Installing Your Wall Safe...
... safe door open, extend the telescoping back by screwing 4 wood screws (included) through the pre-drilled holes in the front flange of the installed safe and using small screws and nuts, secure into place. NOTE: There may be tightened flush to stud. Do not over tighten screws. 2. The right hand hinged side of safe and into studs. Installing Your Wall Safe...
Operating Guide
Page 8
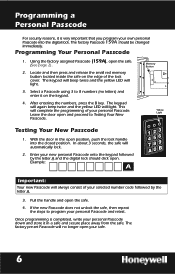
... factory pre-set Passcode will light. If the new Passcode does not unlock the safe, then repeat the steps to program your selected number code followed by the letter A and the digital lock should be changed immediately. Leave the door open your own personal Passcode into the closed position. With the door in a safe and secure place away from the safe. In about 3 seconds, the safe will light. The keypad...
... factory pre-set Passcode will light. If the new Passcode does not unlock the safe, then repeat the steps to program your selected number code followed by the letter A and the digital lock should be changed immediately. Leave the door open your own personal Passcode into the closed position. With the door in a safe and secure place away from the safe. In about 3 seconds, the safe will light. The keypad...
Operating Guide
Page 9
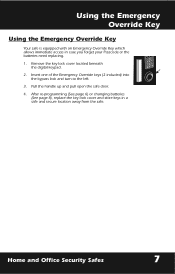
... your Passcode or the batteries need replacing. 1. Insert one of the Emergency Override keys (2 included) into the bypass lock and turn to the left. 3. Pull the handle up and pull open the safe door. 4. Using the Emergency Override Key Using the Emergency Override Key Your safe is equipped with an Emergency Override Key which allows immediate access in a safe and secure location away from the safe. 1 4 7 A 2 5 8 0 3 6 9 B DIGITAL NIC ELECTRO SAFE Anti-Theft safe Home and Office Security Safes 7
... your Passcode or the batteries need replacing. 1. Insert one of the Emergency Override keys (2 included) into the bypass lock and turn to the left. 3. Pull the handle up and pull open the safe door. 4. Using the Emergency Override Key Using the Emergency Override Key Your safe is equipped with an Emergency Override Key which allows immediate access in a safe and secure location away from the safe. 1 4 7 A 2 5 8 0 3 6 9 B DIGITAL NIC ELECTRO SAFE Anti-Theft safe Home and Office Security Safes 7
Operating Guide
Page 10
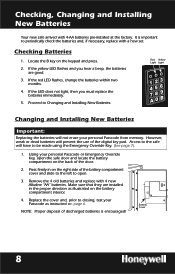
... red LED flashes, change the batteries within two months. 4. Remove the 4 old batteries and replace with 4-AA batteries pre-installed at the factory. NOTE: Proper disposal of the digital key pad. Access to the safe will have to Changing and Installing New Batteries. Replace the cover and, prior to periodically check the batteries and, if necessary, replace with a new set. Checking Batteries 1. Red Yellow Light Light 1 4 7 A 2 5 8 0 3 6 9 B Changing and Installing New Batteries Important: Replacing the batteries will prevent the use of discharged batteries is important...
... red LED flashes, change the batteries within two months. 4. Remove the 4 old batteries and replace with 4-AA batteries pre-installed at the factory. NOTE: Proper disposal of the digital key pad. Access to the safe will have to Changing and Installing New Batteries. Replace the cover and, prior to periodically check the batteries and, if necessary, replace with a new set. Checking Batteries 1. Red Yellow Light Light 1 4 7 A 2 5 8 0 3 6 9 B Changing and Installing New Batteries Important: Replacing the batteries will prevent the use of discharged batteries is important...
Operating Guide
Page 11
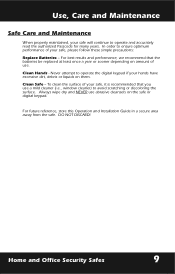
... and NEVER use . Home and Office Security Safes 9 Clean Safe - Never attempt to operate and accurately read the authorized Passcode for many years. For future reference, store this Operation and Installation Guide in a secure area away from the safe. Use, Care and Maintenance Safe Care and Maintenance When properly maintained, your safe will continue to operate the digital keypad if your safe, please follow these simple precautions: Replace Batteries - In order...
... and NEVER use . Home and Office Security Safes 9 Clean Safe - Never attempt to operate and accurately read the authorized Passcode for many years. For future reference, store this Operation and Installation Guide in a secure area away from the safe. Use, Care and Maintenance Safe Care and Maintenance When properly maintained, your safe will continue to operate the digital keypad if your safe, please follow these simple precautions: Replace Batteries - In order...
Operating Guide
Page 12
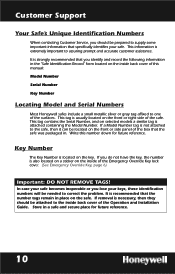
... packaged in. In case your safe becomes inoperable or you lose your safe. Customer Support Your Safe's Unique Identification Numbers When contacting Customer Service, you should be attached to the inside back cover of the Operation and Installation Guide. This information is also located on a sticker on the key. Write this manual: Model Number Serial Number Key Number Locating Model and Serial Numbers Most Honeywell safes include a small metallic silver or...
... packaged in. In case your safe becomes inoperable or you lose your safe. Customer Support Your Safe's Unique Identification Numbers When contacting Customer Service, you should be attached to the inside back cover of the Operation and Installation Guide. This information is also located on a sticker on the key. Write this manual: Model Number Serial Number Key Number Locating Model and Serial Numbers Most Honeywell safes include a small metallic silver or...
Operating Guide
Page 13
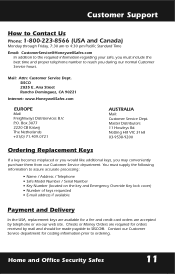
... Support How to Contact Us Phone: 1-800-223-8566 (USA and Canada) Monday through Friday, 7:30 am to 4:30 pm Pacific Standard Time Email: [email protected] In addition to the required information regarding your safe, you must supply the following information to assure accurate processing: • Name / Address / Telephone • Safe Model Number / Serial Number • Key Number (located on the key...
... Support How to Contact Us Phone: 1-800-223-8566 (USA and Canada) Monday through Friday, 7:30 am to 4:30 pm Pacific Standard Time Email: [email protected] In addition to the required information regarding your safe, you must supply the following information to assure accurate processing: • Name / Address / Telephone • Safe Model Number / Serial Number • Key Number (located on the key...
Operating Guide
Page 15
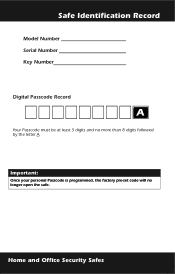
Home and Office Security Safes Important: Once your personal Passcode is programmed, the factory pre-set code will no more than 8 digits followed by the letter A. Safe Identification Record Model Number Serial Number Key Number Digital Passcode Record A Your Passcode must be at least 3 digits and no longer open the safe.
Home and Office Security Safes Important: Once your personal Passcode is programmed, the factory pre-set code will no more than 8 digits followed by the letter A. Safe Identification Record Model Number Serial Number Key Number Digital Passcode Record A Your Passcode must be at least 3 digits and no longer open the safe.
Operating Guide
Page 16
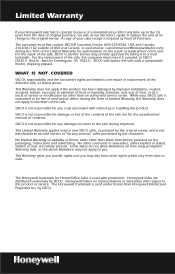
... new SISCO safes, purchased by the original owner, and is not responsible for any costs associated with removing or installing this product or service. Limited Warranty If your Honeywell safe fails to operate because of a manufacturing defect any time up to five (5) years from the date of original purchase, we will replace the safe with a comparable model, shipping prepaid. The Honeywell trademark for Home...
... new SISCO safes, purchased by the original owner, and is not responsible for any costs associated with removing or installing this product or service. Limited Warranty If your Honeywell safe fails to operate because of a manufacturing defect any time up to five (5) years from the date of original purchase, we will replace the safe with a comparable model, shipping prepaid. The Honeywell trademark for Home...


