Owners Guide
Page 1
PLASMA TELEVISION Operating Guide for P42H401, P42H401A P50H401, P50H401A, P55H401, P42H4011 P42H4011A, P50H4011, P50H4011A and P55H4011 IMPORTANT SAFETY INSTRUCTIONS ...2-3 FIRST TIME USE ...4-22 THE REMOTE CONTROL ...23-31 ON-SCREEN DISPLAY ...32-54 USEFUL INFORMATION ...55-64 OPERATING GUIDE IN SPANISH ...65-128 END USER LICENSE AGREEMENT FOR HITACHI DTV SOFTWARE 129-137 APPENDIXES ...138-139 INDEX ...140 SPANISH
PLASMA TELEVISION Operating Guide for P42H401, P42H401A P50H401, P50H401A, P55H401, P42H4011 P42H4011A, P50H4011, P50H4011A and P55H4011 IMPORTANT SAFETY INSTRUCTIONS ...2-3 FIRST TIME USE ...4-22 THE REMOTE CONTROL ...23-31 ON-SCREEN DISPLAY ...32-54 USEFUL INFORMATION ...55-64 OPERATING GUIDE IN SPANISH ...65-128 END USER LICENSE AGREEMENT FOR HITACHI DTV SOFTWARE 129-137 APPENDIXES ...138-139 INDEX ...140 SPANISH
Owners Guide
Page 3
...US) or the Electronic Product Stewardship Canada at www.epsc.ca (in accordance with remote control or power switch on unit. This product incorporates copyright protection technology that this ...programming. If still images are left on the screen for more information call your TV screen. Caution Adjust only those controls that contrast reduces to minimize image retention on ... center. Lead Notice This product contains lead. FOR MORE INFORMATION, CALL 1-800-HITACHI. 3 Never connect the plasma television to 50 Hz, direct current, or anything other than 2.5 minutes, protection...
...US) or the Electronic Product Stewardship Canada at www.epsc.ca (in accordance with remote control or power switch on unit. This product incorporates copyright protection technology that this ...programming. If still images are left on the screen for more information call your TV screen. Caution Adjust only those controls that contrast reduces to minimize image retention on ... center. Lead Notice This product contains lead. FOR MORE INFORMATION, CALL 1-800-HITACHI. 3 Never connect the plasma television to 50 Hz, direct current, or anything other than 2.5 minutes, protection...

Owners Guide
Page 4
... plasma television product is an optional accessory (Not Included). ³ Remote Control Unit CLU-4371UG2 (Part No HL02075 only H401 series) Remote Control Unit CLU-4372UG2 (Part No HL02076 only H4011 series) · Two "AA" size, 1.5V batteries . » Table Top Stand (UX27661 42"..." included) » Table Top Stand (42" included) For U.S. Replace the cover. CAUTION: Do not insert batteries with Hitachi P42H401, P42H401A, P50H401 and P50H401A models. This stand for the remote control. Please see page 7 for optional www.hitachi.us/tv accessories. models: Note: Please visit our...
... plasma television product is an optional accessory (Not Included). ³ Remote Control Unit CLU-4371UG2 (Part No HL02075 only H401 series) Remote Control Unit CLU-4372UG2 (Part No HL02076 only H4011 series) · Two "AA" size, 1.5V batteries . » Table Top Stand (UX27661 42"..." included) » Table Top Stand (42" included) For U.S. Replace the cover. CAUTION: Do not insert batteries with Hitachi P42H401, P42H401A, P50H401 and P50H401A models. This stand for the remote control. Please see page 7 for optional www.hitachi.us/tv accessories. models: Note: Please visit our...
Owners Guide
Page 11
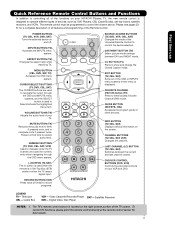
...bottom portion of the Universal Remote Control to complete mute if pressed twice. Cable Box VCR - POWER BUTTON (TV, CBL, VCR, DVD, SAT) Turns the selected device on your VCR and DVD. EXIT BUTTON (TV, CBL, SAT) Exits out of your HITACHI Plasma TV, the new remote control is located on the ...screen. DAY/NIGHT BUTTON (TV) Select picture mode settings between the current...
...bottom portion of the Universal Remote Control to complete mute if pressed twice. Cable Box VCR - POWER BUTTON (TV, CBL, VCR, DVD, SAT) Turns the selected device on your VCR and DVD. EXIT BUTTON (TV, CBL, SAT) Exits out of your HITACHI Plasma TV, the new remote control is located on the ...screen. DAY/NIGHT BUTTON (TV) Select picture mode settings between the current...
Owners Guide
Page 12
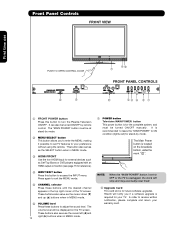
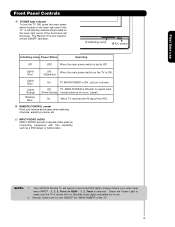
...as the cursor left (̇) and right (̈) buttons when in the top right corner of the TV screen. Hitachi will notify you to enter the MENU, making it possible to set to OFF or the TV is unplugged, the clock will be displayed on the broadside bottom, under the mark " ". Press .... NOTE: When the "MAIN POWER" button is set TV features to access the INPUT menu. In order to turn the Plasma Television ON/OFF. The "MAIN POWER" button must be at stand-by remote control. The Main Power button is located on the TV screen. Front Panel Controls FRONT VIEW First time use...
...as the cursor left (̇) and right (̈) buttons when in the top right corner of the TV screen. Hitachi will notify you to enter the MENU, making it possible to set to OFF or the TV is unplugged, the clock will be displayed on the broadside bottom, under the mark " ". Press .... NOTE: When the "MAIN POWER" button is set TV features to access the INPUT menu. In order to turn the Plasma Television ON/OFF. The "MAIN POWER" button must be at stand-by remote control. The Main Power button is located on the TV screen. Front Panel Controls FRONT VIEW First time use...
Owners Guide
Page 13
... the front bezel will appear to be turned OFF (lights orange) if there is no sync. On When TV receives the IR signal from R/C. ቫ REMOTE CONTROL sensor Point your remote at this area when selecting channels, adjusting volume, etc. ቭ INPUT-FRONT JACKS INPUT-FRONT provide composite...OFF the "MAIN POWER" of the TV. First time use . 2. Your HITACHI Plasma TV will illuminate. When the main power switch on the TV is ON. (Stand-by indicator lamp located on the lower right side of the TV. 13 The Plasma TV is set to make sure the TV is ON with this capability, such...
... the front bezel will appear to be turned OFF (lights orange) if there is no sync. On When TV receives the IR signal from R/C. ቫ REMOTE CONTROL sensor Point your remote at this area when selecting channels, adjusting volume, etc. ቭ INPUT-FRONT JACKS INPUT-FRONT provide composite...OFF the "MAIN POWER" of the TV. First time use . 2. Your HITACHI Plasma TV will illuminate. When the main power switch on the TV is ON. (Stand-by indicator lamp located on the lower right side of the TV. 13 The Plasma TV is set to make sure the TV is ON with this capability, such...
Owners Guide
Page 14
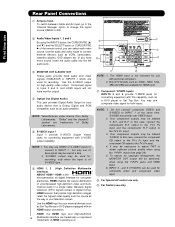
... 1. In this case, connect the component CB output to the TV's PB input and the component CR output to the TV's PR input. 3. In this case, connect the components B-Y output to the TV's PB input and the components R-Y output to the TV's PR input. 4. You may use VIDEO or S-VIDEO inputs... jack). ቤ MONITOR OUT & AUDIO OUT These jacks provide fixed audio and video signals (CABLE/AIR or INPUTS ) which are trademarks of the remote control, you have monitor output. ብ Optical Out (Digital Audio) This jack provides Digital Audio Output for recording. HDMI, the HDMI logo and ...
... 1. In this case, connect the component CB output to the TV's PB input and the component CR output to the TV's PR input. 3. In this case, connect the components B-Y output to the TV's PB input and the components R-Y output to the TV's PR input. 4. You may use VIDEO or S-VIDEO inputs... jack). ቤ MONITOR OUT & AUDIO OUT These jacks provide fixed audio and video signals (CABLE/AIR or INPUTS ) which are trademarks of the remote control, you have monitor output. ብ Optical Out (Digital Audio) This jack provides Digital Audio Output for recording. HDMI, the HDMI logo and ...
Owners Guide
Page 23
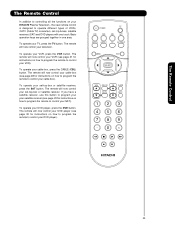
... button. To operate your TV, press the TV button. The remote will now control your television. The remote will now control your VCR (see page 29 for instructions on your HITACHI Plasma Television , the new remote control is designed to operate different types of VCRs, CATV (Cable TV) converters, set -top...-box or satellite receiver, press the SAT button. The remote will now control your set-top-box or ...
... button. To operate your TV, press the TV button. The remote will now control your television. The remote will now control your VCR (see page 29 for instructions on your HITACHI Plasma Television , the new remote control is designed to operate different types of VCRs, CATV (Cable TV) converters, set -top...-box or satellite receiver, press the SAT button. The remote will now control your set-top-box or ...
Owners Guide
Page 24
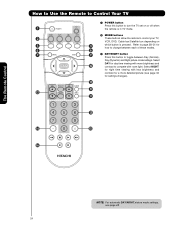
...; POWER button Press this button to control your TV, VCR, DVD, Cable box/Satellite box depending on or off when ³ the remote is pressed. Select NIGHT for night time viewing with less brightness and contrast for a more detailed picture (see page 48. 24 Refer to ...of these modes. ¶ ¾ » DAY/NIGHT button Press this button to turn the TV set on ´ ¿ » ² which button is in TV mode. · MODE buttons · These buttons allow the remote to toggle between Day (Normal), Day (Dynamic) and Night picture mode settings. Select µ DAY...
...; POWER button Press this button to control your TV, VCR, DVD, Cable box/Satellite box depending on or off when ³ the remote is pressed. Select NIGHT for night time viewing with less brightness and contrast for a more detailed picture (see page 48. 24 Refer to ...of these modes. ¶ ¾ » DAY/NIGHT button Press this button to turn the TV set on ´ ¿ » ² which button is in TV mode. · MODE buttons · These buttons allow the remote to toggle between Day (Normal), Day (Dynamic) and Night picture mode settings. Select µ DAY...
Owners Guide
Page 25
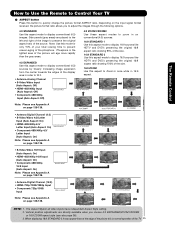
... this mode for only 15% of your total viewing time to prevent uneven aging of the phosphors. Note: Use this is normal operation of the TV 25 Phosphors in the lighted area of the picture will age more rapidly than the gray areas. 4:3 EXPANDED Use this aspect mode to display conventional... 100% of the size. 16:9 ZOOM Use this aspect mode to Zoom-in once while in all video inputs have independent Aspect Style setting. 2. The Remote Control How to Use the Remote to Control Your TV ¿ ASPECT button Press this button to preserve the original aspect ratio of the source.
... this mode for only 15% of your total viewing time to prevent uneven aging of the phosphors. Note: Use this is normal operation of the TV 25 Phosphors in the lighted area of the picture will age more rapidly than the gray areas. 4:3 EXPANDED Use this aspect mode to display conventional... 100% of the size. 16:9 ZOOM Use this aspect mode to Zoom-in once while in all video inputs have independent Aspect Style setting. 2. The Remote Control How to Use the Remote to Control Your TV ¿ ASPECT button Press this button to preserve the original aspect ratio of the source.
Owners Guide
Page 26
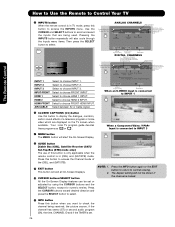
... and SELECT buttons to scroll and select the inputs that are displayed on the TV screen when available. HDMI 2 Select to choose INPUT 3. How to Use the Remote to Control Your TV The Remote Control ´ INPUTS button When the remote control is set or adjusted by using the CURSOR buttons and the SELECT button...
... and SELECT buttons to scroll and select the inputs that are displayed on the TV screen when available. HDMI 2 Select to choose INPUT 3. How to Use the Remote to Control Your TV The Remote Control ´ INPUTS button When the remote control is set or adjusted by using the CURSOR buttons and the SELECT button...

Owners Guide
Page 27
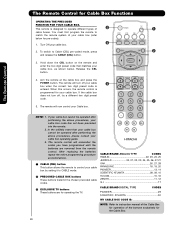
...press the MUTE button one , two, or three numbers to select channels. You can also delete a channel from WHITE to highlighted GREEN. Cable 6 The Remote Control MUTE Volume 8 FAV CH FAV Cable 6 MUTE Soft Mute 8 FAV CH Cable 6 Mute 8 Closed Captioning will know you wish to tune then ...have subchannel numbers indicated by pressing and holding down the FAV CH button until you obtain the desired sound level. How to Use the Remote to Control Your TV ¹ VOLUME (VOL), MUTE button Press the VOLUME button (̆ or ̄) until the displayed channel turns highlighted GREEN to...
...press the MUTE button one , two, or three numbers to select channels. You can also delete a channel from WHITE to highlighted GREEN. Cable 6 The Remote Control MUTE Volume 8 FAV CH FAV Cable 6 MUTE Soft Mute 8 FAV CH Cable 6 Mute 8 Closed Captioning will know you wish to tune then ...have subchannel numbers indicated by pressing and holding down the FAV CH button until you obtain the desired sound level. How to Use the Remote to Control Your TV ¹ VOLUME (VOL), MUTE button Press the VOLUME button (̆ or ̄) until the displayed channel turns highlighted GREEN to...
Owners Guide
Page 28
... CABLE mode. · PRECODED CABLE BOX buttons These buttons transmit the chosen precoded cable codes. » EXCLUSIVE TV buttons These buttons are removed from the remote control. CABLE BRAND ANALOG TYPE CODES HAMLIN 22, 23, 24, 25 JERROLD 00, 01, 02, 03, 04, 05, 06, 07,21... NOTE: 1. When this occurs, the remote control is programmed for Cable Box Functions OPERATING THE PRECODED FUNCTION FOR YOUR CABLE BOX. To switch to instruction manual of the Cable Box for operating the TV. If your cable box cannot be operated after performing the above procedures, your cable...
... CABLE mode. · PRECODED CABLE BOX buttons These buttons transmit the chosen precoded cable codes. » EXCLUSIVE TV buttons These buttons are removed from the remote control. CABLE BRAND ANALOG TYPE CODES HAMLIN 22, 23, 24, 25 JERROLD 00, 01, 02, 03, 04, 05, 06, 07,21... NOTE: 1. When this occurs, the remote control is programmed for Cable Box Functions OPERATING THE PRECODED FUNCTION FOR YOUR CABLE BOX. To switch to instruction manual of the Cable Box for operating the TV. If your cable box cannot be operated after performing the above procedures, your cable...
Owners Guide
Page 29
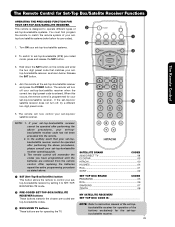
...THE PRECODED FUNCTION FOR YOUR SET-TOP-BOX/SATELLITE RECEIVER. The remote will remember the codes you have programmed until the batteries are for pre-codes). » 1. SATELLITE BRAND CODES 2006 DIRECT TV 09 ECOSTAR 03 HITACHI 00 HUGHES 04 RCA 01 SONY 02 SET TOP BOX BRAND...-TOP-BOX/SATELLITE RECEIVER buttons These buttons transmit the chosen pre-coded settop-box/satellite codes. » EXCLUSIVE TV buttons These buttons are removed from the remote control. The remote control will now control your set -top-box/satellite (STB) pre-coded mode, press and release the SAT...
...THE PRECODED FUNCTION FOR YOUR SET-TOP-BOX/SATELLITE RECEIVER. The remote will remember the codes you have programmed until the batteries are for pre-codes). » 1. SATELLITE BRAND CODES 2006 DIRECT TV 09 ECOSTAR 03 HITACHI 00 HUGHES 04 RCA 01 SONY 02 SET TOP BOX BRAND...-TOP-BOX/SATELLITE RECEIVER buttons These buttons transmit the chosen pre-coded settop-box/satellite codes. » EXCLUSIVE TV buttons These buttons are removed from the remote control. The remote control will now control your set -top-box/satellite (STB) pre-coded mode, press and release the SAT...
Owners Guide
Page 30
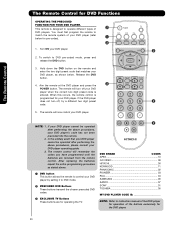
... buttons transmit the chosen precoded DVD codes. » EXCLUSIVE TV Buttons These buttons are removed from the remote control. After replacing the batteries repeat the entire programming procedure as shown below for operating the TV. · DVD BRAND CODES APEX 10 GO VIDEO 09 HITACHI 00 KENWOOD 11 PANASONIC 02 PIONEER 03 RCA 04...
... buttons transmit the chosen precoded DVD codes. » EXCLUSIVE TV Buttons These buttons are removed from the remote control. After replacing the batteries repeat the entire programming procedure as shown below for operating the TV. · DVD BRAND CODES APEX 10 GO VIDEO 09 HITACHI 00 KENWOOD 11 PANASONIC 02 PIONEER 03 RCA 04...
Owners Guide
Page 31
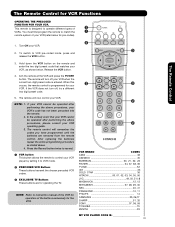
... turn off , try a different two digit preset code. 5. The Remote Control for the VCR. · · VCR BRAND CODES AIWA 48 DAEWOO 45 EMERSON 20, 21, 22, 23 FISHER 34, 37, 38, 39 FUNAI 52 G E 33 GOLD STAR 36 HITACHI 00, 01, 02, 03, 04, 05, 06 JVC 49, ...the VCR and press the POWER button. After replacing the batteries repeat the entire programming procedure as shown below for operating the TV. NOTE: Refer to match the · ³ remote system of your VCR (refer below . In the unlikely event that matches your VCR, as stated above procedures, please ...
... turn off , try a different two digit preset code. 5. The Remote Control for the VCR. · · VCR BRAND CODES AIWA 48 DAEWOO 45 EMERSON 20, 21, 22, 23 FISHER 34, 37, 38, 39 FUNAI 52 G E 33 GOLD STAR 36 HITACHI 00, 01, 02, 03, 04, 05, 06 JVC 49, ...the VCR and press the POWER button. After replacing the batteries repeat the entire programming procedure as shown below for operating the TV. NOTE: Refer to match the · ³ remote system of your VCR (refer below . In the unlikely event that matches your VCR, as stated above procedures, please ...
Owners Guide
Page 32
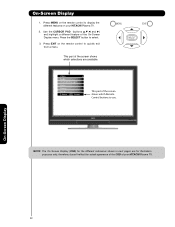
Press EXIT on the remote control to select. 3. Press the SELECT button to quickly exit from a menu. Video Audio Channel Manager Locks Timers Setup Move SEL Select This part of your HITACHI Plasma TV. 2. doesn't reflect the actual apearance of the OSD of the screen shows which selections... the CURSOR PAD (buttons ̆,̄,̇ and ̈) and highlight a different feature of the screen shows which Remote Control buttons to display the different features on the remote control to use. This part of the On-Screen Display menu. Press MENU on your HITACHI Plasma TV.
Press EXIT on the remote control to select. 3. Press the SELECT button to quickly exit from a menu. Video Audio Channel Manager Locks Timers Setup Move SEL Select This part of your HITACHI Plasma TV. 2. doesn't reflect the actual apearance of the OSD of the screen shows which selections... the CURSOR PAD (buttons ̆,̄,̇ and ̈) and highlight a different feature of the screen shows which Remote Control buttons to display the different features on the remote control to use. This part of the On-Screen Display menu. Press MENU on your HITACHI Plasma TV.
Owners Guide
Page 52
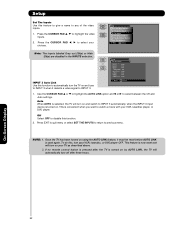
...menu. Off Select OFF to disable this , turn your VCR, laserdisc player, or DVD player. To do this function. 2. If no remote control button is pressed after the TV is turned on and switch to highlight the video inputs. 2. NOTE: 1. This feature is now reset and will automatically turn off after... three hours. Setup Set The Inputs Use this function to automatically turn the TV on and tune to INPUT 3 when it must be reset before AUTO LINK is used again. Setup Setup The Menu Options Set The Screen Saver...
...menu. Off Select OFF to disable this , turn your VCR, laserdisc player, or DVD player. To do this function. 2. If no remote control button is pressed after the TV is turned on and switch to highlight the video inputs. 2. NOTE: 1. This feature is now reset and will automatically turn off after... three hours. Setup Set The Inputs Use this function to automatically turn the TV on and tune to INPUT 3 when it must be reset before AUTO LINK is used again. Setup Setup The Menu Options Set The Screen Saver...
Owners Guide
Page 55
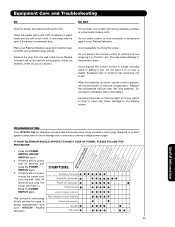
... wait 30 seconds and press the POWER SWITCH again. 3. Remove the plug from your Plasma Television will become erratic or become unresponsive. When the batteries run down, remote control operation will not be used for instance, when you go on your screen with ...strong cleaners, polishes or a chemically treated cloth. Useful Information TROUBLESHOOTING Your HITACHI Plasma Television incorporates advanced power surge protection technology ...
... wait 30 seconds and press the POWER SWITCH again. 3. Remove the plug from your Plasma Television will become erratic or become unresponsive. When the batteries run down, remote control operation will not be used for instance, when you go on your screen with ...strong cleaners, polishes or a chemically treated cloth. Useful Information TROUBLESHOOTING Your HITACHI Plasma Television incorporates advanced power surge protection technology ...
Owners Guide
Page 59
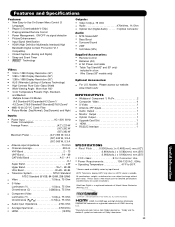
... -Use On-Screen Menu Control (3 Language) • Region 5 (Downloadable V-Chip) • Preprogrammed Remote Control • Power Management: ON/OFF via signal detection • Picture Enhancement • Input Signal ...42") 356 W, 3.0 A (50") 460 W, 3.9 A (55") 560 W, 5.3 A • Antenna input impedance 75 Ohm • Channel coverage 203 ch. Useful Information 59 HDMI, the HDMI logo and High-Definition Multimedia Interface are trademarks of Hitachi Home Electronics (America), Inc. UltraVision Digital is available. Models: Please access our website: www.hitachi.us /tv...
... -Use On-Screen Menu Control (3 Language) • Region 5 (Downloadable V-Chip) • Preprogrammed Remote Control • Power Management: ON/OFF via signal detection • Picture Enhancement • Input Signal ...42") 356 W, 3.0 A (50") 460 W, 3.9 A (55") 560 W, 5.3 A • Antenna input impedance 75 Ohm • Channel coverage 203 ch. Useful Information 59 HDMI, the HDMI logo and High-Definition Multimedia Interface are trademarks of Hitachi Home Electronics (America), Inc. UltraVision Digital is available. Models: Please access our website: www.hitachi.us /tv...


