Owners Guide
Page 3
...must accept any interference received, including interference that may cause undesired operation. This LCD Television receiver will not occur in accordance with paragraph 15.119 and 15.122... Television Apparatus- Public viewing of copyrighted material Public viewing of programs broadcast by Hitachi Home Electronics (America), Inc, may void the user's authority to operate the...HDMI, the HDMI logo and High-Definition Multimedia Interface are not expressly approved by TV stations and cable companies, as well as replacement cables. Important Safety Instructions Warning ...
...must accept any interference received, including interference that may cause undesired operation. This LCD Television receiver will not occur in accordance with paragraph 15.119 and 15.122... Television Apparatus- Public viewing of copyrighted material Public viewing of programs broadcast by Hitachi Home Electronics (America), Inc, may void the user's authority to operate the...HDMI, the HDMI logo and High-Definition Multimedia Interface are not expressly approved by TV stations and cable companies, as well as replacement cables. Important Safety Instructions Warning ...
Owners Guide
Page 6
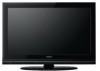
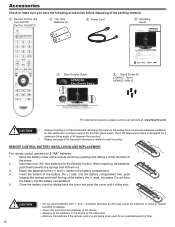
... related to be used and new batteries in the device. • Replace all the batteries in the device at : www.hitachi.us /tv 1-800-Hitachi (1-800-448-2244) OPERATING GUIDE GUIA DE OPERACION IMPORTANTE: APAGAR EL TELEVISOR Y LOS EQUIPOS EXTERNOS ANTES DE CONECTAR O DESCONECTAR LOS...Do not insert batteries with '+' and '-' polarities reversed as this Operating Guide and please visit www.dtvtransition.org Alpha Series LCD Flat Panel HDTV Operating Guide for L42A403 & L32A403 IMPORTANT SAFETY INSTRUCTIONS 2-5 FIRST TIME U SE ...6-17 THE REMOTE CONTROL 18-21 ON-SCREEN D ISPLAY 22-34 USEFUL...
... related to be used and new batteries in the device. • Replace all the batteries in the device at : www.hitachi.us /tv 1-800-Hitachi (1-800-448-2244) OPERATING GUIDE GUIA DE OPERACION IMPORTANTE: APAGAR EL TELEVISOR Y LOS EQUIPOS EXTERNOS ANTES DE CONECTAR O DESCONECTAR LOS...Do not insert batteries with '+' and '-' polarities reversed as this Operating Guide and please visit www.dtvtransition.org Alpha Series LCD Flat Panel HDTV Operating Guide for L42A403 & L32A403 IMPORTANT SAFETY INSTRUCTIONS 2-5 FIRST TIME U SE ...6-17 THE REMOTE CONTROL 18-21 ON-SCREEN D ISPLAY 22-34 USEFUL...
Owners Guide
Page 7
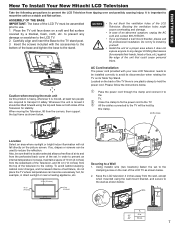
... to any damage or scratches to the LCD TV. 2. e All the cables connected to the TV will not fall directly on a stable and flat surface. FIRST TIME USE How To Install Your New Hitachi LCD Television Take the following precautions to prevent the LCD Television from the corners, then support the... top frame as shown below. Carefully align and insert the Base to the TV. Insert the screws included with your new LCD Television needs to be assembled...
... to any damage or scratches to the LCD TV. 2. e All the cables connected to the TV will not fall directly on a stable and flat surface. FIRST TIME USE How To Install Your New Hitachi LCD Television Take the following precautions to prevent the LCD Television from the corners, then support the... top frame as shown below. Carefully align and insert the Base to the TV. Insert the screws included with your new LCD Television needs to be assembled...
Owners Guide
Page 8
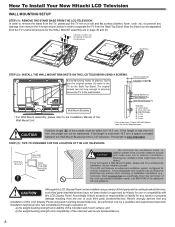
... for the WALL MOUNT assembly are not long enough to properly secure the TV to the wall bracket. Although this LCD Display Panel. C: 1 mm. Keep more than 8.5 mm, the weight can not be maintained. Hitachi strongly advises that you purchased a Wall Mount bracket, please ask for additional... Installation Manual of the Wall Mount Unit. How To Install Your New Hitachi LCD Television WALL MOUNTING SETUP STEP (1) : REMOVE THE STAND BASE FROM THE LCD TELEVISION In order to remove the stand from the TV, please put the TV set on a soft and flat surface (blanket, foam, cloth, etc...
... for the WALL MOUNT assembly are not long enough to properly secure the TV to the wall bracket. Although this LCD Display Panel. C: 1 mm. Keep more than 8.5 mm, the weight can not be maintained. Hitachi strongly advises that you purchased a Wall Mount bracket, please ask for additional... Installation Manual of the Wall Mount Unit. How To Install Your New Hitachi LCD Television WALL MOUNTING SETUP STEP (1) : REMOVE THE STAND BASE FROM THE LCD TELEVISION In order to remove the stand from the TV, please put the TV set on a soft and flat surface (blanket, foam, cloth, etc...
Owners Guide
Page 9
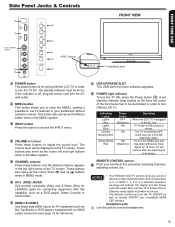
... Red Slowly Blinks Red Power Status OFF (Stand-by) ON ON ON (Stand-by mode (lights red) when not in Stand-by ) Operating When the LCD TV is turned off , plug the power cord into the AC wall outlet. It will resume after the input signal is in the MENU system. This... the Power button ( ). TV will soon be displayed on the lower left and right buttons when in the Off (Stand-by indicator lamp located on the TV screen. FIRST TIME USE Side Panel Jacks & Controls i u Only L42A403 Model. USB UPGRADE SLOT This USB slot is ON; NOTES • Your HITACHI LCD TV will be in...
... Red Slowly Blinks Red Power Status OFF (Stand-by) ON ON ON (Stand-by mode (lights red) when not in Stand-by ) Operating When the LCD TV is turned off , plug the power cord into the AC wall outlet. It will resume after the input signal is in the MENU system. This... the Power button ( ). TV will soon be displayed on the lower left and right buttons when in the Off (Stand-by indicator lamp located on the TV screen. FIRST TIME USE Side Panel Jacks & Controls i u Only L42A403 Model. USB UPGRADE SLOT This USB slot is ON; NOTES • Your HITACHI LCD TV will be in...
Owners Guide
Page 10
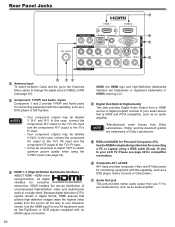
...Laboratories. Composite AV1 JACKS AV1 input provides composite Video and S-Video jacks for your LCD TV. In this case, connect the components B-Y output to the TV's Pb input and the components R-Y output to the TV's Pr input. • Your component outputs may be labeled Y-CbCr. Use ...trademarks or registered trademarks of HDMI Licensing LLC. HDMI 1, 2 (High Definition Multimedia Interface) ABOUT HDMI - NOTE *Manufactured under license from your TV to your television screen. Please see page 33). Rear Panel Jacks RGB RGB 6 7 Antenna Input To switch between Cable and Air, go...
...Laboratories. Composite AV1 JACKS AV1 input provides composite Video and S-Video jacks for your LCD TV. In this case, connect the components B-Y output to the TV's Pb input and the components R-Y output to the TV's Pr input. • Your component outputs may be labeled Y-CbCr. Use ...trademarks or registered trademarks of HDMI Licensing LLC. HDMI 1, 2 (High Definition Multimedia Interface) ABOUT HDMI - NOTE *Manufactured under license from your TV to your television screen. Please see page 33). Rear Panel Jacks RGB RGB 6 7 Antenna Input To switch between Cable and Air, go...
Owners Guide
Page 11
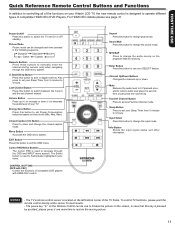
...INPUT menu system, The Select button is designed to operate different types of compatible HDMI CEC DVD Players, For HDMI CEC details please see page 31. Cursor PAD/Select Buttons The Cursor PAD is used to navigate through the OSD menu system. (-) Dash/Sleep Button Press this button to ... Buttons and Functions In addition to controlling all of the functions on the left bottom corner of the TV frame. Volume Button Press up or down (-) to decrease the audio level of your Hitachi LCD TV, the new remote control is used to Set/Activate highlighted menu items. CONTROL BUTTONS (DVD with CEC...
...INPUT menu system, The Select button is designed to operate different types of compatible HDMI CEC DVD Players, For HDMI CEC details please see page 31. Cursor PAD/Select Buttons The Cursor PAD is used to navigate through the OSD menu system. (-) Dash/Sleep Button Press this button to ... Buttons and Functions In addition to controlling all of the functions on the left bottom corner of the TV frame. Volume Button Press up or down (-) to decrease the audio level of your Hitachi LCD TV, the new remote control is used to Set/Activate highlighted menu items. CONTROL BUTTONS (DVD with CEC...
Owners Guide
Page 12
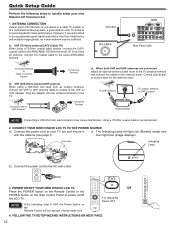
...will light red (Standby mode) and with the cable tie (see page 7) . CONNECT YOUR NEW HITACHI LCD TV TO THE POWER SOURCE a). Press the POWER button on the Remote Control or the POWER button on the TV. When both VHF and UHF antennas are located in an exceptionally good signal area that is...the antenna mixer. The Indicating Lamp will not operate. then light blue (image displays). POWER ON/OFF YOUR NEW HITACHI LCD TV. Or if you are connected Attach an optional antenna cable mixer to the TV antenna terminal and connect the cables to the antenna mixer. Connect the power cord to your new...
...will light red (Standby mode) and with the cable tie (see page 7) . CONNECT YOUR NEW HITACHI LCD TV TO THE POWER SOURCE a). Press the POWER button on the Remote Control or the POWER button on the TV. When both VHF and UHF antennas are located in an exceptionally good signal area that is...the antenna mixer. The Indicating Lamp will not operate. then light blue (image displays). POWER ON/OFF YOUR NEW HITACHI LCD TV. Or if you are connected Attach an optional antenna cable mixer to the TV antenna terminal and connect the cables to the antenna mixer. Connect the power cord to your new...
Owners Guide
Page 13
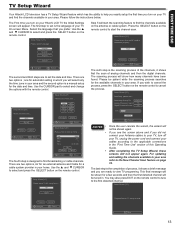
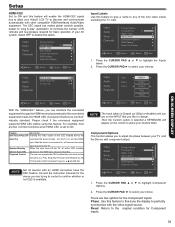
...antenna or cable system. Press the SELECT button on the remote control to start the scanning feature to find the channels available on your Hitachi LCD TV the Initial Settings screen will select only the time zone in . Setup Wizard (5/7) Please check that you turn on page 33. Setup...Please select Time Zone ... Please follow the instructions below. FIRST TIME USE TV Setup Wizard Your Hitachi LCD television has a TV Setup Wizard feature which you did not connect your Antenna cables to your TV, turn off your TV, unplug the power cord and connect your cables according to the applicable ...
...antenna or cable system. Press the SELECT button on the remote control to start the scanning feature to find the channels available on your Hitachi LCD TV the Initial Settings screen will select only the time zone in . Setup Wizard (5/7) Please check that you turn on page 33. Setup...Please select Time Zone ... Please follow the instructions below. FIRST TIME USE TV Setup Wizard Your Hitachi LCD television has a TV Setup Wizard feature which you did not connect your Antenna cables to your TV, turn off your TV, unplug the power cord and connect your cables according to the applicable ...
Owners Guide
Page 14
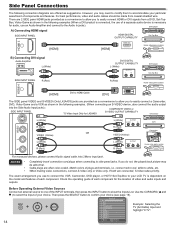
... HDTV Set-Top-Box to one of plugs and terminals, i.e. Before Operating External Video Sources Connect an external source to your LCD TV is necessary for audio, use of a separate audio device is dependent on the model and features of each component for L42A403...; Completely insert connection cord plugs when connecting to accommodate your particular assortment of your choice (see page 19). + + 14 Input List 0. TV 0. Component1 4. HDMI 2 8. Side Panel Connections The following connection diagrams are offered as shown in the following examples (When a DVI product is...
... HDTV Set-Top-Box to one of plugs and terminals, i.e. Before Operating External Video Sources Connect an external source to your LCD TV is necessary for audio, use of a separate audio device is dependent on the model and features of each component for L42A403...; Completely insert connection cord plugs when connecting to accommodate your particular assortment of your choice (see page 19). + + 14 Input List 0. TV 0. Component1 4. HDMI 2 8. Side Panel Connections The following connection diagrams are offered as shown in the following examples (When a DVI product is...
Owners Guide
Page 17
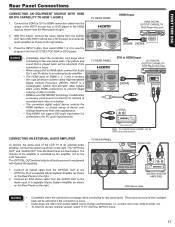
...de Dolby Laboratories. "Dolby" and an external audio amplifier as shown on the Rear Panel on the right. the double-D symbol are trademarks of the LCD TV to view the program from Dolby Laboratories. when using a DVI to HDMI cable, connect the Audio Out L and R cables to an external audio ... be abnormal if the connection is connected to the OPTICAL IN of SRS Labs, Inc. • HDMI is controlled by the amplifier, not by the LCD Television. Le terme « Dolby » et le sigle double D sont des marques commerciales de Dolby Laboratories. The "OPTICAL OUT" and "AUDIO ...
...de Dolby Laboratories. "Dolby" and an external audio amplifier as shown on the Rear Panel on the right. the double-D symbol are trademarks of the LCD TV to view the program from Dolby Laboratories. when using a DVI to HDMI cable, connect the Audio Out L and R cables to an external audio ... be abnormal if the connection is connected to the OPTICAL IN of SRS Labs, Inc. • HDMI is controlled by the amplifier, not by the LCD Television. Le terme « Dolby » et le sigle double D sont des marques commerciales de Dolby Laboratories. The "OPTICAL OUT" and "AUDIO ...
Owners Guide
Page 22
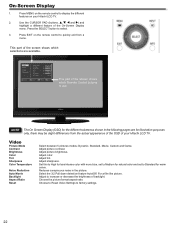
...increase or decrease the brightness of the screen shows which Remote Control buttons to display the different features on your Hitachi LCD TV. Video Picture Mode Contrast Brightness Color Tint Sharpness Color Temperature Noise Reduction Auto Movie Backlight Aspect Ratio Reset Select between... from a menu. Adjust color. Use the CURSOR PAD (buttons, , , and ) and highlight a different feature of your Hitachi LCD TV. 2. Reduces conspicuous noise in the following pages are available. Video Audio Setup Channels Picture Mode Contrast Brightness Color Tint Sharpness Color ...
...increase or decrease the brightness of the screen shows which Remote Control buttons to display the different features on your Hitachi LCD TV. Video Picture Mode Contrast Brightness Color Tint Sharpness Color Temperature Noise Reduction Auto Movie Backlight Aspect Ratio Reset Select between... from a menu. Adjust color. Use the CURSOR PAD (buttons, , , and ) and highlight a different feature of your Hitachi LCD TV. 2. Reduces conspicuous noise in the following pages are available. Video Audio Setup Channels Picture Mode Contrast Brightness Color Tint Sharpness Color ...
Owners Guide
Page 24
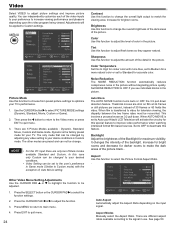
... 65 0 60 High Move SEL Select Return EXIT Exit Picture Mode Use this function to choose from preset picture settings to optimize your Hitachi LCD Television will be reconciled. Press the SELECT button or the CURSOR PAD to adjust picture settings and improve picture quality. Press EXIT to ...or set to Standard for brighter rooms. Brightness Use this function to the user's preference in the picture. Set NOISE REDUCTION to your TV. Theatrical movies are only two Picture modes available Standard and Custom. It changes the intensity of the video inputs to OFF if you see...
... 65 0 60 High Move SEL Select Return EXIT Exit Picture Mode Use this function to choose from preset picture settings to optimize your Hitachi LCD Television will be reconciled. Press the SELECT button or the CURSOR PAD to adjust picture settings and improve picture quality. Press EXIT to ...or set to Standard for brighter rooms. Brightness Use this function to the user's preference in the picture. Set NOISE REDUCTION to your TV. Theatrical movies are only two Picture modes available Standard and Custom. It changes the intensity of the video inputs to OFF if you see...

Owners Guide
Page 26
...by simulating two or more speakers to select Yes or No. 3. Press the SELECT button or the CURSOR PAD to the rear of the LCD TV internal speakers and headphone jack. Digital Output This function allows you to right balance of the listener. Select this feature to allow you to.../ receiver with only two speaker, eliminating the need for analog programing. it to 6 language options (if available). Select this feature if the TV is only for multiple external speakers. Use CURSOR to the audio receiver. If RESET is often done to execute the reset of the present input...
...by simulating two or more speakers to select Yes or No. 3. Press the SELECT button or the CURSOR PAD to the rear of the LCD TV internal speakers and headphone jack. Digital Output This function allows you to right balance of the listener. Select this feature to allow you to.../ receiver with only two speaker, eliminating the need for analog programing. it to 6 language options (if available). Select this feature if the TV is only for multiple external speakers. Use CURSOR to the audio receiver. If RESET is often done to execute the reset of the present input...
Owners Guide
Page 27
...cord is unplugged quickly, the clock is stopped momentarily and the TIME indication will automatically calculate the clock adjustment for Daylight Saving. • The TV counts electrical pulses for the on the Side Panel, except the Power button will be inappropriate due to its content (see page 28). To ...code number back to the factory preset (0000). 2. US This option will block TV and Movie Ratings in the USA to prevent viewing of any content that you forget your LCD TV. Canada This option will block TV and Movie Ratings in Canada to prevent viewing of any one of the Menu OSD...
...cord is unplugged quickly, the clock is stopped momentarily and the TIME indication will automatically calculate the clock adjustment for Daylight Saving. • The TV counts electrical pulses for the on the Side Panel, except the Power button will be inappropriate due to its content (see page 28). To ...code number back to the factory preset (0000). 2. US This option will block TV and Movie Ratings in the USA to prevent viewing of any content that you forget your LCD TV. Canada This option will block TV and Movie Ratings in Canada to prevent viewing of any one of the Menu OSD...
Owners Guide
Page 30
.... 2. Video Audio Setup Channels Energy Options Transparency 0 HDMI - NOTES • The Digital Closed Captions feature only works when using the "TV" tuner of this feature to your choice. Closed Captions: ON/OFF will turn the display on or off On Setup Channels Move SEL Select... . Energy Options Use this television. • Caption Display will not be available with every program. Adjust to save energy when watching your Hitachi LCD TV. Press the CURSOR PAD ▲ or ▼ to highlight Energy Options. 2. Press EXIT to quit menu or select CLOSED CAPTIONS to...
.... 2. Video Audio Setup Channels Energy Options Transparency 0 HDMI - NOTES • The Digital Closed Captions feature only works when using the "TV" tuner of this feature to your choice. Closed Captions: ON/OFF will turn the display on or off On Setup Channels Move SEL Select... . Energy Options Use this television. • Caption Display will not be available with every program. Adjust to save energy when watching your Hitachi LCD TV. Press the CURSOR PAD ▲ or ▼ to highlight Energy Options. 2. Press EXIT to quit menu or select CLOSED CAPTIONS to...
Owners Guide
Page 31
... all active CEC enabled (Device Auto Off) Playback Control devices on "plug & play , turn the TV on the screen to highlight Component Options. 2. There are two options for Component inputs. 31 Reset: Return to select your Hitachi LCD TV to discover and communicate automatically with the video signal source. The CEC signal bus makes global...
... all active CEC enabled (Device Auto Off) Playback Control devices on "plug & play , turn the TV on the screen to highlight Component Options. 2. There are two options for Component inputs. 31 Reset: Return to select your Hitachi LCD TV to discover and communicate automatically with the video signal source. The CEC signal bus makes global...

Owners Guide
Page 32
..., and Phase automatically. Reset Each item in RGB Options Menu will return to select your LCD Television. Reset AV & Setup This feature restores all Audio, Video and Setup configuration that you have made on the TV and it will be restored to match your PC or laptop output with your choices. V-Position...
..., and Phase automatically. Reset Each item in RGB Options Menu will return to select your LCD Television. Reset AV & Setup This feature restores all Audio, Video and Setup configuration that you have made on the TV and it will be restored to match your PC or laptop output with your choices. V-Position...
Owners Guide
Page 35
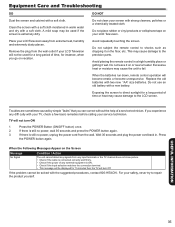
...if the screen is connected correctly and firmly. • Check if the power of any diffi culty with your TV, check a few basic remedies before calling your LCD Television. If there is still no power, unplug the power cord from the wall outlet if your screen with ...batteries. Replace the old batteries with the suggested procedures, contact 800-HITACHI. Avoid repeatedly touching the screen. Do not subject the remote control to the LCD screen. For your LCD Television away from any input terminals or the TV channel does not show picture. • Check if the cable is...
...if the screen is connected correctly and firmly. • Check if the power of any diffi culty with your TV, check a few basic remedies before calling your LCD Television. If there is still no power, unplug the power cord from the wall outlet if your screen with ...batteries. Replace the old batteries with the suggested procedures, contact 800-HITACHI. Avoid repeatedly touching the screen. Do not subject the remote control to the LCD screen. For your LCD Television away from any input terminals or the TV channel does not show picture. • Check if the cable is...


