
User Manual
Page 2
..., Contrast, Gamma, Color temp, Color, Tint, Sharpness, Progressive, My memory Preparations 3 IMAGE Menu 28 Part names 4 Aspect, Over scan, V. phase, H. Projector 4 position, H. size, Auto adjust Controls 5 INPUT Menu 30 Remote control 5 Color space, Component, Video format, Setting up 6 Frame lock, Information Arrangement 7 SETUP Menu 32 Adjusting the projector's elevator . . 8 Keystone, Whisper, Mirror, Volume About the filter cover for bottom-up use . . 9 Connecting your devices 10 Connecting power supply 13 SCREEN Menu 33 Language, Menu position, OSD bright...
..., Contrast, Gamma, Color temp, Color, Tint, Sharpness, Progressive, My memory Preparations 3 IMAGE Menu 28 Part names 4 Aspect, Over scan, V. phase, H. Projector 4 position, H. size, Auto adjust Controls 5 INPUT Menu 30 Remote control 5 Color space, Component, Video format, Setting up 6 Frame lock, Information Arrangement 7 SETUP Menu 32 Adjusting the projector's elevator . . 8 Keystone, Whisper, Mirror, Volume About the filter cover for bottom-up use . . 9 Connecting your devices 10 Connecting power supply 13 SCREEN Menu 33 Language, Menu position, OSD bright...
User Manual
Page 3
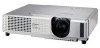
... Connectivity This projector has a variety of the "User's manual - The image can be still kept as NTSC / PAL / SECAM video signals onto a screen. It can be easily connected to many features, this projector is extremely compact and slim, which gives you more options to project various computer signals as well as bright and clean enough for installation and gets a large image from short distance. High Brightness...
... Connectivity This projector has a variety of the "User's manual - The image can be still kept as NTSC / PAL / SECAM video signals onto a screen. It can be easily connected to many features, this projector is extremely compact and slim, which gives you more options to project various computer signals as well as bright and clean enough for installation and gets a large image from short distance. High Brightness...

User Manual
Page 9
... the arrow to the projector.Before handling, make sure the power switch is off and the power cord is facing up use 1. While the projector is in the following procedure. Replace the filter cover for bottom-up , hold the projector. 2. Filter cover's knob Filter cover's knob To remove To set Filter cover Filter cover for bottom-up . 9 While the projector connects with a power supply, or the projector is placed lens-side up use and snap it...
... the arrow to the projector.Before handling, make sure the power switch is off and the power cord is facing up use 1. While the projector is in the following procedure. Replace the filter cover for bottom-up , hold the projector. 2. Filter cover's knob Filter cover's knob To remove To set Filter cover Filter cover for bottom-up . 9 While the projector connects with a power supply, or the projector is placed lens-side up use and snap it...
User Manual
Page 10
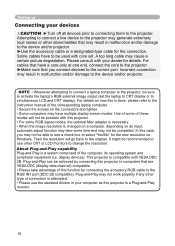
... composed of this projector. • For some RGB signal modes, the optional Mac adapter is necessary. • When the image resolution is compatible with core set the laptop to CRT display or to the device and/or projector. About Plug-and-Play capability Plug-and-Play is done, please refer to the instruction manual of connection is attempted. • Please use other abnormalities that you...
... composed of this projector. • For some RGB signal modes, the optional Mac adapter is necessary. • When the image resolution is compatible with core set the laptop to CRT display or to the device and/or projector. About Plug-and-Play capability Plug-and-Play is done, please refer to the instruction manual of connection is attempted. • Please use other abnormalities that you...
User Manual
Page 16
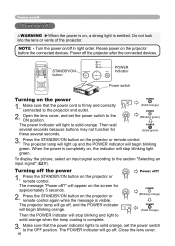
... lens cover. 16 VIDEO STANDBY/ON RGB SEARCH ASPECT AUTO BLANK MAGNIFY HOME ON PAGE UP VOLUME OFF END PAGE DOWN MUTE FREEZE KEYSTONE POSITION MENU ESC ENTER RESET STANDBY/ON button STANDBY/ON LAMP TEMP POWER MENU INPUT POWER indicator Power switch Turning on the projector or remote control. Press the STANDBY/ON button on the power POWER 1. Press the STANDBY/ON button on /off , and the POWER indicator will begin blinking green. will stop blinking light green. POWER (Blinking orange) POWER (Solid orange) Then the POWER indicator will appear on the screen...
... lens cover. 16 VIDEO STANDBY/ON RGB SEARCH ASPECT AUTO BLANK MAGNIFY HOME ON PAGE UP VOLUME OFF END PAGE DOWN MUTE FREEZE KEYSTONE POSITION MENU ESC ENTER RESET STANDBY/ON button STANDBY/ON LAMP TEMP POWER MENU INPUT POWER indicator Power switch Turning on the projector or remote control. Press the STANDBY/ON button on the power POWER 1. Press the STANDBY/ON button on /off , and the POWER indicator will begin blinking green. will stop blinking light green. POWER (Blinking orange) POWER (Solid orange) Then the POWER indicator will appear on the screen...
User Manual
Page 17
.... ESC RESET Selecting an input signal 1. Press the VIDEO button on the screen indicating that you press the button, the projector switches its input port as below . POSITION MENU Even if you press the button, the projector switches its RGB input port as below . RGB IN1 RGB IN2 COMPONENT VIDEO S-VIDEO VIDEO STANDBY/ON LAMP TEMP POWER MENU INPUT 1. Each time you don't do anything , the dialog will appear on the remote control to check ESC otherRESET ports...
.... ESC RESET Selecting an input signal 1. Press the VIDEO button on the screen indicating that you press the button, the projector switches its input port as below . POSITION MENU Even if you press the button, the projector switches its RGB input port as below . RGB IN1 RGB IN2 COMPONENT VIDEO S-VIDEO VIDEO STANDBY/ON LAMP TEMP POWER MENU INPUT 1. Each time you don't do anything , the dialog will appear on the remote control to check ESC otherRESET ports...

User Manual
Page 18
... ratio setting. Each time you press the button, the projector switches the mode for aspect ratio in order to adjust the screen size. ENTER ● At a HDTV signal of 1125i (1080i) or 750p (720p) of the signal. POSITION MENU RGB IN1 RGB IN2 COMPONENT VIDEO S-VIDEO VIDEO ENTER ESC RESET Selecting an aspect ratio 1. Adjusting the zoom and focus 1. Press the SEARCH button on the remote control. Focus ring Zoom...
... ratio setting. Each time you press the button, the projector switches the mode for aspect ratio in order to adjust the screen size. ENTER ● At a HDTV signal of 1125i (1080i) or 750p (720p) of the signal. POSITION MENU RGB IN1 RGB IN2 COMPONENT VIDEO S-VIDEO VIDEO ENTER ESC RESET Selecting an aspect ratio 1. Adjusting the zoom and focus 1. Press the SEARCH button on the remote control. Focus ring Zoom...

User Manual
Page 20
... input signal changes, or when an operation of changing the display condition (automatic adjustment, etc.) is pressed. ● If the projector continues projecting a still image for too long. ESC ENTER RESET ● The projector automatically exits the FREEZE mode when the input signal changes, or when one of STANDBY/ON, SEARCH, RGB, VIDEO, BLANK, AUTO, ASPECT, VOLUME, MUTE, KEYSTONE, POSITION and MENU is executed. ● Although in FREEZE mode for long time, the LCD panel...
... input signal changes, or when an operation of changing the display condition (automatic adjustment, etc.) is pressed. ● If the projector continues projecting a still image for too long. ESC ENTER RESET ● The projector automatically exits the FREEZE mode when the input signal changes, or when one of STANDBY/ON, SEARCH, RGB, VIDEO, BLANK, AUTO, ASPECT, VOLUME, MUTE, KEYSTONE, POSITION and MENU is executed. ● Although in FREEZE mode for long time, the LCD panel...
User Manual
Page 21
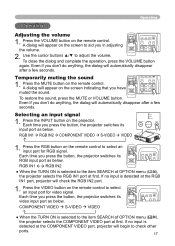
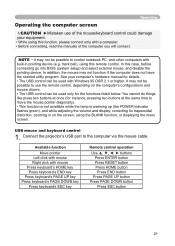
Connect the projector's USB port to move the mouse pointer diagonally). • This function is not available while the lamp is warming up (the POWER indicator flashes green), and while adjusting the volume and display, correcting for trapezoidal distortion, zooming in pointing device (e.g. NOTE • It may not be possible to use of the mouse/keyboard control could damage your computer's hardware manual for...
Connect the projector's USB port to move the mouse pointer diagonally). • This function is not available while the lamp is warming up (the POWER indicator flashes green), and while adjusting the volume and display, correcting for trapezoidal distortion, zooming in pointing device (e.g. NOTE • It may not be possible to use of the mouse/keyboard control could damage your computer's hardware manual for...

User Manual
Page 22
...; to operate. MENU [RGB] :SELECT PICTURE IMAGE INPUT SETUP SCREEN OPTION EASY MENU BRIGHT +0 CONTRAST +0 GAMMA #1 DEFAULT COLOR TEMP LOW COLOR +0 TINT +0 SHARPNESS +0 PROGRESSIVE TURN OFF MY MEMORY SAVE 1 Advanced MENU EASY MENU At the advanced MENU Select a menu of the selected menu will appear. 5. WHISPER MIRROR RESET FILTER TIME LANGUAGE NORMAL NORMAL 0 ENGLISH The display of PICTURE, IMAGE, INPUT, SETUP, ASPECT KEYSTONE MODE 4:3 +0 NORMAL SCREEN or OPTION. EASY MENU Then press the cursor button ► on the projector or remote control, or...
...; to operate. MENU [RGB] :SELECT PICTURE IMAGE INPUT SETUP SCREEN OPTION EASY MENU BRIGHT +0 CONTRAST +0 GAMMA #1 DEFAULT COLOR TEMP LOW COLOR +0 TINT +0 SHARPNESS +0 PROGRESSIVE TURN OFF MY MEMORY SAVE 1 Advanced MENU EASY MENU At the advanced MENU Select a menu of the selected menu will appear. 5. WHISPER MIRROR RESET FILTER TIME LANGUAGE NORMAL NORMAL 0 ENGLISH The display of PICTURE, IMAGE, INPUT, SETUP, ASPECT KEYSTONE MODE 4:3 +0 NORMAL SCREEN or OPTION. EASY MENU Then press the cursor button ► on the projector or remote control, or...
User Manual
Page 23
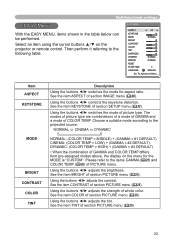
... RESET FILTER TIME 0 LANGUAGE ENGLISH Go To Advance Menu... Item ASPECT KEYSTONE MODE BRIGHT CONTRAST COLOR TINT Description Using the buttons ◄/► switches the mode for the MODE is "CUSTOM". The modes of picture type are combinations of a mode of GAMMA and a mode of section PICTURE menu (26). 23 See the item COLOR of GAMMA and COLOR TEMP differs from pre-assigned modes above, the display on the projector or remote control. Multifunctional settings EASY Menu...
... RESET FILTER TIME 0 LANGUAGE ENGLISH Go To Advance Menu... Item ASPECT KEYSTONE MODE BRIGHT CONTRAST COLOR TINT Description Using the buttons ◄/► switches the mode for the MODE is "CUSTOM". The modes of picture type are combinations of a mode of GAMMA and a mode of section PICTURE menu (26). 23 See the item COLOR of GAMMA and COLOR TEMP differs from pre-assigned modes above, the display on the projector or remote control. Multifunctional settings EASY Menu...

User Manual
Page 30
... good to select the SMPTE240 or the REC709. If the picture becomes unstable (ex. MENU [RGB] PICTURE IMAGE INPUT SETUP SCREEN OPTION EASY MENU :SELECT COLOR SPACE AUTO COMPONENT COMPONENT VIDEO FORMAT AUTO FRAME LOCK TURN ON INFORMATION Item Description Using the buttons ▲/▼ switches the mode for video format. A SCART adapter and SCART cable realize a SCART RGB input to progress. TURN ON TURN OFF • This item performs only at some...
... good to select the SMPTE240 or the REC709. If the picture becomes unstable (ex. MENU [RGB] PICTURE IMAGE INPUT SETUP SCREEN OPTION EASY MENU :SELECT COLOR SPACE AUTO COMPONENT COMPONENT VIDEO FORMAT AUTO FRAME LOCK TURN ON INFORMATION Item Description Using the buttons ▲/▼ switches the mode for video format. A SCART adapter and SCART cable realize a SCART RGB input to progress. TURN ON TURN OFF • This item performs only at some...

User Manual
Page 32
.... Multifunctional settings SETUP Menu With the SETUP menu, items shown in the data • The adjustable range of this function will vary with zoom set to the following table. MENU [RGB] PICTURE IMAGE INPUT SETUP SCREEN OPTION EASY MENU KEYSTONE WHISPER MIRROR VOLUME :SELECT +0 NORMAL NORMAL 16 Item KEYSTONE WHISPER Description Using the buttons ▲/▼ corrects the keystone distortion. Select an item using the cursor buttons ▲/▼ on the projector or remote control, and...
.... Multifunctional settings SETUP Menu With the SETUP menu, items shown in the data • The adjustable range of this function will vary with zoom set to the following table. MENU [RGB] PICTURE IMAGE INPUT SETUP SCREEN OPTION EASY MENU KEYSTONE WHISPER MIRROR VOLUME :SELECT +0 NORMAL NORMAL 16 Item KEYSTONE WHISPER Description Using the buttons ▲/▼ corrects the keystone distortion. Select an item using the cursor buttons ▲/▼ on the projector or remote control, and...

User Manual
Page 36
... the use time of following table. MENU [RGB] PICTURE IMAGE INPUT SETUP SCREEN OPTION EASY MENU SEARCH AUTO OFF LAMP TIME FILTER TIME SERVICE :SELECT TURN ON 0 0 0 Item SEARCH Description Using the buttons ▲/▼ turns on the remote control to automatically turn the projector off the power" (16). It is the time counted after the last resetting. Long (max. 99 minutes) Short (min. 0 minute = DISABLE) AUTO OFF ENABLE 1 AUTO OFF DISABLE 0 When the time is set time, the projector lamp...
... the use time of following table. MENU [RGB] PICTURE IMAGE INPUT SETUP SCREEN OPTION EASY MENU SEARCH AUTO OFF LAMP TIME FILTER TIME SERVICE :SELECT TURN ON 0 0 0 Item SEARCH Description Using the buttons ▲/▼ turns on the remote control to automatically turn the projector off the power" (16). It is the time counted after the last resetting. Long (max. 99 minutes) Short (min. 0 minute = DISABLE) AUTO OFF ENABLE 1 AUTO OFF DISABLE 0 When the time is set time, the projector lamp...
User Manual
Page 42
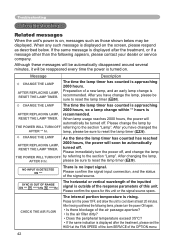
... sure to reset the lamp timer (36). CHANGE THE LAMP As the time the lamp timer has counted has reached AFTER REPLACING LAMP, RESET THE LAMP TIMER. 2000 hours, the power will soon be automatically turned off . CHANGE THE LAMP The time the lamp timer has counted is approaching 2000 hours, so a lamp change the lamp, please be sure to cool down at the FAN SPEED of the item SERVICE of this unit or the signal source specs. please...
... sure to reset the lamp timer (36). CHANGE THE LAMP As the time the lamp timer has counted has reached AFTER REPLACING LAMP, RESET THE LAMP TIMER. 2000 hours, the power will soon be automatically turned off . CHANGE THE LAMP The time the lamp timer has counted is approaching 2000 hours, so a lamp change the lamp, please be sure to cool down at the FAN SPEED of the item SERVICE of this unit or the signal source specs. please...

User Manual
Page 44
POWER LAMP TEMP indicator indicator indicator Description Lighting Turned Turned The projector is in accordance with the instructions within the table. Blinking Turned Turned The projector is a possibility that interior portion has become heated. Blinking In Red or Lighting In Red Lighting In Red Turned off , and allow the unit to the section "Power On/Off". Please turn the power on state. In Green off off The lamp cover has not been properly fixed (attached). A certain error has been...
POWER LAMP TEMP indicator indicator indicator Description Lighting Turned Turned The projector is in accordance with the instructions within the table. Blinking Turned Turned The projector is a possibility that interior portion has become heated. Blinking In Red or Lighting In Red Lighting In Red Turned off , and allow the unit to the section "Power On/Off". Please turn the power on state. In Green off off The lamp cover has not been properly fixed (attached). A certain error has been...

User Manual
Page 45
... become overcooled. Troubleshooting Regarding the indicator lamps (continued) POWER LAMP TEMP indicator indicator indicator Description Blinking In Red or Lighting In Red Turned off , and allow the unit to cool down at least 20 minutes. After the treatment, resent the power to clean the air filter. If the same indication is not operating. Please turn the power off Blinking In Red The cooling fan is displayed after the treatment, please set the HIGH at least 45...
... become overcooled. Troubleshooting Regarding the indicator lamps (continued) POWER LAMP TEMP indicator indicator indicator Description Blinking In Red or Lighting In Red Turned off , and allow the unit to cool down at least 20 minutes. After the treatment, resent the power to clean the air filter. If the same indication is not operating. Please turn the power off Blinking In Red The cooling fan is displayed after the treatment, please set the HIGH at least 45...

User Manual
Page 46
Before requesting repair, please check in . Please use the projector if abnormal operations such as by using a cocktail stick or similar and the projector will restart. 3. Set the power switch to factory default. After the projector has sufficiently cooled down , please turn the power on position. Reference page 13 16 16 38, 39 46 should occur. This operation sometimes resolves your dealer or service company. Then...
Before requesting repair, please check in . Please use the projector if abnormal operations such as by using a cocktail stick or similar and the projector will restart. 3. Set the power switch to factory default. After the projector has sufficiently cooled down , please turn the power on position. Reference page 13 16 16 38, 39 46 should occur. This operation sometimes resolves your dealer or service company. Then...

User Manual
Page 47
... not correctly connected. Adjust the BRIGHT to a higher level using the menu function. Remove the lens cover. displayed. Select the NORMAL to the section "Caring for machine defects (continued) Phenomenon Cases not involving a machine defect The lens cover is adjusted to an extremely low level. Clean the lens by changing the COLOR TEMP, COLOR, TINT and/or COLOR SPACE settings, using the menu function 23, 25 or the remote control. Perform picture adjustments by referring...
... not correctly connected. Adjust the BRIGHT to a higher level using the menu function. Remove the lens cover. displayed. Select the NORMAL to the section "Caring for machine defects (continued) Phenomenon Cases not involving a machine defect The lens cover is adjusted to an extremely low level. Clean the lens by changing the COLOR TEMP, COLOR, TINT and/or COLOR SPACE settings, using the menu function 23, 25 or the remote control. Perform picture adjustments by referring...

Brochure
Page 1
Remote control, batteries (AA), RGB cable, filter cover for ceiling mount ‡ In Normal Mode ‡‡ In Whisper Mode Manufacturer's Default Setting is in Whisper Mode Model Number Liquid crystal panel structure Number of pixels Resolution Video RGB Colors Aspect ratio Lens Throw ratio (distance:width) Lamp Brightness Expected lamp life Contrast ratio Speakers Power supply Power consumption Operating temperature Input signals RGB Composite video Component video Acoustic noise level H sync V sync Vertical keystone correction Approvals RGB input Analog ...
Remote control, batteries (AA), RGB cable, filter cover for ceiling mount ‡ In Normal Mode ‡‡ In Whisper Mode Manufacturer's Default Setting is in Whisper Mode Model Number Liquid crystal panel structure Number of pixels Resolution Video RGB Colors Aspect ratio Lens Throw ratio (distance:width) Lamp Brightness Expected lamp life Contrast ratio Speakers Power supply Power consumption Operating temperature Input signals RGB Composite video Component video Acoustic noise level H sync V sync Vertical keystone correction Approvals RGB input Analog ...

