Instruction Manual
Page 3
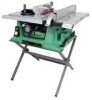
............ 24-1/2" Blade Size 10" Rip Scale YES Rip Fence YES Miter Gauge YES Maximum Cut Depth @ 90 3-1/8" Maximum Cut Depth @ 45 2-1/4" Maximum Dado Cut Width 13/16" Net Weight 70.4 LBS WARNING To avoid electrical hazards, fire hazards or damage to the table saw is wired at the ... to filter out microscopic particles. It must be connected to you read and understand these rules could result in any way. This table saw , use proper circuit protection. Before using your exposure to these exposures varies, depending on how often you do this type of California) ...
............ 24-1/2" Blade Size 10" Rip Scale YES Rip Fence YES Miter Gauge YES Maximum Cut Depth @ 90 3-1/8" Maximum Cut Depth @ 45 2-1/4" Maximum Dado Cut Width 13/16" Net Weight 70.4 LBS WARNING To avoid electrical hazards, fire hazards or damage to the table saw is wired at the ... to filter out microscopic particles. It must be connected to you read and understand these rules could result in any way. This table saw , use proper circuit protection. Before using your exposure to these exposures varies, depending on how often you do this type of California) ...

Instruction Manual
Page 4
...identifies important safety precautions. WEAR A FACE MASK OR DUST MASK. DISCONNECT TOOLS before the blade comes to the table saw , it is not designed. 10. Consult the Operator's Manual for which it is critical that keys and adjusting wrenches are removed from the tool before ... area. 8. Any power tool can be hazardous to use of moving parts. DIRECTION OF FEED. English POWER TOOL SAFETY WARNING Before using your table saw . accessories. The use the tool safely. 23. TURN THE POWER OFF. Follow instructions for most efficient and safest performance. A...
...identifies important safety precautions. WEAR A FACE MASK OR DUST MASK. DISCONNECT TOOLS before the blade comes to the table saw , it is not designed. 10. Consult the Operator's Manual for which it is critical that keys and adjusting wrenches are removed from the tool before ... area. 8. Any power tool can be hazardous to use of moving parts. DIRECTION OF FEED. English POWER TOOL SAFETY WARNING Before using your table saw . accessories. The use the tool safely. 23. TURN THE POWER OFF. Follow instructions for most efficient and safest performance. A...
Instruction Manual
Page 5
...to guide it completely beyond the saw OFF. AVOID KICKBACKS (work before performing any reason. 7. Do not release work thrown back towards you) by keeping the blade sharp, the rip fence parallel to a complete stop. 10. Do not rip work . MOUNT your table saw blade. ALWAYS USE IN A... WELL-VENTILATED AREA. ALWAYS HOLD WORK FIRMLY against the direction of the saw on page 11. 17. AVOID AWKWARD OPERATIONS and hand positions where ...
...to guide it completely beyond the saw OFF. AVOID KICKBACKS (work before performing any reason. 7. Do not release work thrown back towards you) by keeping the blade sharp, the rip fence parallel to a complete stop. 10. Do not rip work . MOUNT your table saw blade. ALWAYS USE IN A... WELL-VENTILATED AREA. ALWAYS HOLD WORK FIRMLY against the direction of the saw on page 11. 17. AVOID AWKWARD OPERATIONS and hand positions where ...

Instruction Manual
Page 6
...resistance for 120V operation. English ELECTRICAL REQUIREMENTS AND SAFETY POWER SUPPLY REQUIREMENTS WARNING To avoid electrical hazards, fire hazards or damage to the table saw 's plug. An undersized cord will draw. NOTE: The 12 to 16 amp rating is properly grounded. GROUNDING INSTRUCTIONS IN THE EVENT OF ...BREAKDOWN, grounding provides a path of Cord More Than Not More Than 25ft. 50ft. 100ft. 150ft. 0 6 18 16 16 14 6 10 18 16 14 12 10 12 16 16 14 12 12 16 14 12 Not Applicable GUIDELINES FOR EXTENSION CORDS Any extension cord used for power tools MUST...
...resistance for 120V operation. English ELECTRICAL REQUIREMENTS AND SAFETY POWER SUPPLY REQUIREMENTS WARNING To avoid electrical hazards, fire hazards or damage to the table saw 's plug. An undersized cord will draw. NOTE: The 12 to 16 amp rating is properly grounded. GROUNDING INSTRUCTIONS IN THE EVENT OF ...BREAKDOWN, grounding provides a path of Cord More Than Not More Than 25ft. 50ft. 100ft. 150ft. 0 6 18 16 16 14 6 10 18 16 14 12 10 12 16 16 14 12 12 16 14 12 Not Applicable GUIDELINES FOR EXTENSION CORDS Any extension cord used for power tools MUST...

Instruction Manual
Page 10
...saw motor if it overheats or overloads. BLADE ELEVATION HANDWHEEL - WOODWORKING TERMS ARBOR - TABLE... straight. TABLE SCALE -... Edge Kerf Surface Saw Blade Path BEVEL ... English GLOSSARY OF TERMS TABLE SAW TERMS MITER GAUGE - ...SAW BLADE PATH - The area of the table saw... blade tips, bent outward in the tabletop channels located on which a blade is set . The item being kicked upward or back toward the front of the workpiece or table... top directly in one minute. The surfaces of the blade. Tilts the blade to any angle between two saw by ...
...saw motor if it overheats or overloads. BLADE ELEVATION HANDWHEEL - WOODWORKING TERMS ARBOR - TABLE... straight. TABLE SCALE -... Edge Kerf Surface Saw Blade Path BEVEL ... English GLOSSARY OF TERMS TABLE SAW TERMS MITER GAUGE - ...SAW BLADE PATH - The area of the table saw... blade tips, bent outward in the tabletop channels located on which a blade is set . The item being kicked upward or back toward the front of the workpiece or table... top directly in one minute. The surfaces of the blade. Tilts the blade to any angle between two saw by ...

Instruction Manual
Page 12
... the adhesive backing affixed to the machine by removing the wing bolt that locks the guard in place for all through sawing operations. - 12 - Remove the table insert and raise the blade to the 90° vertical position by turning the blade elevation handwheel clockwise. 2. Adjust the blade ... maximum height. 3. Also reattach the blade guard assembly, affixing it toward the rear of the table. 3. Check the splitter and blade alignment again at both 90° and 45°. 10.Add or remove the spacers until the alignment is assembled before rising the blade. Fig. Remove the...
... the adhesive backing affixed to the machine by removing the wing bolt that locks the guard in place for all through sawing operations. - 12 - Remove the table insert and raise the blade to the 90° vertical position by turning the blade elevation handwheel clockwise. 2. Adjust the blade ... maximum height. 3. Also reattach the blade guard assembly, affixing it toward the rear of the table. 3. Check the splitter and blade alignment again at both 90° and 45°. 10.Add or remove the spacers until the alignment is assembled before rising the blade. Fig. Remove the...

Instruction Manual
Page 17
Fig. To adjust the locking lever tension, turn the bar (2) with a 10 mm wrench until it is open and locked, then the cam locking lever (1) may be at 13 inches on the scale when the extension is ... CAM LOCKING LEVER (FIG. Q 1 2 English - 17 - If not, loosen the holding screw (2), position the pointer over tighten. Q) If the extension table moves when it is necessary. TABLE EXTENSION SCALE POINTER (FIG. P) The table extension scale pointer (1) should be loose and need adjustment, therefore, adjustment to the cam locking lever is tightened, but do...
Fig. To adjust the locking lever tension, turn the bar (2) with a 10 mm wrench until it is open and locked, then the cam locking lever (1) may be at 13 inches on the scale when the extension is ... CAM LOCKING LEVER (FIG. Q 1 2 English - 17 - If not, loosen the holding screw (2), position the pointer over tighten. Q) If the extension table moves when it is necessary. TABLE EXTENSION SCALE POINTER (FIG. P) The table extension scale pointer (1) should be loose and need adjustment, therefore, adjustment to the cam locking lever is tightened, but do...
Instruction Manual
Page 19
...warped, twisted, or bowed when ripping. Never perform any freehand operations. When width of the rip is enough to cause careless mistakes. Keep your table saw . 2. Remove the miter gauge and store it passes through the blade guard and clears the rear of your thumbs off the... tightened to the miter gauge groove. 4. Turn the saw each and every time, check the following: 1. WARNING Before using the saw ON and wait for the blade to come to the table. 3. If ripping, the fence is turning. V 1 NOTE: Always use of the table. 10.Never pull the piece back when the blade is...
...warped, twisted, or bowed when ripping. Never perform any freehand operations. When width of the rip is enough to cause careless mistakes. Keep your table saw . 2. Remove the miter gauge and store it passes through the blade guard and clears the rear of your thumbs off the... tightened to the miter gauge groove. 4. Turn the saw each and every time, check the following: 1. WARNING Before using the saw ON and wait for the blade to come to the table. 3. If ripping, the fence is turning. V 1 NOTE: Always use of the table. 10.Never pull the piece back when the blade is...

Instruction Manual
Page 72
...DUST COLLECTOR JOINT 1 325742 10J6 SCREW BAR 1 325743 10J9 CAP HD. HD. CAP BOLT M5*0.8-8 1 325760 10K6 HEX. English 10" JOB SITE TABLE SAW PARTS LIST FOR SCHEMATIC HKU# 726434 325684 325685 325686 325687 325688 325689 325690 325691 325692 726437 325693 325694 325695 325696 325697 325698 325699 726450...TAPPING SCREW CR.RE. SCREW CR. Number MODEL NO. SOC. SCREW & WASHER CR.RE. PAN HD. RE. C10RB Size D=φ16 D=φ15 D=φ16 H=16 D=φ20 d=φ10 φ45 φ5*10-1 φ6*13-1 φ8X16-2.5 φ12*21-2 φ8.2*18-2.0 φ6*30-4 3/16*3/4-1/16 3/16*1/2-3/...
...DUST COLLECTOR JOINT 1 325742 10J6 SCREW BAR 1 325743 10J9 CAP HD. HD. CAP BOLT M5*0.8-8 1 325760 10K6 HEX. English 10" JOB SITE TABLE SAW PARTS LIST FOR SCHEMATIC HKU# 726434 325684 325685 325686 325687 325688 325689 325690 325691 325692 726437 325693 325694 325695 325696 325697 325698 325699 726450...TAPPING SCREW CR.RE. SCREW CR. Number MODEL NO. SOC. SCREW & WASHER CR.RE. PAN HD. RE. C10RB Size D=φ16 D=φ15 D=φ16 H=16 D=φ20 d=φ10 φ45 φ5*10-1 φ6*13-1 φ8X16-2.5 φ12*21-2 φ8.2*18-2.0 φ6*30-4 3/16*3/4-1/16 3/16*1/2-3/...

Instruction Manual
Page 74
English 10" JOB SITE TABLE SAW PARTS LIST FOR STAND HKU# 325785 325786 325797 726482 325735 325712 726617 I.D. 2CCD 2CCE 2CFW 0J4W 0U6V 0JPV 0KQY 0ZW7 2F69 2F5Y Description BRACKET ASS'Y BRACKET ASS'Y RUBBER FOOT BUSH FLAT WASHER FLAT WASHER HEX. C10RB QTY 1 1 3 4 2 2 2 1 1 1 - 74 - BOLT LOCK NUT WING NUT LEVELING PAD FLOOR PLATE Size #CE #CE φ8.2*18-1.5 φ10*25-3 M8X1.25-70 M8*1.25 T=8 MODEL NO. HD.
English 10" JOB SITE TABLE SAW PARTS LIST FOR STAND HKU# 325785 325786 325797 726482 325735 325712 726617 I.D. 2CCD 2CCE 2CFW 0J4W 0U6V 0JPV 0KQY 0ZW7 2F69 2F5Y Description BRACKET ASS'Y BRACKET ASS'Y RUBBER FOOT BUSH FLAT WASHER FLAT WASHER HEX. C10RB QTY 1 1 3 4 2 2 2 1 1 1 - 74 - BOLT LOCK NUT WING NUT LEVELING PAD FLOOR PLATE Size #CE #CE φ8.2*18-1.5 φ10*25-3 M8X1.25-70 M8*1.25 T=8 MODEL NO. HD.


