Instruction Manual
Page 3
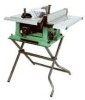
... table saw is wired at the factory for 110-120 Volt operation. English WARNING Some dust created by power sanding, sawing, grinding, drilling and other construction activities contains chemicals (known to the State of these chemicals, work in a well-ventilated area and work . PRODUCT SPECIFICATIONS MOTOR HP...This table saw . - 3 - Some examples of California) to follow these safety rules. To avoid shock or fire, replace power cord immediately if it is worn, cut or damaged in serious injury to you do this type of work with Extension ......... 24-1/2" Blade Size 10"...
... table saw is wired at the factory for 110-120 Volt operation. English WARNING Some dust created by power sanding, sawing, grinding, drilling and other construction activities contains chemicals (known to the State of these chemicals, work in a well-ventilated area and work . PRODUCT SPECIFICATIONS MOTOR HP...This table saw . - 3 - Some examples of California) to follow these safety rules. To avoid shock or fire, replace power cord immediately if it is worn, cut or damaged in serious injury to you do this type of work with Extension ......... 24-1/2" Blade Size 10"...
Instruction Manual
Page 5
... your hands out of the saw . 9. Attach a vacuum to build up in the motor area resulting in place, aligned and functioning. Do not leave the saw blade and by keeping the splitter...stop. 10. Do not release work thrown back towards you) by keeping the blade sharp, the rip fence parallel to the saw until the blade comes to move into the saw blade path...Refer to guide it completely beyond the saw table for additional sawdust removal. 19. NEVER LEAVE THE SAW RUNNING UNATTENDED. Failure to ripping instructions in detail. English TABLE SAW SAFETY 1. Only a soft damp cloth...
... your hands out of the saw . 9. Attach a vacuum to build up in the motor area resulting in place, aligned and functioning. Do not leave the saw blade and by keeping the splitter...stop. 10. Do not release work thrown back towards you) by keeping the blade sharp, the rip fence parallel to the saw until the blade comes to move into the saw blade path...Refer to guide it completely beyond the saw table for additional sawdust removal. 19. NEVER LEAVE THE SAW RUNNING UNATTENDED. Failure to ripping instructions in detail. English TABLE SAW SAFETY 1. Only a soft damp cloth...
Instruction Manual
Page 10
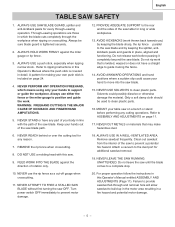
.... The item being cut . COMPOUND CUT - Leading Edge Kerf Surface Saw Blade Path BEVEL CUT - Workpiece Trailing Edge - 10 - GUM - SAW BLADE PATH - WORKPIECE - RIP FENCE - Keeps the workpiece spread apart after being kicked upward or back toward the front of the table saw motor if it overheats or overloads. Provides access to the tabletop. Performing...
.... The item being cut . COMPOUND CUT - Leading Edge Kerf Surface Saw Blade Path BEVEL CUT - Workpiece Trailing Edge - 10 - GUM - SAW BLADE PATH - WORKPIECE - RIP FENCE - Keeps the workpiece spread apart after being kicked upward or back toward the front of the table saw motor if it overheats or overloads. Provides access to the tabletop. Performing...
Instruction Manual
Page 17
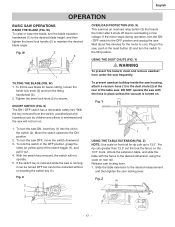
...be turned OFF but cannot be restarted without re-inserting the switch key (1). Wait about five minutes for the motor to overloading or low voltage. DO NOT operate the saw with the fence to 13.5". To turn the blade elevation handwheel (1) to the desired blade height, and then tighten ... (FIG. To lock the switch in the OFF position, grasp the sides (or yellow part) of the table saw blade for rip cuts up to the desired dimension using the scale on . Fig. X 2 1 USING THE TABLE EXTENSION (FIG. Fig. W) 1. Tighten the bevel lock knob (2) to the desired measurement and then tighten...
...be turned OFF but cannot be restarted without re-inserting the switch key (1). Wait about five minutes for the motor to overloading or low voltage. DO NOT operate the saw with the fence to 13.5". To turn the blade elevation handwheel (1) to the desired blade height, and then tighten ... (FIG. To lock the switch in the OFF position, grasp the sides (or yellow part) of the table saw blade for rip cuts up to the desired dimension using the scale on . Fig. X 2 1 USING THE TABLE EXTENSION (FIG. Fig. W) 1. Tighten the bevel lock knob (2) to the desired measurement and then tighten...
Instruction Manual
Page 21
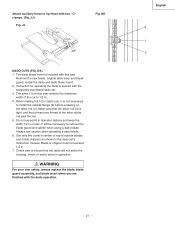
... with two "C" clamps. (Fig. It will not strike the housing, insert, or motor when in operation. Use only the correct number of round outside flange (2) before screwing on this saw restricts the maximum width of the arbor sticks out past the nut. 5. Make sure ... blade insert when you are finished with the separately purchased dado set 's instruction manual. The arbor (1) on the arbor nut (3). Check saw blade, original table inser and blade guard. Install the dado and dado blade insert. 2. Do not exceed 6 in diameter dadoes and keep the width 1/2 in ...
... with two "C" clamps. (Fig. It will not strike the housing, insert, or motor when in operation. Use only the correct number of round outside flange (2) before screwing on this saw restricts the maximum width of the arbor sticks out past the nut. 5. Make sure ... blade insert when you are finished with the separately purchased dado set 's instruction manual. The arbor (1) on the arbor nut (3). Check saw blade, original table inser and blade guard. Install the dado and dado blade insert. 2. Do not exceed 6 in diameter dadoes and keep the width 1/2 in ...
Instruction Manual
Page 22
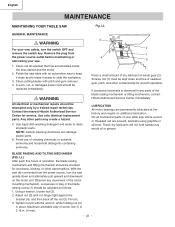
... allowable play in . (4 mm). - 22 - English MAINTENANCE MAINTAINING YOUR TABLE SAW Fig. LL GENERAL MAINTENANCE WARNING For your saw table with the wrench, while holding nut (3) in any movement of the motor mounting mechanism. Avoid use of cleaning chemicals or solvents, ammonia and household detergents... loosen nut (2). 2. On all mechanical parts of dry lubricant on the motor unit. LL) After each five hours of the blade raising mechanism or tilting mechanism, contact Hitachi Authorized Service Center immediately. Clean cutting blades with pitch and gum remover....
... allowable play in . (4 mm). - 22 - English MAINTENANCE MAINTAINING YOUR TABLE SAW Fig. LL GENERAL MAINTENANCE WARNING For your saw table with the wrench, while holding nut (3) in any movement of the motor mounting mechanism. Avoid use of cleaning chemicals or solvents, ammonia and household detergents... loosen nut (2). 2. On all mechanical parts of dry lubricant on the motor unit. LL) After each five hours of the blade raising mechanism or tilting mechanism, contact Hitachi Authorized Service Center immediately. Clean cutting blades with pitch and gum remover....
Instruction Manual
Page 23
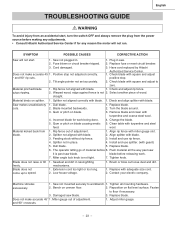
...6. Replace with blade. 3. Fasten to speed. 1. Damaged saw blade. Replace blade. and 90° crosscuts. - 23 - Plug in place. 4. Have cord replaced by Hitachi Does not make accurate 45° 1. when ripping. 2....Miter gauge out of material before releasing work being done. 4. Saw not plugged in raising/tilting mechanisms. 1. Authorized Service Center. 1. Clean table with square and adjust ° and 90° rip cuts... or pitch on flat level surface. Incorrect blade for any reason the motor will not start , turn the switch OFF and always remove the plug from...
...6. Replace with blade. 3. Fasten to speed. 1. Damaged saw blade. Replace blade. and 90° crosscuts. - 23 - Plug in place. 4. Have cord replaced by Hitachi Does not make accurate 45° 1. when ripping. 2....Miter gauge out of material before releasing work being done. 4. Saw not plugged in raising/tilting mechanisms. 1. Authorized Service Center. 1. Clean table with square and adjust ° and 90° rip cuts... or pitch on flat level surface. Incorrect blade for any reason the motor will not start , turn the switch OFF and always remove the plug from...
Instruction Manual
Page 69
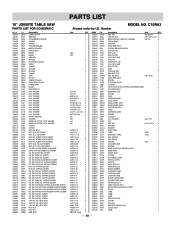
...PAN HEAD TAPPING & WASHER SCREW CR. PAN HD. RE. NUT HEX. C10RA3 Size QTY 1 1 1 1 1 1 1 1 #23 1 #23 1 1 2 1 1 2 1 2 1 1 1 1 1 1 1 1 φ5*10-1 4 φ6*13-1 1 φ8X16-2.5 1 φ10*30-0.2 2 φ12*21-1 2 3/16*3/4-1/16 4 3/16*1/2-3/64 ...EXTENSION TABLE #CD 1 RAIL (FORNT) 1 RAIL (REAR) 1 HANDLE #CE 3 LOCATING BAR 1 HANDLE 1 BEVEL ANGLE ADJUSTMENT ASS'Y 1 BLIND RIVET 6 ANGLE ROD 1 SPACER 1 MOVABLE COVER 1 FRONT COVER 1 MOTOR ...QTY HEX. English PARTS LIST 10" JOBSITE TABLE SAW PARTS LIST FOR SCHEMATIC HKU...
...PAN HEAD TAPPING & WASHER SCREW CR. PAN HD. RE. NUT HEX. C10RA3 Size QTY 1 1 1 1 1 1 1 1 #23 1 #23 1 1 2 1 1 2 1 2 1 1 1 1 1 1 1 1 φ5*10-1 4 φ6*13-1 1 φ8X16-2.5 1 φ10*30-0.2 2 φ12*21-1 2 3/16*3/4-1/16 4 3/16*1/2-3/64 ...EXTENSION TABLE #CD 1 RAIL (FORNT) 1 RAIL (REAR) 1 HANDLE #CE 3 LOCATING BAR 1 HANDLE 1 BEVEL ANGLE ADJUSTMENT ASS'Y 1 BLIND RIVET 6 ANGLE ROD 1 SPACER 1 MOVABLE COVER 1 FRONT COVER 1 MOTOR ...QTY HEX. English PARTS LIST 10" JOBSITE TABLE SAW PARTS LIST FOR SCHEMATIC HKU...


