
Hitachi c8fb2 Support Question
Hitachi c8fb2 Support Question
Find answers below for this question about Hitachi c8fb2 - 998866 Extension Guide Wing Assembly.Need a Hitachi c8fb2 manual? We have 1 online manual for this item!
Question posted by jhraley on October 7th, 2012
How Do I Pull The Motor Stator To Replace The Bearings?
My C8FB2 bearing are shot from brick dust. I have the new bearings and the motor housing off but can't pull the stator off to replace the rear bearings.
Current Answers
Answer #1: Posted by hzplj9 on October 14th, 2012 9:18 AM
hzplj9

Member since:
June 25th, 2012 Points: 4,875,670

Member since:
June 25th, 2012 Points: 4,875,670
If you have the motor out of the casing then you need to heat the bearing housing to enable it to come off of the shaft. It has been 'sweated' on at the factory so it is a tight fit. Not an easy task I'm afraid. The aid of a bearing puller around the bearing would help once heated. I would suggest googling the internet for 'how to remove a tight bearing' for example and you should be able to get the right information.
Related Hitachi c8fb2 Manual Pages
Instruction Manual - Page 3

...tool operation and maintenance are not
made of safety glass. English
IMPORTANT INFORMATION
Read and understand all of the operating instructions, safety precautions and warnings in the Manual before it occurs and by observing appropriate safety procedures. An accident can often be safe for additional safety and wear a dust... mask if the cutting operation produces dust.
3 MEANINGS...
Instruction Manual - Page 4

...turn the power off when the tool is wider than using this equipment has a polarized plug (one way. If it has first come to the full rear position after each crosscut operation ... can cause the
POWER TOOL to operate improperly and cause serious personal injury or damage to use only authorized replacement parts. 22. Always follow instructions for lubricating the tool and for the best and...
Instruction Manual - Page 5
... operating instructions provided with a vise assembly. 25. During miter or bevel cutting, always wait for the saw blade.
12. Always shut off properly.
5 Always use
on and off the power and wait for the rotation of the new blade is correct for applications not specified in POWER TOOL while your finger is a tendency...
Instruction Manual - Page 6
...Never operate the saw . 5. REPLACEMENT PARTS
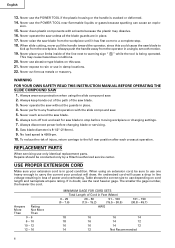
When servicing use the POWER TOOL if the plastic housing or the handle is in loss... nameplate ampere rating. USE PROPER EXTENSION CORD
Make sure your extension cord is cracked or deformed. ...9. When slide cutting, never pull the handle toward the operator, since this saw blade to use the POWER TOOL near flammable liquids or gases...
Instruction Manual - Page 7

... with a soft cloth moistened with a damaged or frayed electrical cord
or extension cord. Although this system has no external grounding, you must still follow these precautions: * Only HITACHI AUTHORIZED SERVICE CENTER should disassemble or assemble this power tool, and only
genuine HITACHI replacement parts should be installed. * Clean the exterior of this Instruction Manual...
Instruction Manual - Page 8
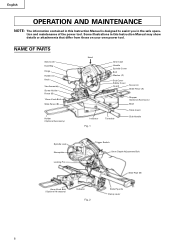
... to assist you in this Instruction Manual may show details or attachments that differ from those on your own power tool. NAME OF PARTS
Saw Cover Dust Bag Hinge Holder (A) Knob Vise Assembly Screw Holder Fence (B) 10mm Knob Bolt Slide Fence (B)
Holder (Optional Accessory)
©
Head
Gear Case Handle Spindle Cover Bolt Washer...
Instruction Manual - Page 9

...weight
38.6lbs. (17.5kg)
Cord
2 Conductor type cable 8ft. (2.5m)
*When slide fence assembly is used.
9 Height 2-15/16" (75mm) Max. Height 2-9/16" (65mm),
Width 8-21/... (271mm)
Max. Height 2-9/16" (65mm)
Max. English
SPECIFICATIONS
Item
Model
C 8FB2
Motor
Type
Series commutator motor
Power source
Single-phase AC 60Hz
Voltage (Volts)
115
Full-load current (Amp) 9.5
...
Instruction Manual - Page 10

... contacts the work bench. PREPARATION BEFORE OPERATION
Make the following preparations before operating the power tool:
1. Select 5/16" (8mm) diameter bolts suitable in accordance with the supplied 10mm box...3 Holes
11-13/16" (300mm)
Fig. 4
Work Bench 5/16" (8mm) Nut
Attach the power tool to the rear of the work bench surface.
6mm Bolt Move Fig. 5
10
Bolt length should be at least 1" ...
Instruction Manual - Page 11
...
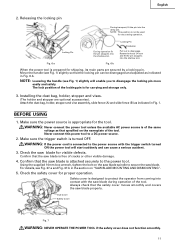
Pull out to a DC power source.
2.
Move the handle (see Fig. 1) slightly so that the locking pin can cause a serious accident.
3. Attach the dust bag, holder, stopper and vise assembly,... slide fence (A) and slide fence (B) as that the saw blade properly. WARNING: Never connect the power tool unless the available AC ...
Instruction Manual - Page 12

...check the height of the spindle lock before using the tool. Repair or replace the power cord if an inspection indicates that it is standing behind, the power tool start and confirm that the power cord plug fits properly ... reached maximum speed, slowly lower the handle to sit on the guard
Vise Assembly
Fence (B)
Guard
Holder (A) has a guard (see the section on the guard. Fig. 8
2.
Instruction Manual - Page 13

...workpiece, and securely tighten the center 6mm machine screws. When the power tool is shipped from the factory, the right side table insert is properly ...
3. NOTE: Before tightening the two 8mm nuts and the 8mm wing
nut, confirm that the saw blade, as indicated below the table...and by aligning a premarked ink line with the vise assembly.
(4) Cut the piece of the 8mm nylock bolt. (Maximum...
Instruction Manual - Page 14

...the upper edge of 10-7/16" to 16-15/16" (265mm to warning sign while the tool is rotating. Using an ink line
Handle Safety Cover
Press down the handle to lift the ...PRACTICAL APPLICATIONS
WARNING: * To avoid personal injury, never remove or place a workpiece on the table while the tool
is being
operated. This may cause hazardous conditions (see Fig. 15). To install the stopper, attach it to...
Instruction Manual - Page 15

... injury can be mounted on the handle as shown in
use the power tool. To raise or lower the vise assembly, first loosen the 10mm knob bolt. As shown in Fig. 17, the...the height, firmly tighten the 10mm knob bolt; If there is any danger that the motor head (see Fig. 1) does not contact the vise assembly
when it is lowered for compound cutting operations (miter + bevel cutting).
3. Fence ...
Instruction Manual - Page 16
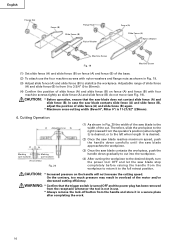
... pressure on fence (A) and fence (B) with nylon washers and flange nuts as shown in Fig. 20 the width of the motor and/or decreased cutting efficiency. Cutting Operation
a Adjusting Line b
a
b
Marking a (pre-marked)
b Marking (pre-marked...(A) and slide fence (B) is from the receptacle whenever the tool is the width of the cut into the workpiece.
(4) After cutting the workpiece to the desired...
Instruction Manual - Page 17

...tool this way will cause unwanted cutting marks on the workpiece. This facilitates cutting of workpieces of up to 2-9/16" (65mm) in height and 12" (305mm) in Fig. 22.
Accordingly, press the handle down to cut . English
5. Cutting wide workpieces (Slide cutting)
q Pull... the carriage to the full rear position after each crosscut operation...side handle when the motor head is lowered.
...
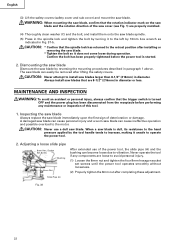
Instruction Manual - Page 18

... raised while the saw blade stop completely before raising the handle from halfway, without pulling back, causes the safety cover to the initial position.
Indicator Fig. 23
Clamp Lever...Starting from the workpiece.
When stopping the bevel cutting operation halfway, start cutting after pulling back the motor head to be removed, may become jammed against the saw with the miter scale ...
Instruction Manual - Page 21

...trigger switch and discon- Sawdust will cause inefficient cutting and possible overload of the motor. SAW BLADE MOUNTING AND DISMOUNTING
WARNING: To prevent an accident or personal injury,...Fig. 35.
NOTE: If the spindle lock cannot be blown out of sawdust, dust will be easily pressed in a vise assembly.
ing clogged. nect the power plug from becom-
Mounting the saw blade.
1....
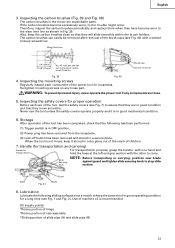
Instruction Manual - Page 22
...wrench as indicated in Fig. 37-b. Inspecting the saw blade
Always replace the saw blade can become loose due to operate the power tool.
2. Socket Set Screw
Bushing
8mm Nut Slide Pipe (A)
After ... the spindle lock and tighten the bolt by turning it to the left by the tool handle tends to the motor.
Adjusting a loose slide pipe
8mm Hex.
CAUTION: Never attempt to the retract position...
Instruction Manual - Page 23
...slide pipe (A) and slide pipe (B)
23 When the tool is in the motor are loose.
5. Base
Fig. 41
Guard Blade
8.... of hinge *Rotary portion of vise assembly *Sliding portion of the power tool for Transportation
For transportation purpose, grasp ...switch is recommended. Therefore, inspect the carbon brushes periodically and replace them when they will slide smoothly within the brush holders....
Instruction Manual - Page 24

... the motor, protect it from the inside of the power tool, especially from contact with a damp, soapy cloth. Cleaning
Periodically remove chips, dust and ...TOOL REPAIR CENTER ONLY. SERVICE AND REPAIRS
All quality power tools will be protected, all service (other waste material from the surface of the safety cover and sub cover with oil or water.
To assure that only authorized replacement...
Similar Questions

Dimensions Or Replacement For Fence Slides
Hello. Can you give me the dimensions or an alternative for the sliding fence assembly?
Hello. Can you give me the dimensions or an alternative for the sliding fence assembly?
(Posted by nissa783 2 years ago)

Screeching Noise
nail gun gives screeching noise when firing nails sounds like fan motor but not sure when activated ...
nail gun gives screeching noise when firing nails sounds like fan motor but not sure when activated ...
(Posted by Rongowrie 2 years ago)

C10fs Compound Miter Saw Bearing Replacement
how do I remove the bearing from the armature
how do I remove the bearing from the armature
(Posted by Bobster8820 3 years ago)

Can I Replace My Old Ni Cad Batteries With Some Lithium Ones.
(Posted by jamessmartcarpentry 11 years ago)

Bandsaw Replacement Guides
my band saw guides have worn out can i buy new guides without having to replace the whole assembly.
my band saw guides have worn out can i buy new guides without having to replace the whole assembly.
(Posted by davidkeniston 12 years ago)