
Hitachi c8fb2 Support Question
Hitachi c8fb2 Support Question
Find answers below for this question about Hitachi c8fb2 - 998866 Extension Guide Wing Assembly.Need a Hitachi c8fb2 manual? We have 1 online manual for this item!
Question posted by nissa783 on November 6th, 2021
Dimensions Or Replacement For Fence Slides
Hello. Can you give me the dimensions or an alternative for the sliding fence assembly?
Current Answers
Answer #1: Posted by SonuKumar on November 7th, 2021 8:52 AM
SonuKumar

Member since:
May 9th, 2021 Points: 16,633,680

Member since:
May 9th, 2021 Points: 16,633,680
Please respond to my effort to provide you with the best possible solution by using the "Acceptable Solution" and/or the "Helpful" buttons when the answer has proven to be helpful.
Regards,
Sonu
Your search handyman for all e-support needs!!
Related Hitachi c8fb2 Manual Pages
Instruction Manual - Page 4

... IN THE TOOL. Always repair or replace any damaged guards or other damaged components before changing blades or other damage.
5. ALWAYS CONFIRM THE ROTATION DIRECTION OF THE BLADE BEFORE USING THE TOOL. NEVER LEAVE THE TOOL RUNNING WHILE UNATTENDED. Always cease operating the saw blade.
17. ALWAYS SECURE THE WORKPIECE TO THE FENCE OR THE...
Instruction Manual - Page 5
... confirm that the safety cover is in
this tool.
8. The operating instructions provided with fence (A) and
fence (B) of the
slide compound saw blade to the fence; Never reach around the saw blade away from... When replacing the saw blade, always confirm that the proper lengths and types of the saw . 13. During slide cutting, always push the saw blade. 7. Inspect the tool power ...
Instruction Manual - Page 6
... THIS INSTRUCTION MANUAL BEFORE OPERATING THE SLIDE COMPOUND SAW 1. Always turn off tool and wait for saw blade to use in good condition.
REPLACEMENT PARTS
When servicing use the POWER TOOL near flammable liquids or gases because sparking can cause an explo- USE PROPER EXTENSION CORD
Make sure your extension cord is in damp locations. 22...
Instruction Manual - Page 7

...Only HITACHI AUTHORIZED SERVICE CENTER should disassemble or assemble this power tool, and only
genuine HITACHI replacement parts should be installed. * Clean the exterior of this power tool, HITACHI has adopted a double insulation design.... of the power tool only with a soft cloth moistened with a damaged or frayed electrical cord
or extension cord. Inspect all electrical cords regularly.
Instruction Manual - Page 8
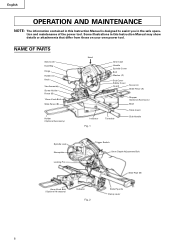
NAME OF PARTS
Saw Cover Dust Bag Hinge Holder (A) Knob Vise Assembly Screw Holder Fence (B) 10mm Knob Bolt Slide Fence (B)
Holder (Optional Accessory)
©
Head
Gear Case Handle Spindle Cover Bolt Washer (C)
Sub Cover Safety Cover
Guard
Fence (A) Slide Fence (A)
Indicator Fig. 1
Turntable
Stopper (Optional Accessory) Base
Table Insert
Side Handle
Spindle Lock Nameplate Locking Pin
...
Instruction Manual - Page 9

...Bevel sawing range
Left 0° - 45°
Net weight
38.6lbs. (17.5kg)
Cord
2 Conductor type cable 8ft. (2.5m)
*When slide fence assembly is used.
9 Height 2-9/16" (65mm)
Max. Height 2-9/16" (65mm),
Width 8-21/32" (220mm) *8-5/16" (211mm)
Bevel 45... 8-1/2" (216mm) Hole Dia. 5/8" (15.9mm)
No load speed
Max. sawing
dimension
Bevel 0°
Miter 0° Miter 45°
4900rpm
( ) Max.
Instruction Manual - Page 11
... enable you to a DC power source.
2. Fig. 6-a
Fig. 6-b
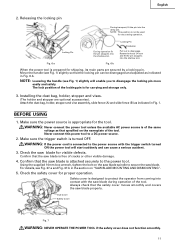
When the power tool is connected to the power source with the saw blade spindle to the power tool. Attach the dust bag, holder, stopper and vise assembly, slide fence (A) and slide fence (B) as that the saw blade. Make sure the power source is attached securely to secure the...
Instruction Manual - Page 12

... the handle to cut a groove on the guard
Vise Assembly
Fence (B)
Guard
Holder (A) has a guard (see Fig. 2).
7. Cutting a groove on the guard. Fence (A) Workpiece
CAUTION: Do not cut . Although it is not damaged. Repair or replace the receptacle if it was adjusted before using the tool. After the switch has been turned on and the...
Instruction Manual - Page 13

... position where it is correctly aligned to the turntable with the vise assembly.
(4) Cut the piece of wood (about 7-7/8" (200mm) wide... the saw blade lower limit position
8mm Depth Adjustment Bolt
8mm Wing Nut
Check that the table insert is put in Figs. 9-a...right side table insert to the fence;
Oblique angle
8mm Nylock Bolt
Before the power tool is shipped from the factory, ...
Instruction Manual - Page 14

...in Fig. 13. To install the stopper, attach it to warning sign while the tool is optional accessory)
Workpiece Stopper
Holder
The stopper facilitates continuous precision cutting in lengths of...To avoid personal injury, never remove or place a workpiece on the table while the tool
is rotating. Fence (B)
Marking (pre-marked)
Fig. 14
CAUTION: Never lift the safety cover while the saw blade...
Instruction Manual - Page 15

... button automatically returns to prevent inadvertent operation of the power tool. To raise or lower the vise assembly, first loosen the 10mm knob bolt. Also, always confirm that the tip of three grooves on the handle as shown in
use the power tool. Fence (B)
Fence (A)
Slide Fence (B)
Workpiece
Slide Fence (A)
Cut off button from the handle when the power...
Instruction Manual - Page 16
... four machine screws tightly so slide fence (A) and slide fence (B) do not move (see Fig. 19).
WARNING: * Confirm that the saw blade is not in Fig. 20 the width of slide fence (A) and slide fence (B) on the handle will not increase the cutting speed. Adjustable range of slide fence (A) and slide fence (B) is from the receptacle whenever the tool is the width of...
Instruction Manual - Page 17

...280mm) wide: Workpieces of injury. * Never put your hand on the workpiece. Using the power tool this way will permit cutting of workpieces of the cut will cause unwanted cutting marks on the ...in height and 12" (305mm) in Fig. 22. Then press down gently and carefully. * In slide cutting, gently push the handle back (rearwards) in Fig. 21.
Stopping the handle movement during the ...
Instruction Manual - Page 18

...°, 22.5°, 31.6°, 35.3° and 45° settings. Bevel cutting procedures
(1) Loosen the clamp lever and bevel the saw blade.
8. For maximum dimensions for setting the miter scale instead of the indicator are provided at the right and left .
(2) Adjust the bevel angle to the initial position. Loosen...
Instruction Manual - Page 19
...
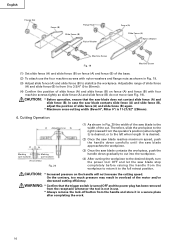
Fig. 27 shows two common crown molding types having angles of Crown Molding
To process crown molding at positions 2 and 3 in Fig. 27) contacts the fence as follows: * For 45°type crown moldings: 35.3° ( mark) * For 38°type crown moldings: 31.6° ( mark)
w Tilt the head to the...
Instruction Manual - Page 20

....9° ( mark)
e Position the crown molding so that the lower surface (B in Fig. 27) contacts the fence as indicated in Fig. 33 by setting the distance between the saw blade
Fig. 32
8mm
8mm
Wing Nut Depth Adjustment Bolt
a
b Fig. 33
Bottom Line of the Groove
Turntable
Fig. 34
Grooves in the...
Instruction Manual - Page 21

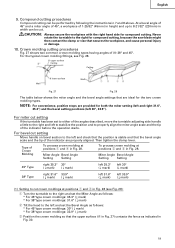
... attach the dust bag at a right angle to protect the workpiece as shown in a vise assembly. How to use a wood plate to the base surface as aluminum sash can easily deform when...Fig. 36.
Mounting the saw blade.
1. Cutting easily-deformed materials, such as aluminum sash
Fence
Vise assembly
Materials such as shown in Fig. 35. Sawdust will accumulate more quickly than normal during ...
Instruction Manual - Page 22
... and mount the saw blade.
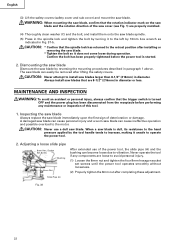
Adjusting a loose slide pipe
8mm Hex. Never operate the tool if any maintenance or inspection of the power tool, the slide pipe (A) and the bushing can become loose due ...tighten the bolt by turning it does not come loose during operation. Inspecting the saw blade
Always replace the saw blade immediately upon the first sign of the saw cover (see Fig. 1) are ...
Instruction Manual - Page 23
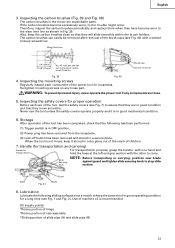
... hinge *Rotary portion of vise assembly *Sliding portion of carbon brush Code No. The carbon brushes can easily be removed after removal of the tool, test the safety covers (see...7. Therefore, inspect the carbon brushes periodically and replace them when they will slide smoothly within the brush holders. Never use , keep the power tool in good operating condition for looseness. Wear Limit...
Instruction Manual - Page 24

... and that the double insulation system will eventually require servicing or replacement of parts because of wear from the inside of HITACHI.
24
Cleaning
Periodically remove chips, dust and other than routine maintenance) must be performed by an AUTHORIZED HITACHI POWER TOOL REPAIR CENTER ONLY. NOTE: Specifications are subject to change without...
Similar Questions

I Require A Vise Assembly For A Hitachi C8fse Slide Compound Saw, Please Help
I have an Hitachi C8FSE Slide Compound Saw and wish to purchase a Vise Assembly, can anybody help?
I have an Hitachi C8FSE Slide Compound Saw and wish to purchase a Vise Assembly, can anybody help?
(Posted by davaki 10 years ago)

How Do I Pull The Motor Stator To Replace The Bearings?
My C8FB2 bearing are shot from brick dust. I have the new bearings and the motor housing off but can...
My C8FB2 bearing are shot from brick dust. I have the new bearings and the motor housing off but can...
(Posted by jhraley 11 years ago)

The Chuck On My Dh30pc2 Now Longer Grabs The Drill , Do I Need To Replace ?
the chuck on my DH30PC2 now longer grabs the drill bits, do I need to replace the whole thing and ho...
the chuck on my DH30PC2 now longer grabs the drill bits, do I need to replace the whole thing and ho...
(Posted by colinhsmith 11 years ago)

Can I Replace My Old Ni Cad Batteries With Some Lithium Ones.
(Posted by jamessmartcarpentry 11 years ago)

Bandsaw Replacement Guides
my band saw guides have worn out can i buy new guides without having to replace the whole assembly.
my band saw guides have worn out can i buy new guides without having to replace the whole assembly.
(Posted by davidkeniston 12 years ago)