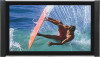
Owners Guide
Page 2
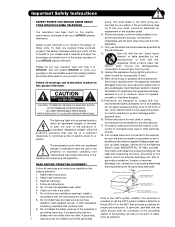
..., stoves, or other apparatus Article 820-44 of antenna- An outdoor antenna should be of the cabinet which will enable HITACHI to the point of overhead power lines or other . Keep these instructions. Clean only with respect to proper grounding for (including amplifiers) that a safety problem... electrician for long periods of HITACHI plasma televisions. Do not defeat the safety purpose of the polarized or cable ground shall be located in the improbable event that produce heat. A polarized plug has two system of the building, as power-supply cord or plug is intended...
..., stoves, or other apparatus Article 820-44 of antenna- An outdoor antenna should be of the cabinet which will enable HITACHI to the point of overhead power lines or other . Keep these instructions. Clean only with respect to proper grounding for (including amplifiers) that a safety problem... electrician for long periods of HITACHI plasma televisions. Do not defeat the safety purpose of the polarized or cable ground shall be located in the improbable event that produce heat. A polarized plug has two system of the building, as power-supply cord or plug is intended...
Owners Guide
Page 3
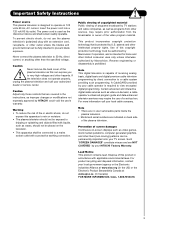
..., receptacle, or other fixed (non-moving) patterns can be connected to a cable system providing such programming. Important Safety Instructions Power source This plasma television is designed to 50 Hz, direct current, or anything other intellectual property rights. Caution Adjust only those ...and disposal information, contact your TV screen. If the television does not operate properly, unplug the plasma television and call your HITACHI Factory Warranty. patents and other than the specified voltage. Never connect the plasma television to operate on -demand, a cable operator...
..., receptacle, or other fixed (non-moving) patterns can be connected to a cable system providing such programming. Important Safety Instructions Power source This plasma television is designed to 50 Hz, direct current, or anything other intellectual property rights. Caution Adjust only those ...and disposal information, contact your TV screen. If the television does not operate properly, unplug the plasma television and call your HITACHI Factory Warranty. patents and other than the specified voltage. Never connect the plasma television to operate on -demand, a cable operator...
Owners Guide
Page 4
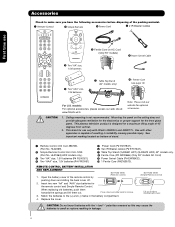
... and sliding the back cover off. 2. SELECT VOL + MUTE CH - models: For optional accessories, please access our web site at: www.hitachi.us/tv Note: Please visit our website for a maximum tilting angle of stand. ³ Remote Control Unit CLU-3861WL (Part No. HL01864)(HDX...182; Table Top Stand (QJ02681 HDT) (QJ02673 HDX) 42" models only. º Ferrite Core (P# GX00666) (Only 55" models AC Cord) ¾ Power Swivel Cable (P# EW08432). µ 1 Ferrite Core (P#2169513). Match the batteries to make sure you have the following accessories before disposing of resulting in the ...
... and sliding the back cover off. 2. SELECT VOL + MUTE CH - models: For optional accessories, please access our web site at: www.hitachi.us/tv Note: Please visit our website for a maximum tilting angle of stand. ³ Remote Control Unit CLU-3861WL (Part No. HL01864)(HDX...182; Table Top Stand (QJ02681 HDT) (QJ02673 HDX) 42" models only. º Ferrite Core (P# GX00666) (Only 55" models AC Cord) ¾ Power Swivel Cable (P# EW08432). µ 1 Ferrite Core (P#2169513). Match the batteries to make sure you have the following accessories before disposing of resulting in the ...

Owners Guide
Page 5
...to mount the unit in . 38.1 cm 42.8 cm NOTE: The Table Top Stand for model 55HDT79 & 55HDX99 is recommended for best performance. Do not block the ventilation holes of an abnormal symptom, unplug...swivel slot of the Table Top Stand. First time use How To Set Up Your New Hitachi Plasma Television To take measures to prevent the Plasma Television from tipping over and prevent possible ..." models), support the top frame (55" models) and the bottom frame as shown below . CONNECT POWER SWIVEL CABLE Connect one end of cable (Arrow mark facing left and right). Connect the other end (...
...to mount the unit in . 38.1 cm 42.8 cm NOTE: The Table Top Stand for model 55HDT79 & 55HDX99 is recommended for best performance. Do not block the ventilation holes of an abnormal symptom, unplug...swivel slot of the Table Top Stand. First time use How To Set Up Your New Hitachi Plasma Television To take measures to prevent the Plasma Television from tipping over and prevent possible ..." models), support the top frame (55" models) and the bottom frame as shown below . CONNECT POWER SWIVEL CABLE Connect one end of cable (Arrow mark facing left and right). Connect the other end (...
Owners Guide
Page 8
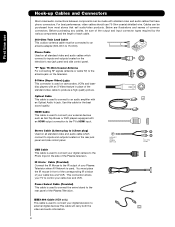
... jack on all standard video and audio cable which connect to inputs and outputs located on the television's rear jack panel and side control panel. Power Swivel Cable (Provided) This cable is used to connect the swivel stand to produce a high quality picture.
... jack on all standard video and audio cable which connect to inputs and outputs located on the television's rear jack panel and side control panel. Power Swivel Cable (Provided) This cable is used to connect the swivel stand to produce a high quality picture.

Owners Guide
Page 9
First time use the back light feature. POWER BUTTON (TV, DVD, CBL, STB, PVR/VCR, AMP/CD) Turns the selected device on or blinks to show remote control mode when the SOURCE ACCESS ... devices. LEGEND TV - Set-Top-Box PVR - The TV's remote control sensor is only available for a complete description of all of the functions on your HITACHI Plasma TV, the new remote control is designed to show and change the Freeze mode of the Remote Control. VCR precode is in the PVR...
First time use the back light feature. POWER BUTTON (TV, DVD, CBL, STB, PVR/VCR, AMP/CD) Turns the selected device on or blinks to show remote control mode when the SOURCE ACCESS ... devices. LEGEND TV - Set-Top-Box PVR - The TV's remote control sensor is only available for a complete description of all of the functions on your HITACHI Plasma TV, the new remote control is designed to show and change the Freeze mode of the Remote Control. VCR precode is in the PVR...

Owners Guide
Page 10
... when in the top right corner of the differences are the handles that are only present on the broadside bottom, under the label "MAIN POWER". ቦ CHANNEL selector Press these buttons to your preference without using the remote. This button also serves as Set-Top-Boxes or DVD ...Controls FRONT VIEW First time use ቪቩ ቤ ቨ ቭ REAR/SIDE VIEW G-LINK/IR OUT IR OUT ቫ ቨ ቢ SIDE POWER button Press this button to access the INPUT menu. It is for reference). ብ INPUT/EXIT button Press this button to turn the Plasma Television...
... when in the top right corner of the differences are the handles that are only present on the broadside bottom, under the label "MAIN POWER". ቦ CHANNEL selector Press these buttons to your preference without using the remote. This button also serves as Set-Top-Boxes or DVD ...Controls FRONT VIEW First time use ቪቩ ቤ ቨ ቭ REAR/SIDE VIEW G-LINK/IR OUT IR OUT ቫ ቨ ቢ SIDE POWER button Press this button to access the INPUT menu. It is for reference). ብ INPUT/EXIT button Press this button to turn the Plasma Television...

Owners Guide
Page 11
.... It may use composite video signal for connecting equipment with no signal input except antenna (no video input when INPUT : 1, 2, 3, 4 and 5. Check the Power Light to the TV's PR input. 3. but no picture is ON ; Your component outputs may be necessary to adjust TINT to Off. TV MAIN... Lamp 1 Lamp 2 Off Off OFF. signal). ቪ REMOTE CONTROL sensor Point your remote at this input. Your HITACHI Plasma TV will illuminate. TV MAIN POWER is no sync. Lights Red Off Off Blinking Blue OFF. (Stand-by indicator lamp located on the TV is now ready for composite ...
.... It may use composite video signal for connecting equipment with no signal input except antenna (no video input when INPUT : 1, 2, 3, 4 and 5. Check the Power Light to the TV's PR input. 3. but no picture is ON ; Your component outputs may be necessary to adjust TINT to Off. TV MAIN... Lamp 1 Lamp 2 Off Off OFF. signal). ቪ REMOTE CONTROL sensor Point your remote at this input. Your HITACHI Plasma TV will illuminate. TV MAIN POWER is no sync. Lights Red Off Off Blinking Blue OFF. (Stand-by indicator lamp located on the TV is now ready for composite ...
Owners Guide
Page 13
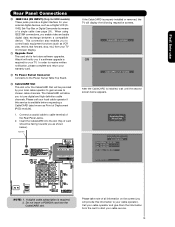
...of the Rear Panel Jacks. 2. In order to receive written notification, please complete and return your warranty card. ቮ To Power Swivel Connector Connects to chosen cable channels. Call your cable operator and give them the information from the card to start cable service... use Rear Panel Connections ቫ IEEE1394 (DV INPUT) (Only for HDX models) These jacks provide a digital interface for your TV. Hitachi will display the following respective screens. Connect a coaxial cable to tune digital and high definition cable channels. Digital Cable INSERT If the CableCARD...
...of the Rear Panel Jacks. 2. In order to receive written notification, please complete and return your warranty card. ቮ To Power Swivel Connector Connects to chosen cable channels. Call your cable operator and give them the information from the card to start cable service... use Rear Panel Connections ቫ IEEE1394 (DV INPUT) (Only for HDX models) These jacks provide a digital interface for your TV. Hitachi will display the following respective screens. Connect a coaxial cable to tune digital and high definition cable channels. Digital Cable INSERT If the CableCARD...

Owners Guide
Page 22
...command without the equipment's remote control. Place the IR Blaster in place. 3. Video Audio TV Guide On Screen Channel Manager Locks Timers Setup Power Swivel Move SEL Select 6. Press the SELECT or CURSOR PAD ̈ button to highlight the SET AV NET features then press the SELECT ...NET SETUP WIZARD Press the MENU button. 5. This feature helps to control your external Audio/Video components to control your equipment using your Hitachi Plasma Television and external Audio/Video equipment (VCR and DVD Player). CONNECTING EXTERNAL AUDIO/VIDEO COMPONENTS TO IR OUT FOR AV NETWORK 1....
...command without the equipment's remote control. Place the IR Blaster in place. 3. Video Audio TV Guide On Screen Channel Manager Locks Timers Setup Power Swivel Move SEL Select 6. Press the SELECT or CURSOR PAD ̈ button to highlight the SET AV NET features then press the SELECT ...NET SETUP WIZARD Press the MENU button. 5. This feature helps to control your external Audio/Video components to control your equipment using your Hitachi Plasma Television and external Audio/Video equipment (VCR and DVD Player). CONNECTING EXTERNAL AUDIO/VIDEO COMPONENTS TO IR OUT FOR AV NETWORK 1....
Owners Guide
Page 23
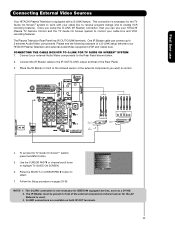
...to select. 7. Video Audio TV Guide On Screen Channel Manager Locks Timers Setup Power Swivel Move SEL Select NOTE: 1. G-LINK connections are available on pages 53-55. First time use your HITACHI Plasma TV Remote Control and the TV Guide On Screen system to control your external.... 23 The IR Blaster must be placed in front of the infrared sensor of the Rear Panel. 3. The G-LINK connection is equipped with your HITACHI Plasma Television and external Audio/Video equipment (VCR and Cable box). Infrared Sensor IR Blaster V L R OUTPUT VCR Infrared Sensor OUTPUT Y PB/CB...
...to select. 7. Video Audio TV Guide On Screen Channel Manager Locks Timers Setup Power Swivel Move SEL Select NOTE: 1. G-LINK connections are available on pages 53-55. First time use your HITACHI Plasma TV Remote Control and the TV Guide On Screen system to control your external.... 23 The IR Blaster must be placed in front of the infrared sensor of the Rear Panel. 3. The G-LINK connection is equipped with your HITACHI Plasma Television and external Audio/Video equipment (VCR and Cable box). Infrared Sensor IR Blaster V L R OUTPUT VCR Infrared Sensor OUTPUT Y PB/CB...

Owners Guide
Page 26
Press the EXIT button to return the picture to freeze the picture. The Remote Control How to Use the Remote to Control Your TV ቢ POWER button Press this button to turn the TV set on or off when the remote is in TV mode. (See page 25 for ቢ instructions ...
Press the EXIT button to return the picture to freeze the picture. The Remote Control How to Use the Remote to Control Your TV ቢ POWER button Press this button to turn the TV set on or off when the remote is in TV mode. (See page 25 for ቢ instructions ...

Owners Guide
Page 29
... "Input device not detected" if the digital camera's large capacity memory is fully loaded, or because of digital cameras may not work with low battery power may show Picture Numbers in Thumbnail view, plus other information in this input. 7. How to Use the Remote to Control Your TV PHOTO INPUT This...
... "Input device not detected" if the digital camera's large capacity memory is fully loaded, or because of digital cameras may not work with low battery power may show Picture Numbers in Thumbnail view, plus other information in this input. 7. How to Use the Remote to Control Your TV PHOTO INPUT This...

Owners Guide
Page 31
... of those manufacturers. 5. Not all devices with IEEE1394 capability are not available when D-VHS is Air / Cable IEEE1394 DVHS1 DEVICE NAME, BRAND NAME POWER TV TV RESET Move STD SEL Select 00:00:00 Counter:-00:03:31 NOTES: 1. Use CURSOR PAD cursors to the attention of some programs... select connected device (example D-VHS1). 3. Device not detected The Remote Control When an IEEE1394 device is pressed. 4. IEEE1394 DVHS1 DEVICE NAME, BRAND NAME POWER TV TV RESET Move STD SEL Select 00:00:00 Counter:-00:03:31 1. Press the SELECT button to select: TV IN is DVHS TV...
... of those manufacturers. 5. Not all devices with IEEE1394 capability are not available when D-VHS is Air / Cable IEEE1394 DVHS1 DEVICE NAME, BRAND NAME POWER TV TV RESET Move STD SEL Select 00:00:00 Counter:-00:03:31 NOTES: 1. Use CURSOR PAD cursors to the attention of some programs... select connected device (example D-VHS1). 3. Device not detected The Remote Control When an IEEE1394 device is pressed. 4. IEEE1394 DVHS1 DEVICE NAME, BRAND NAME POWER TV TV RESET Move STD SEL Select 00:00:00 Counter:-00:03:31 1. Press the SELECT button to select: TV IN is DVHS TV...

Owners Guide
Page 32
... sound to one more time or VOL Up (̆). The cursor up or down(̆ CH+ or ̄CH-) to change channels ; When the TV power is turned off completely (MUTE).
... sound to one more time or VOL Up (̆). The cursor up or down(̆ CH+ or ̄CH-) to change channels ; When the TV power is turned off completely (MUTE).

Owners Guide
Page 36
... precoded function for your cable box (refer to pages 42-43 for pre-codes). 1. Aim the remote control at the cable box and press the POWER button. Hold down the ENT button on pages 42-43. If your cable box cannot be operated after performing the above . ቢ PRECODED CABLE BOX...
... precoded function for your cable box (refer to pages 42-43 for pre-codes). 1. Aim the remote control at the cable box and press the POWER button. Hold down the ENT button on pages 42-43. If your cable box cannot be operated after performing the above . ቢ PRECODED CABLE BOX...

Owners Guide
Page 37
... event that matches your set-top-box/satellite receiver operating guide. 3. Aim the remote control at the set-top-box/satellite receiver and press the POWER button. box/satellite receiver does not turn ባ off , try a different four digit preset code. - / ቢ ቢ 6. The remote control will turn off your set...
... event that matches your set-top-box/satellite receiver operating guide. 3. Aim the remote control at the set-top-box/satellite receiver and press the POWER button. box/satellite receiver does not turn ባ off , try a different four digit preset code. - / ቢ ቢ 6. The remote control will turn off your set...

Owners Guide
Page 38
Turn ON your DVD player cannot be operated after performing the above . Aim the remote control at the DVD player and press the POWER button. When this occurs, the remote control is programmed for operating the TV. 38 You will need to the corresponding selection. 4. After replacing the batteries ...
Turn ON your DVD player cannot be operated after performing the above . Aim the remote control at the DVD player and press the POWER button. When this occurs, the remote control is programmed for operating the TV. 38 You will need to the corresponding selection. 4. After replacing the batteries ...

Owners Guide
Page 39
Aim the remote control at the VCR/PVR and press the ባ POWER button. MY VCR/PVR CODE IS: NOTE: Refer to instruction manual of the VCR/PVR for operation of your PVR when the correct four digit ...
Aim the remote control at the VCR/PVR and press the ባ POWER button. MY VCR/PVR CODE IS: NOTE: Refer to instruction manual of the VCR/PVR for operation of your PVR when the correct four digit ...

Owners Guide
Page 40
... was accepted. 5. If your Audio component cannot be operated after performing the above . NOTE: 1. Aim the remote control at the Audio component and press the POWER button. Hold down the ENT button on pages 42-43. The Remote Control The Remote Control for Additional Audio Equipment Operating the precoded function for...
... was accepted. 5. If your Audio component cannot be operated after performing the above . NOTE: 1. Aim the remote control at the Audio component and press the POWER button. Hold down the ENT button on pages 42-43. The Remote Control The Remote Control for Additional Audio Equipment Operating the precoded function for...


