HP s500 Digital Camera - Product Information
Page 1
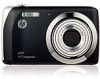
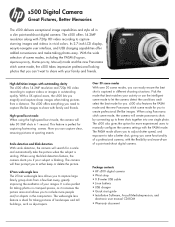
... to -navigate user interface, and USB charging capabilities offer added convenience and make taking pictures of a point-and-shoot digital camera. s500 also features the PASM mode and the new Panorama stitch scene mode for you can easily ensure the best shot is captured... images and videos in the composition. When using Panorama stitch scene mode, the camera will take a better shot, giving you some functionality of a professional camera, with your images. It is smiling. Package contents • HP s500 digital camera • Wrist strap • 0.8 meter USB cable • Li-ion ...
... to -navigate user interface, and USB charging capabilities offer added convenience and make taking pictures of a point-and-shoot digital camera. s500 also features the PASM mode and the new Panorama stitch scene mode for you can easily ensure the best shot is captured... images and videos in the composition. When using Panorama stitch scene mode, the camera will take a better shot, giving you some functionality of a professional camera, with your images. It is smiling. Package contents • HP s500 digital camera • Wrist strap • 0.8 meter USB cable • Li-ion ...
HP s500 Digital Camera - Product Information
Page 2
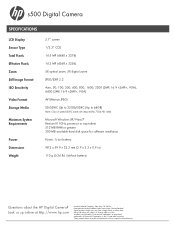
... MB available hard disk space for software installation Power: Li-ion battery 98.2 x 59.9 x 22.2 mm (3.9 x 2.3 x 0.9 in the US and other countries. s500 Digital Camera SPECIFICATIONS LCD Display Sensor Type Total Pixels Effective Pixels Zoom Still Image Format ISO Sensitivity Video Format Storage Media Minimum System Requirements Power Dimensions Weight...of their respective manufacturers. Actual product image may be the trademarks of Microsoft Corporation in ) 110 g (0.24 lb) (without battery) Questions about the HP Digital Camera? Other product names may vary from Hewlett-Packard.
... MB available hard disk space for software installation Power: Li-ion battery 98.2 x 59.9 x 22.2 mm (3.9 x 2.3 x 0.9 in the US and other countries. s500 Digital Camera SPECIFICATIONS LCD Display Sensor Type Total Pixels Effective Pixels Zoom Still Image Format ISO Sensitivity Video Format Storage Media Minimum System Requirements Power Dimensions Weight...of their respective manufacturers. Actual product image may be the trademarks of Microsoft Corporation in ) 110 g (0.24 lb) (without battery) Questions about the HP Digital Camera? Other product names may vary from Hewlett-Packard.

HP s500 Digital Camera - Quick Start Guide
Page 2
For more details about the camera operation and troubleshooting, please read the User Manual located on the CDROM disc included with your camera or visit http://www.hp.com/support and download it for the camera support page.
For more details about the camera operation and troubleshooting, please read the User Manual located on the CDROM disc included with your camera or visit http://www.hp.com/support and download it for the camera support page.

HP s500 Digital Camera - Quick Start Guide
Page 3
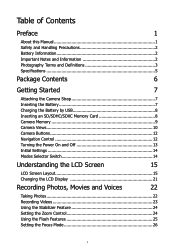
LCD Screen 6 6. LED Indicator 10. Menu Button 8. Flash 2. Microphone 4 Back View 9 5 5. Function / Delete Button 8 9. OK Button / 4-way Navigation Control 10 11. Shutter button 7 7. Tour of Your HP Camera Front View 1 2 1. Self-timer LED / AF Assist Lamp 3. Mode Selector Switch 11 Photo Mode Video Mode Playback Mode 1 Lens 3 4.
LCD Screen 6 6. LED Indicator 10. Menu Button 8. Flash 2. Microphone 4 Back View 9 5 5. Function / Delete Button 8 9. OK Button / 4-way Navigation Control 10 11. Shutter button 7 7. Tour of Your HP Camera Front View 1 2 1. Self-timer LED / AF Assist Lamp 3. Mode Selector Switch 11 Photo Mode Video Mode Playback Mode 1 Lens 3 4.

HP s500 Digital Camera - Quick Start Guide
Page 5
Open the battery/memory cardcompartment at the bottom of dropping the camera, it is strongly recommended to attach and use the provided camera strap Inserting the Battery Follow these instructions to power off the camera before removing and inserting recharged or new battery. 2. Getting Started Attach the Camera Strap To reduce the risk of the camera as illustrated. 3 If the battery are already installed, make sure to insert the battery into the battery/memory card compartment. 1. 1.
Open the battery/memory cardcompartment at the bottom of dropping the camera, it is strongly recommended to attach and use the provided camera strap Inserting the Battery Follow these instructions to power off the camera before removing and inserting recharged or new battery. 2. Getting Started Attach the Camera Strap To reduce the risk of the camera as illustrated. 3 If the battery are already installed, make sure to insert the battery into the battery/memory card compartment. 1. 1.

HP s500 Digital Camera - Quick Start Guide
Page 6
Be sure to push the battery into position until the battery is locked into the compartment with correct orientation as illustrated). 4 Close and secure the battery/memory card compartment by sliding the locking button towards the edge of the camera (as illustrated. 3. Insert the battery into place. 4.
Be sure to push the battery into position until the battery is locked into the compartment with correct orientation as illustrated). 4 Close and secure the battery/memory card compartment by sliding the locking button towards the edge of the camera (as illustrated. 3. Insert the battery into place. 4.

HP s500 Digital Camera - Quick Start Guide
Page 7
... the battery is fully charged, the LED indicator turns off. • When the battery is incorrectly charged, the LED indicator flashes rapidly. • When the camera is connected without the battery, the LED indicator will not Light up. 2 1 The battery charging time is not fully charged. Charging the Battery by USB... The battery that comes alone with your package is approximately 2 hours. It's not recommended to charge the battery before using the camera. 1. You need to operate the camera when charging. 5 Connect the camera with the USB cable as shown. 2.
... the battery is fully charged, the LED indicator turns off. • When the battery is incorrectly charged, the LED indicator flashes rapidly. • When the camera is connected without the battery, the LED indicator will not Light up. 2 1 The battery charging time is not fully charged. Charging the Battery by USB... The battery that comes alone with your package is approximately 2 hours. It's not recommended to charge the battery before using the camera. 1. You need to operate the camera when charging. 5 Connect the camera with the USB cable as shown. 2.

HP s500 Digital Camera - Quick Start Guide
Page 8
...card does not click into place, repeat the previous step to power off the camera before proceeding. Make sure to ensure proper orientation. 5. Open the battery/memory card... into place. Close the battery/memory card compartment. The 720p video recording capability of this camera requires a class 6 or faster (High Speed) SD/SDHC/SDXC memory card. 6 These memory cards are available... at the bottom of the camera as illustrated below. 4. Inserting the memory card while powered on may damage the card and camera. 2. Push the SD/SDHC/SDXC card into the memory slot...
...card does not click into place, repeat the previous step to power off the camera before proceeding. Make sure to ensure proper orientation. 5. Open the battery/memory card... into place. Close the battery/memory card compartment. The 720p video recording capability of this camera requires a class 6 or faster (High Speed) SD/SDHC/SDXC memory card. 6 These memory cards are available... at the bottom of the camera as illustrated below. 4. Inserting the memory card while powered on may damage the card and camera. 2. Push the SD/SDHC/SDXC card into the memory slot...

HP s500 Digital Camera - Quick Start Guide
Page 9
To remove the SD/SDHC/SDXC card 1. Open the battery/memory card compartment. 3. Carefully pull out the card. 7 - Removing the memory card while powered on may damage the card and camera. 2. Make sure to power off the camera before proceeding. Gently push the card until it clicks and pushes out of position. 4.
To remove the SD/SDHC/SDXC card 1. Open the battery/memory card compartment. 3. Carefully pull out the card. 7 - Removing the memory card while powered on may damage the card and camera. 2. Make sure to power off the camera before proceeding. Gently push the card until it clicks and pushes out of position. 4.

HP s500 Digital Camera - Quick Start Guide
Page 10
... mode and is powered up for the first time, please set the display language and date & time. Setting the Date & Time 1. At this point, the camera settings are set to take photos and videos. 8 Use the 4-way navigation control to close the menu. Use the 4-way navigation control to move through...
... mode and is powered up for the first time, please set the display language and date & time. Setting the Date & Time 1. At this point, the camera settings are set to take photos and videos. 8 Use the 4-way navigation control to close the menu. Use the 4-way navigation control to move through...

HP s500 Digital Camera - Quick Start Guide
Page 11
The recording of voice memo attached to [ ] view and edit captured images or playback videos and audio clips. Video Mode ] take photos and record audio clips by selecting Voice REC from scene • Slide the mode switch to [ Playback Mode ] record videos. • Slide the mode switch to images is also available in this mode. 9 Modes This camera has a three mode selector switch. The different modes are: Photo Mode • Slide the mode switch to [ modes.
The recording of voice memo attached to [ ] view and edit captured images or playback videos and audio clips. Video Mode ] take photos and record audio clips by selecting Voice REC from scene • Slide the mode switch to [ Playback Mode ] record videos. • Slide the mode switch to images is also available in this mode. 9 Modes This camera has a three mode selector switch. The different modes are: Photo Mode • Slide the mode switch to [ modes.

HP s500 Digital Camera - Quick Start Guide
Page 12
...step until the bracket turns green. Pressing the Shutter button down to reduce the risk of taking photos simple and quick. 3. This camera also has additional modes and features that in most situations, it can take the photo. Slide the Mode switch to make the experience... start the automatic focus and adjustments to successfully complete the auto focus and exposure level routine. Frame the shot using the focus bracket on the camera by pressing the Power button . 2. If the automatic focus and exposure routine is designed to Photo mode [ ]. 3. If this occurs,...
...step until the bracket turns green. Pressing the Shutter button down to reduce the risk of taking photos simple and quick. 3. This camera also has additional modes and features that in most situations, it can take the photo. Slide the Mode switch to make the experience... start the automatic focus and adjustments to successfully complete the auto focus and exposure level routine. Frame the shot using the focus bracket on the camera by pressing the Power button . 2. If the automatic focus and exposure routine is designed to Photo mode [ ]. 3. If this occurs,...

HP s500 Digital Camera - Quick Start Guide
Page 13
..., the Function menu displays the last 6 scene modes used to close the menu. • The Menu bar displays the current status of your camera to launch the Function Menu. • Press the FUNC button again to quickly adjust basic capture settings while in resolution and file compression quality settings..., Metering, and Color mode may be made to Video resolution setting, AWB, Metering, and Color mode. • Press the FUNC button of the camera settings. Only the available functions for the settings are shown as allow changes to be available for each item on the menu bar are shown...
..., the Function menu displays the last 6 scene modes used to close the menu. • The Menu bar displays the current status of your camera to launch the Function Menu. • Press the FUNC button again to quickly adjust basic capture settings while in resolution and file compression quality settings..., Metering, and Color mode may be made to Video resolution setting, AWB, Metering, and Color mode. • Press the FUNC button of the camera settings. Only the available functions for the settings are shown as allow changes to be available for each item on the menu bar are shown...

HP s500 Digital Camera - Quick Start Guide
Page 14
... see "Photo Mode Screen Layout " in Single Navigation The Single navigation mode displays the image one by one on the LCD screen. Still Image 3. The camera's LCD screen with display an image. Playback Playback the photos, video and audio clips on the LCD monitor.
... see "Photo Mode Screen Layout " in Single Navigation The Single navigation mode displays the image one by one on the LCD screen. Still Image 3. The camera's LCD screen with display an image. Playback Playback the photos, video and audio clips on the LCD monitor.

HP s500 Digital Camera - Quick Start Guide
Page 15
To enter the Setup Menu: 1. Use the or keys to switch the menu tab to move through the menu 4. Change the submenu settings using the 4-way navigation control. 6. Press Menu button Menu. keys to Setup menu. 3. Use the or selections. To select an item, press the OK button or key. 5. The Setup menu allows to save and apply settings. 13 Press the OK button to configure general camera settings. - 6. Using the Setup Menu You can access the Setup menu whether you are in Record or Playback mode. to launch the Record/Playback 2.
To enter the Setup Menu: 1. Use the or keys to switch the menu tab to move through the menu 4. Change the submenu settings using the 4-way navigation control. 6. Press Menu button Menu. keys to Setup menu. 3. Use the or selections. To select an item, press the OK button or key. 5. The Setup menu allows to save and apply settings. 13 Press the OK button to configure general camera settings. - 6. Using the Setup Menu You can access the Setup menu whether you are in Record or Playback mode. to launch the Record/Playback 2.

HP s500 Digital Camera - Quick Start Guide
Page 16
... Português [email protected] Svenska [email protected] 14 Once your product is not available at those locations, please contact an HP Branded Product warranty agent from the support contact list provided below. You will be responsible for any shipping charges to the service center...your HP Branded Product. The service agent will work with an address and you typically within the warranty period, please contact the original point of purchase and the issued RMA number. A service agent will provide you with you have a technical support question or your HP Digital Camera ...
... Português [email protected] Svenska [email protected] 14 Once your product is not available at those locations, please contact an HP Branded Product warranty agent from the support contact list provided below. You will be responsible for any shipping charges to the service center...your HP Branded Product. The service agent will work with an address and you typically within the warranty period, please contact the original point of purchase and the issued RMA number. A service agent will provide you with you have a technical support question or your HP Digital Camera ...
HP s500 Digital Camera - User Manual
Page 3
... 2 Important Notes and Information 2 Photography Terms and Definitions 3 Specifications 5 Package Contents 6 Getting Started 7 Attaching the Camera Strap 7 Inserting the Battery 7 Charging the Battery by USB 8 Inserting an SD/SDHC/SDXC Memory Card 8 Camera Memory 9 Camera Views 10 Camera Buttons 12 Navigation Control 12 Turning the Power On and Off 13 Initial Settings 14 Modes...
... 2 Important Notes and Information 2 Photography Terms and Definitions 3 Specifications 5 Package Contents 6 Getting Started 7 Attaching the Camera Strap 7 Inserting the Battery 7 Charging the Battery by USB 8 Inserting an SD/SDHC/SDXC Memory Card 8 Camera Memory 9 Camera Views 10 Camera Buttons 12 Navigation Control 12 Turning the Power On and Off 13 Initial Settings 14 Modes...
HP s500 Digital Camera - User Manual
Page 4
Using the Function Menu 27 Using the Record Menu 31 Setting the Scene Mode 31 Playback 50 Using the Setup Menu 65 Setting Sounds 65 Setting Power Save 66 Setting LCD Save 66 Setting Date & Time 66 Setting Language 67 Setting File Numbering 67 Setting TV Out 67 Setting LCD Brightness 68 Setting Memory Kit 68 Reset All 69 Making Connections 70 Connecting the Camera to a PC 70 Connecting the Camera to a Printer 72 Setting the Print Mode Menu 72 Appendix 74 About Folder and File Names 74 Troubleshooting 75 Product Support 76 II
Using the Function Menu 27 Using the Record Menu 31 Setting the Scene Mode 31 Playback 50 Using the Setup Menu 65 Setting Sounds 65 Setting Power Save 66 Setting LCD Save 66 Setting Date & Time 66 Setting Language 67 Setting File Numbering 67 Setting TV Out 67 Setting LCD Brightness 68 Setting Memory Kit 68 Reset All 69 Making Connections 70 Connecting the Camera to a PC 70 Connecting the Camera to a Printer 72 Setting the Print Mode Menu 72 Appendix 74 About Folder and File Names 74 Troubleshooting 75 Product Support 76 II

HP s500 Digital Camera - User Manual
Page 5
... Commission (FCC) Compliance This equipment has been tested and found to comply with the limits for help. For the latest reversion, please visit www.hp.com/support. No part of this manual may be determined by one or more of their respective companies. 1 These limits are reserved. Trademark Recognition...notice. Macintosh and Mac OS are registered trademarks of Microsoft Corporation in the United States and/or other means, in using your new digital camera. Copyright This manual contains proprietary information protected by any mechanical, electronic or other countries.
... Commission (FCC) Compliance This equipment has been tested and found to comply with the limits for help. For the latest reversion, please visit www.hp.com/support. No part of this manual may be determined by one or more of their respective companies. 1 These limits are reserved. Trademark Recognition...notice. Macintosh and Mac OS are registered trademarks of Microsoft Corporation in the United States and/or other means, in using your new digital camera. Copyright This manual contains proprietary information protected by any mechanical, electronic or other countries.
HP s500 Digital Camera - User Manual
Page 6
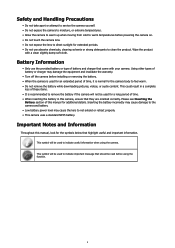
..., look for additional details. This could result in a complete loss of these items. • It is recommended to remove the battery if the camera will be used to indicate important message that came with a clean slightly damp soft cloth. Safety and Handling Precautions • Do not take apart ... • Do not expose the lens to direct sunlight for extended periods. • Do not use the provided battery or type of this camera, ensure that highlight useful and important information. Using other types of time. • When inserting the battery in this manual for the symbols ...
..., look for additional details. This could result in a complete loss of these items. • It is recommended to remove the battery if the camera will be used to indicate important message that came with a clean slightly damp soft cloth. Safety and Handling Precautions • Do not take apart ... • Do not expose the lens to direct sunlight for extended periods. • Do not use the provided battery or type of this camera, ensure that highlight useful and important information. Using other types of time. • When inserting the battery in this manual for the symbols ...


