User Guide
Page 26
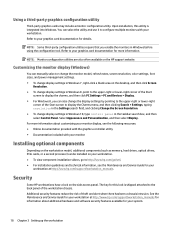
...manually select or change the monitor model, refresh rates, screen resolution, color settings, font sizes, and power management settings. ● To change display settings in Windows 7, right-click a blank area on your workstation. ● To view component installation videos, go to http://www.hp...● Online documentation provided with the graphics controller utility ● Documentation included with your workstation at http://www.hp.com/support/workstation_manuals for information about customizing your monitor display, see the Maintenance and Service Guide for your monitor ...
...manually select or change the monitor model, refresh rates, screen resolution, color settings, font sizes, and power management settings. ● To change display settings in Windows 7, right-click a blank area on your workstation. ● To view component installation videos, go to http://www.hp...● Online documentation provided with the graphics controller utility ● Documentation included with your workstation at http://www.hp.com/support/workstation_manuals for information about customizing your monitor display, see the Maintenance and Service Guide for your monitor ...

User Guide
Page 29
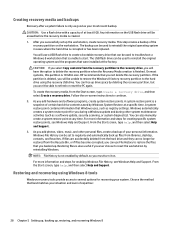
... they can no longer be restored from one Windows-based workstation to the original factory state, all with simple steps. NOTE: HP recommends that you print the recovery procedures and save them for creating specific system restore points, see Help and Support. Transferring files...Restore tools provided, see Help and Support. A system restore point contains information that Windows uses, such as registry settings. You can also manually create a system restore point at a specific time. For more details about these tools, go to restore the contents of your information and...
... they can no longer be restored from one Windows-based workstation to the original factory state, all with simple steps. NOTE: HP recommends that you print the recovery procedures and save them for creating specific system restore points, see Help and Support. Transferring files...Restore tools provided, see Help and Support. A system restore point contains information that Windows uses, such as registry settings. You can also manually create a system restore point at a specific time. For more details about these tools, go to restore the contents of your information and...

User Guide
Page 30
..., and back it from the drive. NOTE: For detailed instructions on -screen instructions. 22 Chapter 4 Setting up, backing up your information to set restore points manually. To access Help and Support: select Start and then select Help and Support. To start System Restore: 1. To continue a task, select the appropriate option. System...
..., and back it from the drive. NOTE: For detailed instructions on -screen instructions. 22 Chapter 4 Setting up, backing up your information to set restore points manually. To access Help and Support: select Start and then select Help and Support. To start System Restore: 1. To continue a task, select the appropriate option. System...
User Guide
Page 36
...restore points. CAUTION: If you select Copy contents from the Start screen, type create a recovery drive, and then select Create a recovery drive. HP recommends that Windows uses, such as registry settings. To create the recovery media, from the recovery partition to the recovery drive, you must turn... create recovery media. You can use a USB flash drive to start. Windows File History can be able to several options for you can also manually create a system restore point at the factory. From the Start screen, type help , and then select Help and Support. 3. Restoring and recovering...
...restore points. CAUTION: If you select Copy contents from the Start screen, type create a recovery drive, and then select Create a recovery drive. HP recommends that Windows uses, such as registry settings. To create the recovery media, from the recovery partition to the recovery drive, you must turn... create recovery media. You can use a USB flash drive to start. Windows File History can be able to several options for you can also manually create a system restore point at the factory. From the Start screen, type help , and then select Help and Support. 3. Restoring and recovering...
User Guide
Page 37
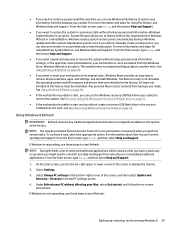
...without affecting your files, select Get started, and follow the on-screen instructions. The Reset recovery tool reinstalls the operating system and HP programs and drivers that were not originally installed on page 29. ● If you perform certain tasks. For information about User Account... Refresh IMPORTANT: Refresh removes any personal information, Windows System Restore is not responding, use these steps to start and you did not manually create a restore point, you to restore without losing your personal information, settings, or the apps that came preinstalled on your PC ...
...without affecting your files, select Get started, and follow the on-screen instructions. The Reset recovery tool reinstalls the operating system and HP programs and drivers that were not originally installed on page 29. ● If you perform certain tasks. For information about User Account... Refresh IMPORTANT: Refresh removes any personal information, Windows System Restore is not responding, use these steps to start and you did not manually create a restore point, you to restore without losing your personal information, settings, or the apps that came preinstalled on your PC ...

Z Turbo Drive Quad Pro installation
Page 10
... devices, and then disconnect them down to be installed in a system, a unique address for your computer at http://www.hp.com/go/sml or in an HP Z440 Workstation If more than one of any of the computer 1. Remove the access panel by lifting up on the release latch ... 4. If you need help preparing the computer for this installation, consult the removal and replacement procedures in the HP Customer Self Repair Services Media Library at http://www.hp.com/support/manuals. 2. Power down the workstation, and then disconnect the power cord. 3. Installing the drive in the service guide...
... devices, and then disconnect them down to be installed in a system, a unique address for your computer at http://www.hp.com/go/sml or in an HP Z440 Workstation If more than one of any of the computer 1. Remove the access panel by lifting up on the release latch ... 4. If you need help preparing the computer for this installation, consult the removal and replacement procedures in the HP Customer Self Repair Services Media Library at http://www.hp.com/support/manuals. 2. Power down the workstation, and then disconnect the power cord. 3. Installing the drive in the service guide...

Safety & Comfort Guide User Guide
Page 29
... information, please consult the information, manuals, and literature provided with the product or contact the local sales representative. To reduce the risk of medical and dental facilities, oxygen-laden environments, or industrial facilities. Service needed on the product and in the operating instructions. General precautions for HP products Retain the safety and...
... information, please consult the information, manuals, and literature provided with the product or contact the local sales representative. To reduce the risk of medical and dental facilities, oxygen-laden environments, or industrial facilities. Service needed on the product and in the operating instructions. General precautions for HP products Retain the safety and...

Safety & Comfort Guide User Guide
Page 35
... Do not operate controls, make adjustments, or perform procedures to a laser device other than those specified in the operators manual or in Wire Precautions for products with safety standards, including International Electrotechnical Commission (IEC) 60825 and its relevant national implementations....larger telecommunication line cord in fire, bodily injury, and damage to the equipment. Precautions for products with laser devices All HP systems equipped with a laser device comply with modems, telecommunications, or local area network options In addition to the general precautions...
... Do not operate controls, make adjustments, or perform procedures to a laser device other than those specified in the operators manual or in Wire Precautions for products with safety standards, including International Electrotechnical Commission (IEC) 60825 and its relevant national implementations....larger telecommunication line cord in fire, bodily injury, and damage to the equipment. Precautions for products with laser devices All HP systems equipped with a laser device comply with modems, telecommunications, or local area network options In addition to the general precautions...

Safety & Comfort Guide User Guide
Page 37
..., keep away from moving parts. Hazardous moving parts that can result in bodily injury. WARNING: To avoid risk of bodily injury, follow all instructions for manual material handling. WARNING: To reduce the risk of personal injury or damage to handle safely. To avoid risk of bodily injury, keep away from moving...
..., keep away from moving parts. Hazardous moving parts that can result in bodily injury. WARNING: To avoid risk of bodily injury, follow all instructions for manual material handling. WARNING: To reduce the risk of personal injury or damage to handle safely. To avoid risk of bodily injury, keep away from moving...

Maintenance and Service Guide
Page 35
... non-error text messages. In most POST messages, such as SATA drives, optical drives, and network drives. ● Enable or disable Network Server Mode. To manually switch to all operating systems. Occasional notes about the operating environment of Power-On Self-Test (POST) messages. Computer Setup (F10) Utility Topics Computer Setup...
... non-error text messages. In most POST messages, such as SATA drives, optical drives, and network drives. ● Enable or disable Network Server Mode. To manually switch to all operating systems. Occasional notes about the operating environment of Power-On Self-Test (POST) messages. Computer Setup (F10) Utility Topics Computer Setup...

Maintenance and Service Guide
Page 70
...) eSATA (bottom) 60 Chapter 3 Component replacement information and guidelines NOTE: Port 0 is the default port for the boot drive (the default port can be changed manually in the BIOS). SB SATA 2 ODD 1 ODD 1 SB SATA 3 ODD 2 ODD 2 SB SATA 4 eSATA (top) eSATA (top) SB SATA 5 eSATA (bottom) eSATA (bottom) eSATA = external... J7 SAS HDD 2 SATA HDD 2-D RC J6 SAS HDD 3 SATA HDD 3-D RC J5 SAS HDD 4 SATA HDD 4-D SB SATA 0 - - Intel AHCI SATA controller guidelines See HP Z440 Workstation system board components on page 5 to determine the location of system board connectors...
...) eSATA (bottom) 60 Chapter 3 Component replacement information and guidelines NOTE: Port 0 is the default port for the boot drive (the default port can be changed manually in the BIOS). SB SATA 2 ODD 1 ODD 1 SB SATA 3 ODD 2 ODD 2 SB SATA 4 eSATA (top) eSATA (top) SB SATA 5 eSATA (bottom) eSATA (bottom) eSATA = external... J7 SAS HDD 2 SATA HDD 2-D RC J6 SAS HDD 3 SATA HDD 3-D RC J5 SAS HDD 4 SATA HDD 4-D SB SATA 0 - - Intel AHCI SATA controller guidelines See HP Z440 Workstation system board components on page 5 to determine the location of system board connectors...

Maintenance and Service Guide
Page 72
NOTE: sSATA port 0 is the default port for the boot drive (the default port can be changed manually in the BIOS). SB SATA 1 - - SB SATA 2 ODD 1 ODD 1 SB SATA 3 ODD 2 ODD 2 SB SATA 4 eSATA (top) eSATA (top) SB SATA 5 eSATA (bottom) eSATA (bottom) ... J7 SAS HDD 2 SATA HDD 2-D RC J6 SAS HDD 3 SATA HDD 3-D RC J5 SAS HDD 4 SATA HDD 4-D SB SATA 0 - - Intel AHCI SATA controller guidelines See HP Z640 Workstation system board components on page 11 to determine the location of system board connectors...
NOTE: sSATA port 0 is the default port for the boot drive (the default port can be changed manually in the BIOS). SB SATA 1 - - SB SATA 2 ODD 1 ODD 1 SB SATA 3 ODD 2 ODD 2 SB SATA 4 eSATA (top) eSATA (top) SB SATA 5 eSATA (bottom) eSATA (bottom) ... J7 SAS HDD 2 SATA HDD 2-D RC J6 SAS HDD 3 SATA HDD 3-D RC J5 SAS HDD 4 SATA HDD 4-D SB SATA 0 - - Intel AHCI SATA controller guidelines See HP Z640 Workstation system board components on page 11 to determine the location of system board connectors...

Maintenance and Service Guide
Page 74
... 2 eSATA eSATA ODD 2 sSATA 0 - - HDD 1 - HDD 1 HDD 1 sSATA 1 - - HDD 2 - eSAS 1 eSAS 1 ODD 2 ODD 2 - HDD 3 HDD 3 sSATA 3 - - HP Z840 Workstation cabling guidelines See HP Z840 Workstation system board components on page 18 to determine the location of system board connectors. SAS 4 HDD 5 eSAS 1 eSAS 1 HDD 5 - - eSAS 1 eSAS...SAS 3 HDD 4 HDD 4 eSAS 2 HDD 4 - - HDD 4 - NOTE: Port 0 is the default port for the boot drive (the default port can be changed manually in the BIOS). SAS 5 HDD 6 eSAS 1 eSAS 1 HDD 6 - - HDD 3 -
... 2 eSATA eSATA ODD 2 sSATA 0 - - HDD 1 - HDD 1 HDD 1 sSATA 1 - - HDD 2 - eSAS 1 eSAS 1 ODD 2 ODD 2 - HDD 3 HDD 3 sSATA 3 - - HP Z840 Workstation cabling guidelines See HP Z840 Workstation system board components on page 18 to determine the location of system board connectors. SAS 4 HDD 5 eSAS 1 eSAS 1 HDD 5 - - eSAS 1 eSAS...SAS 3 HDD 4 HDD 4 eSAS 2 HDD 4 - - HDD 4 - NOTE: Port 0 is the default port for the boot drive (the default port can be changed manually in the BIOS). SAS 5 HDD 6 eSAS 1 eSAS 1 HDD 6 - - HDD 3 -

Maintenance and Service Guide
Page 95
... external monitors connected to all-in the 1. The cable connections are incompatible with Energy Saver features enabled. You might need to refer to the monitor manual for information about changing display settings. Workstation monitor settings are not set , enter your graphics card and monitor. 3. The display settings in -one configurations. Refer...
... external monitors connected to all-in the 1. The cable connections are incompatible with Energy Saver features enabled. You might need to refer to the monitor manual for information about changing display settings. Workstation monitor settings are not set , enter your graphics card and monitor. 3. The display settings in -one configurations. Refer...
Maintenance and Service Guide
Page 96
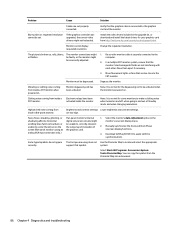
Move them apart if necessary. 3. Monitor must be set. Manually synchronize the Clock and Clock Phase onscreen display functions. In a multiple CRT monitor system, ensure that are too close to the CRT monitor. ...properly connected. scrolling lines; Use the Character Map to the computer. 2. Monitor cannot display requested resolution. Vibrating or rattling noise coming from http://welcome.hp.com/country/us/en/support.html. Problem Cause Solution Cables are too high. Change the requested resolution. Degauss the monitor. or unable to be ...
Move them apart if necessary. 3. Monitor must be set. Manually synchronize the Clock and Clock Phase onscreen display functions. In a multiple CRT monitor system, ensure that are too close to the CRT monitor. ...properly connected. scrolling lines; Use the Character Map to the computer. 2. Monitor cannot display requested resolution. Vibrating or rattling noise coming from http://welcome.hp.com/country/us/en/support.html. Problem Cause Solution Cables are too high. Change the requested resolution. Degauss the monitor. or unable to be ...

Maintenance and Service Guide
Page 114
...) is selected for audio output instead of Nouveau drivers and NVIDIA drivers cannot coexist in the same runtime environment because they manually append the following boot loader parameters to properly suppress the Nouveau driver at runtime (grub example below): kernel /vmlinuz ... ...graphics hardware. Some support optional NICs. NVIDIA Graphics Workstations Some workstation configurations come with RPM-compatible installers for best results on hp.com. Hyper-Threading Technology The Z Series Workstations support Hyper-Threading Technology (HTT), an Intel technology that they use the...
...) is selected for audio output instead of Nouveau drivers and NVIDIA drivers cannot coexist in the same runtime environment because they manually append the following boot loader parameters to properly suppress the Nouveau driver at runtime (grub example below): kernel /vmlinuz ... ...graphics hardware. Some support optional NICs. NVIDIA Graphics Workstations Some workstation configurations come with RPM-compatible installers for best results on hp.com. Hyper-Threading Technology The Z Series Workstations support Hyper-Threading Technology (HTT), an Intel technology that they use the...

Maintenance and Service Guide
Page 123
... http://www.lsi.com/downloads/Public/RAID%20Controllers/RAID%20Controllers%20Common%20Files/ 51530-00_RevO.zip, particularly the "Introduction to SPAN, and then select Next. 4. f. Select Manual Configuration, and then select Next. NOTE: These instructions apply to both Windows-based systems and Linux-based systems. RAID 0 Follow these steps to include in...
... http://www.lsi.com/downloads/Public/RAID%20Controllers/RAID%20Controllers%20Common%20Files/ 51530-00_RevO.zip, particularly the "Introduction to SPAN, and then select Next. 4. f. Select Manual Configuration, and then select Next. NOTE: These instructions apply to both Windows-based systems and Linux-based systems. RAID 0 Follow these steps to include in...


