

User Guide 1
Page 5
...Cleaning the monitor ...3 Shipping the monitor ...3 3 Setting up the monitor ...4 Use caution when setting up the monitor ...4 Installing the stand ...4 Identifying rear and side components ...5 Connecting the cables ...6 Identifying front and bottom panel controls ...10 Remote control features ...11 Replacing the remote control battery ...12 Adjusting the monitor ...13 Mounting the monitor (select models only) ...14 Removing the monitor stand ...14 Attaching the optional VESA mounting bracket (select models only 14 Turning on the monitor ...15 Connecting USB devices ...17 Locating the rating...
...Cleaning the monitor ...3 Shipping the monitor ...3 3 Setting up the monitor ...4 Use caution when setting up the monitor ...4 Installing the stand ...4 Identifying rear and side components ...5 Connecting the cables ...6 Identifying front and bottom panel controls ...10 Remote control features ...11 Replacing the remote control battery ...12 Adjusting the monitor ...13 Mounting the monitor (select models only) ...14 Removing the monitor stand ...14 Attaching the optional VESA mounting bracket (select models only 14 Turning on the monitor ...15 Connecting USB devices ...17 Locating the rating...
User Guide 1
Page 6
... ...20 Using My Display software (select models) ...21 Installing the software ...21 Using the software ...21 Downloading the software ...22 Using HP Display Assistant software (select models 23 Installing the software ...23 Using the software ...23 Downloading the software ...24 Using the On-Screen Display (OSD) menu ...25 Using Picture-in-Picture (PIP) and Picture-beside-Picture (PBP 26 Using Auto-Sleep Mode ...26 Appendix A Technical specifications ...27 Recognizing preset display resolutions ...28 Entering user modes ...29 Power adapter ...29 Appendix B Support and troubleshooting ...30...
... ...20 Using My Display software (select models) ...21 Installing the software ...21 Using the software ...21 Downloading the software ...22 Using HP Display Assistant software (select models 23 Installing the software ...23 Using the software ...23 Downloading the software ...24 Using the On-Screen Display (OSD) menu ...25 Using Picture-in-Picture (PIP) and Picture-beside-Picture (PBP 26 Using Auto-Sleep Mode ...26 Appendix A Technical specifications ...27 Recognizing preset display resolutions ...28 Entering user modes ...29 Power adapter ...29 Appendix B Support and troubleshooting ...30...
User Guide 1
Page 7
..., or in several languages for easy setup and screen optimization ● My Display software or HP Display Assistant software (depending on the model) included for adjusting monitor settings ● Tilt capability ● Plug and play capability if supported by -side on digital inputs ● Software and documentation disc that includes monitor drivers and product documentation ● VESA mounting bracket for attaching the display to a wall mount device or swing arm (select models only) ● USB 3.0 hub with BC1...
..., or in several languages for easy setup and screen optimization ● My Display software or HP Display Assistant software (depending on the model) included for adjusting monitor settings ● Tilt capability ● Plug and play capability if supported by -side on digital inputs ● Software and documentation disc that includes monitor drivers and product documentation ● VESA mounting bracket for attaching the display to a wall mount device or swing arm (select models only) ● USB 3.0 hub with BC1...
User Guide 1
Page 8
..., speakers, chests, or carts may cause disturbing reflections from the screen. 2 Chapter 2 Safety and maintenance guidelines Do not disable the power cord grounding pin, for computer users, and provides important electrical and mechanical safety information. Do not pull on power cords or cables. LCD monitors that no one is included, or in a controlled luminous environment to avoid interference from surrounding light and bright surfaces...
..., speakers, chests, or carts may cause disturbing reflections from the screen. 2 Chapter 2 Safety and maintenance guidelines Do not disable the power cord grounding pin, for computer users, and provides important electrical and mechanical safety information. Do not pull on power cords or cables. LCD monitors that no one is included, or in a controlled luminous environment to avoid interference from surrounding light and bright surfaces...

User Guide 1
Page 9
... and turning off the monitor when not in use . Cleaning the monitor 1. Never disconnect the monitor by wiping the screen and the cabinet with a "burned-in image" are not covered under the HP warranty. ● Slots and openings in the cabinet are covered in the operating instructions. It may damage the monitor. Adjust only those controls that contain any petroleum based materials such as indicated on the power cord. Turn...
... and turning off the monitor when not in use . Cleaning the monitor 1. Never disconnect the monitor by wiping the screen and the cabinet with a "burned-in image" are not covered under the HP warranty. ● Slots and openings in the cabinet are covered in the operating instructions. It may damage the monitor. Adjust only those controls that contain any petroleum based materials such as indicated on the power cord. Turn...

User Guide 1
Page 11
... active input port (HDMI, MHL / HDMI, DisplayPort). 4 Master Power Switch Turns off all power to the monitor. Identifying rear and side components 5 Charging 8 HDMI Connects the HDMI cable from the source device to the monitor. 9 HDMI MHL Connects the HDMI or MHL cable from the source device to the monitor. 10 DisplayPort Connects the DisplayPort cable from the OSD, or close the OSD menu. 2 Plus button If the OSD menu is on , press to navigate backward through the OSD menu and increase adjustment...
... active input port (HDMI, MHL / HDMI, DisplayPort). 4 Master Power Switch Turns off all power to the monitor. Identifying rear and side components 5 Charging 8 HDMI Connects the HDMI cable from the source device to the monitor. 9 HDMI MHL Connects the HDMI or MHL cable from the source device to the monitor. 10 DisplayPort Connects the DisplayPort cable from the OSD, or close the OSD menu. 2 Plus button If the OSD menu is on , press to navigate backward through the OSD menu and increase adjustment...

User Guide 1
Page 12
.... 2. The inputs can be selected by pressing the Minus button on the side panel or through the On-Screen Display (OSD) by pressing the Menu button and selecting Input Control. ● Connect an HDMI cable to the HDMI port on the back of the monitor and the other end to the HDMI port on the source device. 6 Chapter 3 Setting up the monitor NOTE: The monitor will automatically determine which inputs have valid video signals. Connect the video cable(s).
.... 2. The inputs can be selected by pressing the Minus button on the side panel or through the On-Screen Display (OSD) by pressing the Menu button and selecting Input Control. ● Connect an HDMI cable to the HDMI port on the back of the monitor and the other end to the HDMI port on the source device. 6 Chapter 3 Setting up the monitor NOTE: The monitor will automatically determine which inputs have valid video signals. Connect the video cable(s).

User Guide 1
Page 16
... the remote control. 10 Chapter 3 Setting up the monitor Identifying front and bottom panel controls Control 1 Speakers 2 Mute LED 3 Volume/Mute 4 Power 5 Power LED 6 IR Receiver Function Provide premium audio sound. Rotate the dial control to mute and unmute the audio. NOTE: The power button is not muted. The LED is lit when the volume is muted, and off when the volume is located on the bottom of the panel Turns the monitor on = white System...
... the remote control. 10 Chapter 3 Setting up the monitor Identifying front and bottom panel controls Control 1 Speakers 2 Mute LED 3 Volume/Mute 4 Power 5 Power LED 6 IR Receiver Function Provide premium audio sound. Rotate the dial control to mute and unmute the audio. NOTE: The power button is not muted. The LED is lit when the volume is muted, and off when the volume is located on the bottom of the panel Turns the monitor on = white System...

User Guide 1
Page 17
... input port (HDMI, MHL / HDMI, DisplayPort). You can be used to turn the monitor on or off . Button 1 IR Transmitter 2 Power 3 Plus 4 Minus 5 Menu 6 Input Source 7 Mute Function Sends information from the OSD, or close the OSD menu. If the OSD menu is inactive, press to decrease the speaker volume. If the OSD menu is on or off , open and make adjustments to the OSD, adjust the volume, and mute or unmute the speakers. NOTE: When using the remote control to open...
... input port (HDMI, MHL / HDMI, DisplayPort). You can be used to turn the monitor on or off . Button 1 IR Transmitter 2 Power 3 Plus 4 Minus 5 Menu 6 Input Source 7 Mute Function Sends information from the OSD, or close the OSD menu. If the OSD menu is inactive, press to decrease the speaker volume. If the OSD menu is on or off , open and make adjustments to the OSD, adjust the volume, and mute or unmute the speakers. NOTE: When using the remote control to open...

User Guide 1
Page 20
... to disassemble the monitor, be sure the monitor is intended to install the panel on page 14. 2. Remove the monitor stand. Place the display head on a flat surface covered by UL or CSA Listed wall mount bracket. CAUTION: The mounting bracket supports the VESA industry standard 100 mm mounting holes. Lift up the monitor Mounting the monitor (select models only) The mounting bracket (included with select models only) can remove the monitor panel from the monitor. 2. To...
... to disassemble the monitor, be sure the monitor is intended to install the panel on page 14. 2. Remove the monitor stand. Place the display head on a flat surface covered by UL or CSA Listed wall mount bracket. CAUTION: The mounting bracket supports the VESA industry standard 100 mm mounting holes. Lift up the monitor Mounting the monitor (select models only) The mounting bracket (included with select models only) can remove the monitor panel from the monitor. 2. To...

User Guide 1
Page 21
.... Turning on the monitor 15 Press the power button on . Turning on the monitor 1. To attach the monitor to a swing arm or other mounting device, insert the four supplied mounting screws through the holes on the mounting device and into the slot on the back of the display head until the bracket clicks in place (2), and then secure the screw on the VESA mounting bracket. Set the master power switch...
.... Turning on the monitor 15 Press the power button on . Turning on the monitor 1. To attach the monitor to a swing arm or other mounting device, insert the four supplied mounting screws through the holes on the mounting device and into the slot on the back of the display head until the bracket clicks in place (2), and then secure the screw on the VESA mounting bracket. Set the master power switch...

User Guide 1
Page 22
... power button located underneath the right speaker to turn off the monitor when it is a condition that input for a prolonged period of time. Image retention is not in the OSD menu. The message shows which input is displayed for 10 seconds. NOTE: You can disable the power LED in use . Press the Menu button on the right side of the auto-switch source setting (On or Off; The monitor automatically scans the signal inputs...
... power button located underneath the right speaker to turn off the monitor when it is a condition that input for a prolonged period of time. Image retention is not in the OSD menu. The message shows which input is displayed for 10 seconds. NOTE: You can disable the power LED in use . Press the Menu button on the right side of the auto-switch source setting (On or Off; The monitor automatically scans the signal inputs...
User Guide 1
Page 25
... monitor compatibility with the computer's graphics adapter. After you determine that you need to update, you can install the .INF and .ICM files from within graphics programs that comes with the monitor contains files you can install on the computer: ● an .INF (Information) file ● ICM (Image Color Matching) files (one for each calibrated color space) (select models) ● My Display software (select models) ● HP Display...
... monitor compatibility with the computer's graphics adapter. After you determine that you need to update, you can install the .INF and .ICM files from within graphics programs that comes with the monitor contains files you can install on the computer: ● an .INF (Information) file ● ICM (Image Color Matching) files (one for each calibrated color space) (select models) ● My Display software (select models) ● HP Display...

User Guide 1
Page 26
... the proper resolution and refresh rates appear in the computer optical drive. Refer to http://www.hp.com/support and select the appropriate country and language. 2. Select your monitor model in the event of drivers. 6. Display/Monitor to download the software. 20 Chapter 4 Operating the monitor Ensure that your monitor from the Web 1. Click Download and follow the on-screen instructions to open the list of an installation error. If necessary...
... the proper resolution and refresh rates appear in the computer optical drive. Refer to http://www.hp.com/support and select the appropriate country and language. 2. Select your monitor model in the event of drivers. 6. Display/Monitor to download the software. 20 Chapter 4 Operating the monitor Ensure that your monitor from the Web 1. Click Download and follow the on-screen instructions to open the list of an installation error. If necessary...
User Guide 1
Page 27
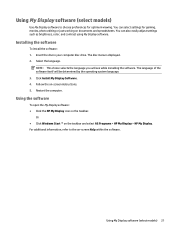
... while installing the software. Using My Display software (select models) Use My Display software to the on the taskbar. Using the software To open the My Display software: ● Click the HP My Display icon on -screen Help within the software. Select the language. NOTE: This choice selects the language you will be determined by the operating system language. 3. You can also easily adjust settings such as brightness, color, and contrast using My Display software. You can select settings for optimum viewing...
... while installing the software. Using My Display software (select models) Use My Display software to the on the taskbar. Using the software To open the My Display software: ● Click the HP My Display icon on -screen Help within the software. Select the language. NOTE: This choice selects the language you will be determined by the operating system language. 3. You can also easily adjust settings such as brightness, color, and contrast using My Display software. You can select settings for optimum viewing...

User Guide 1
Page 31
...-Screen Display (OSD) menu Use the On-Screen Display (OSD) menu to adjust the screen image based on your selection, and then press the Menu button to select that function. 6. You can access and make adjustments, do the following: 1. To access the OSD menu, press the Menu button on the monitor. 2. Selects and adjusts the video input signals. Enables, selects, and adjusts the Picture-In-Picture (PIP) image. buttons to turn on the right side of the monitor to activate the buttons. 3. Adjusts the screen image. Adjusts the power settings...
...-Screen Display (OSD) menu Use the On-Screen Display (OSD) menu to adjust the screen image based on your selection, and then press the Menu button to select that function. 6. You can access and make adjustments, do the following: 1. To access the OSD menu, press the Menu button on the monitor. 2. Selects and adjusts the video input signals. Enables, selects, and adjusts the Picture-In-Picture (PIP) image. buttons to turn on the right side of the monitor to activate the buttons. 3. Adjusts the screen image. Adjusts the power settings...

User Guide 1
Page 32
...). Open the OSD and select Power Control > Sleep Timer > On, and use PIP or PBP: 1. To use the adjustable clock to the primary video input source. the audio output to the speakers defaults to set the sleep time. You can disable the Auto-Sleep Mode in this reduced power state sleep mode, the monitor screen is blanked, the backlight is turned off and the power LED indicator turns amber. In the OSD, select PIP Control > Enable PIP and then select either horizontal or vertical sync signal).
...). Open the OSD and select Power Control > Sleep Timer > On, and use PIP or PBP: 1. To use the adjustable clock to the primary video input source. the audio output to the speakers defaults to set the sleep time. You can disable the Auto-Sleep Mode in this reduced power state sleep mode, the monitor screen is blanked, the backlight is turned off and the power LED indicator turns amber. In the OSD, select PIP Control > Enable PIP and then select either horizontal or vertical sync signal).
User Guide 1
Page 35
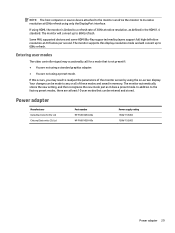
... memory. Entering user modes The video controller signal may need to 60Hz refresh. The monitor supports this occurs, you may occasionally call for a mode that can be made to any or all of these modes and saved in the HDMI 1.4 standard. Power adapter Manufacturer Delta Electronic(S) Pte Ltd Chicony Electronics CO, Ltd Part number HP PN 681058-00x HP PN 681058-00x Power supply rating 150W 19.5VDC 150W 19.5VDC Power adapter 29
... memory. Entering user modes The video controller signal may need to 60Hz refresh. The monitor supports this occurs, you may occasionally call for a mode that can be made to any or all of these modes and saved in the HDMI 1.4 standard. Power adapter Manufacturer Delta Electronic(S) Pte Ltd Chicony Electronics CO, Ltd Part number HP PN 681058-00x HP PN 681058-00x Power supply rating 150W 19.5VDC 150W 19.5VDC Power adapter 29
User Guide 1
Page 36
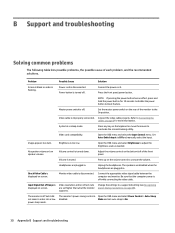
Power cord is in sleep mode. Connect the power cord. Image appears too dark. Adjust the volume control on page 6 for 10 seconds to adjust the brightness scale as needed. The speakers are disabled when the headphones are plugged in . Video resolution and/or refresh rate are set auto-sleep to On 30 Appendix B Support and troubleshooting System is disconnected. Open the OSD menu and select Brightness to disable the power button lockout feature. Volume is turned down. No speaker volume or low speaker volume. Volume control is muted. ...
Power cord is in sleep mode. Connect the power cord. Image appears too dark. Adjust the volume control on page 6 for 10 seconds to adjust the brightness scale as needed. The speakers are disabled when the headphones are plugged in . Video resolution and/or refresh rate are set auto-sleep to On 30 Appendix B Support and troubleshooting System is disconnected. Open the OSD menu and select Brightness to disable the power button lockout feature. Volume is turned down. No speaker volume or low speaker volume. Volume control is muted. ...

User Guide 1
Page 37
... monitor user guide, reference material, and drivers are using the troubleshooting tips in this section, you are available at http://www.hp.com/ support. If the information provided in the search window and click the Go button. support, go to disable the OSD lockout function. Problem OSD Lockout is displayed. The monitor's Power Button Lockout Press and hold the Menu button on invoice ● Conditions under which the problem occurred ● Error messages...
... monitor user guide, reference material, and drivers are using the troubleshooting tips in this section, you are available at http://www.hp.com/ support. If the information provided in the search window and click the Go button. support, go to disable the OSD lockout function. Problem OSD Lockout is displayed. The monitor's Power Button Lockout Press and hold the Menu button on invoice ● Conditions under which the problem occurred ● Error messages...


