
w19b, w19e, w19ev, W19q LCD Monitor - User's Guide
Page 8
Back to Contents Page Cables Attaching the Cables Attaching the Cables You can attach a VGA cable (provided), a DVI-D cable (select models only), or both cables are found on the back of input can be selected using the audio cable (green connector). Connectors are installed, the source of the monitor. To use DVI, your computer. 2 Connect the built-in monitor speakers to the computer, using the Input Select option in the OSD menu. If both to the OSD Menu section. 1 Turn off your computer must have a DVI-compliant graphics card. Please refer to this monitor.
Back to Contents Page Cables Attaching the Cables Attaching the Cables You can attach a VGA cable (provided), a DVI-D cable (select models only), or both cables are found on the back of input can be selected using the audio cable (green connector). Connectors are installed, the source of the monitor. To use DVI, your computer. 2 Connect the built-in monitor speakers to the computer, using the Input Select option in the OSD menu. If both to the OSD Menu section. 1 Turn off your computer must have a DVI-compliant graphics card. Please refer to this monitor.

w19b, w19e, w19ev, W19q LCD Monitor - User's Guide
Page 9
3 If you are attaching a VGA cable, connect one end of the 15-pin D-Sub VGA cable (blue connector) to the back of the monitor and connect the other end to the computer VGA port. 4 If you are attaching a DVI cable, connect one end of the 24-pin DVI cable (white connector) to the back of the monitor (select models only) and connect the other end to the computer DVI port.
3 If you are attaching a VGA cable, connect one end of the 15-pin D-Sub VGA cable (blue connector) to the back of the monitor and connect the other end to the computer VGA port. 4 If you are attaching a DVI cable, connect one end of the 24-pin DVI cable (white connector) to the back of the monitor (select models only) and connect the other end to the computer DVI port.

w19b, w19e, w19ev, W19q LCD Monitor - User's Guide
Page 16
... Do not execute reset, return to main menu Exit OSD See Specifications for the horizontal and vertical scan ranges addressable by this monitor. Position V. Position Adjust the vertical position of the OSD OSD Timeout Adjust the OSD timeout Language Language N/A Select the language ... temperature from EEPROM Red gain from digital-register User / Green Green gain from digital-register User / Blue Blue gain from digital source (DVI) Adjust the horizontal position of the OSD V. Position N/A N/A Select input signal from analog source (VGA) Select input signal from digital...
... Do not execute reset, return to main menu Exit OSD See Specifications for the horizontal and vertical scan ranges addressable by this monitor. Position V. Position Adjust the vertical position of the OSD OSD Timeout Adjust the OSD timeout Language Language N/A Select the language ... temperature from EEPROM Red gain from digital-register User / Green Green gain from digital-register User / Blue Blue gain from digital source (DVI) Adjust the horizontal position of the OSD V. Position N/A N/A Select input signal from analog source (VGA) Select input signal from digital...

w19b, w19e, w19ev, W19q LCD Monitor - User's Guide
Page 17
Do not use this procedure if your monitor is using DVI input. Using the Auto-Adjustment Function Press the AUTO button to : http://www.hp.com/support 2 Select your country/region. 3 Select Download Drivers and Software. 4 Enter the model number of drivers and software files from the HP Support Web site: 1 Refer to optimize the...
Do not use this procedure if your monitor is using DVI input. Using the Auto-Adjustment Function Press the AUTO button to : http://www.hp.com/support 2 Select your country/region. 3 Select Download Drivers and Software. 4 Enter the model number of drivers and software files from the HP Support Web site: 1 Refer to optimize the...
w19b, w19e, w19ev, W19q LCD Monitor - User's Guide
Page 20
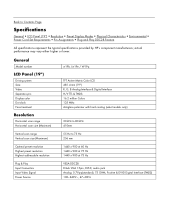
...range Vertical scan size (Maximum) 55 Hz to Contents Page Specifications General • LCD Panel (19") • Resolution • Preset Display Modes • Physical Characteristics • Environmental... • Power Cord Set Requirements • Pin Assignments • Plug and Play DDC2B Feature All specifications represent the typical specifications provided by HP...DVI-D, audio jack Analog: 0.7Vp-p(standard), 75 OHM, Positive & DVI-D Digital Interface (TMDS) 100~240V , 47~63Hz
...range Vertical scan size (Maximum) 55 Hz to Contents Page Specifications General • LCD Panel (19") • Resolution • Preset Display Modes • Physical Characteristics • Environmental... • Power Cord Set Requirements • Pin Assignments • Plug and Play DDC2B Feature All specifications represent the typical specifications provided by HP...DVI-D, audio jack Analog: 0.7Vp-p(standard), 75 OHM, Positive & DVI-D Digital Interface (TMDS) 100~240V , 47~63Hz

w19b, w19e, w19ev, W19q LCD Monitor - User's Guide
Page 21
...1024 1280 x 1024 1440 x 900 1440 x 900 Physical Characteristics Connector Types Signal Cable Type Dimensions & Weight: Height (with base) Width Depth Weight (monitor only) Weight (with packaging) Environmental Temperature: Operating Non-Operating Humidity: Operating Non-Operating Altitude: Operating Non-Operating Horizontal Frequency (kHz) 31.47 31....70.635 Vertical Frequency (Hz) 70.0 60.0 75.0 60.0 75.0 60.0 70.0 75.0 60.0 75.0 59.8 74.984 15-pin Mini D-Sub VGA, DVI-D, headphone-out Detachable 14.0 inches (356.5 mm) 17.3 inches (438.5 mm) 8.3 inches (211 mm) 12.61 (4.85 kg) 17.00 lb (6.54...
...1024 1280 x 1024 1440 x 900 1440 x 900 Physical Characteristics Connector Types Signal Cable Type Dimensions & Weight: Height (with base) Width Depth Weight (monitor only) Weight (with packaging) Environmental Temperature: Operating Non-Operating Humidity: Operating Non-Operating Altitude: Operating Non-Operating Horizontal Frequency (kHz) 31.47 31....70.635 Vertical Frequency (Hz) 70.0 60.0 75.0 60.0 75.0 60.0 70.0 75.0 60.0 75.0 59.8 74.984 15-pin Mini D-Sub VGA, DVI-D, headphone-out Detachable 14.0 inches (356.5 mm) 17.3 inches (438.5 mm) 8.3 inches (211 mm) 12.61 (4.85 kg) 17.00 lb (6.54...

User Guide 1506, 1706 and 1906 LCD Monitors
Page 40
... and contrast are too low. Position may need adjustment. Connect the 15-pin monitor video cable to the VGA connector on the computer, the DVI-D signal cable to the DVI connector on the computer, or the VGA to DVI-I cable to adjust the horizontal or vertical position of the image. A-2 User...is off while connecting the video cable. Be sure that the computer power is not centered. "No Connection, Check Signal Cable" is disconnected. Monitor video cable is displayed on screen. Select Image Control/ Horizontal Position or Vertical Position to the VGA connector on the front panel.
... and contrast are too low. Position may need adjustment. Connect the 15-pin monitor video cable to the VGA connector on the computer, the DVI-D signal cable to the DVI connector on the computer, or the VGA to DVI-I cable to adjust the horizontal or vertical position of the image. A-2 User...is off while connecting the video cable. Be sure that the computer power is not centered. "No Connection, Check Signal Cable" is disconnected. Monitor video cable is displayed on screen. Select Image Control/ Horizontal Position or Vertical Position to the VGA connector on the front panel.
User's Guide FP9419 LCD Monitor
Page 7
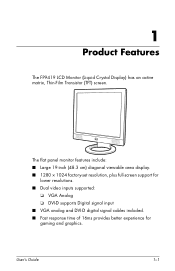
The flat panel monitor features include: ■ Large 19-inch (48.3 cm) diagonal viewable area display. ■ 1280 × 1024 factory-set resolution, plus full-screen support for lower resolutions. ■ Dual video inputs supported: ❏ VGA Analog ❏ DVI-D supports Digital signal input ■ VGA analog and DVI-D digital signal cables included. ■ Fast response time of 16ms provides better experience for gaming and graphics. User's Guide 1-1 1 Product Features The FP9419 LCD Monitor (Liquid Crystal Display) has an active matrix, Thin-Film Transistor (TFT) screen.
The flat panel monitor features include: ■ Large 19-inch (48.3 cm) diagonal viewable area display. ■ 1280 × 1024 factory-set resolution, plus full-screen support for lower resolutions. ■ Dual video inputs supported: ❏ VGA Analog ❏ DVI-D supports Digital signal input ■ VGA analog and DVI-D digital signal cables included. ■ Fast response time of 16ms provides better experience for gaming and graphics. User's Guide 1-1 1 Product Features The FP9419 LCD Monitor (Liquid Crystal Display) has an active matrix, Thin-Film Transistor (TFT) screen.

User's Guide FP9419 LCD Monitor
Page 15
... outputs to the monitor, computer system, and other attached devices (monitor ships in off position). 3. Unpack the monitor. Determine the video cable or cables that the power is for use the DVI-D to -digital connection only. The DVI-D cable supplied with this monitor is turned off to the VGA and DVI inputs on the monitor. Store the boxes...
... outputs to the monitor, computer system, and other attached devices (monitor ships in off position). 3. Unpack the monitor. Determine the video cable or cables that the power is for use the DVI-D to -digital connection only. The DVI-D cable supplied with this monitor is turned off to the VGA and DVI inputs on the monitor. Store the boxes...

User's Guide FP9419 LCD Monitor
Page 21
VGA LCD TV-OUT Connecting the VGA Cable User's Guide 3-7 Place the monitor upright as shown in the following illustration. 2. Connect the video cable from the monitor to the VGA input connector on the rear panel of the computer. ✎ You can connect the VGA cable, the DVI-D cable, or both. Only one... cable is connected for typical installations. ❏ Connect one end of the 15-pin VGA cable to the video connector on the monitor. Then connect the other end to the computer: 1. Setting Up ...
VGA LCD TV-OUT Connecting the VGA Cable User's Guide 3-7 Place the monitor upright as shown in the following illustration. 2. Connect the video cable from the monitor to the VGA input connector on the rear panel of the computer. ✎ You can connect the VGA cable, the DVI-D cable, or both. Only one... cable is connected for typical installations. ❏ Connect one end of the 15-pin VGA cable to the video connector on the monitor. Then connect the other end to the computer: 1. Setting Up ...

User's Guide FP9419 LCD Monitor
Page 22
Then connect the other end to the DVI input connector on the computer. DVI Connecting the DVI-D Cable LCD TV-OUT 3-8 User's Guide Setting Up the Monitor ❏ Connect one end of the DVI-D cable to the DVI connector on the monitor.
Then connect the other end to the DVI input connector on the computer. DVI Connecting the DVI-D Cable LCD TV-OUT 3-8 User's Guide Setting Up the Monitor ❏ Connect one end of the DVI-D cable to the DVI connector on the monitor.

User's Guide FP9419 LCD Monitor
Page 25
... that it cannot fall over. Apply power to the computer and monitor, and other attached devices. 6. The Monitor Status displays: ❏ VGA Input: Active or No Input Signal ❏ DVI Input: Active or No Input Signal ❏ Mode: Settings 7. Test the monitor function. If it could fall off the table if bumped. 8. User's Guide...
... that it cannot fall over. Apply power to the computer and monitor, and other attached devices. 6. The Monitor Status displays: ❏ VGA Input: Active or No Input Signal ❏ DVI Input: Active or No Input Signal ❏ Mode: Settings 7. Test the monitor function. If it could fall off the table if bumped. 8. User's Guide...

User's Guide FP9419 LCD Monitor
Page 29
...the Menu button, then select Auto Adjustment from the HP Monitors Support Web site: 1. Using the Auto-Adjustment Function You can easily optimize the screen performance for your monitor to : http://www.hp.com/support Select your monitor is using the Select/Auto button and the auto-... the support page and download page. 3. Download the software by using a DVI input. Press the Select/Auto button under the monitor's front panel. ❏ You can correct the following the instructions. Operating the Monitor Downloading from the World Wide Web To download the latest version of .INF...
...the Menu button, then select Auto Adjustment from the HP Monitors Support Web site: 1. Using the Auto-Adjustment Function You can easily optimize the screen performance for your monitor to : http://www.hp.com/support Select your monitor is using the Select/Auto button and the auto-... the support page and download page. 3. Download the software by using a DVI input. Press the Select/Auto button under the monitor's front panel. ❏ You can correct the following the instructions. Operating the Monitor Downloading from the World Wide Web To download the latest version of .INF...

User's Guide FP9419 LCD Monitor
Page 32
... settings down. on and off. OSD Inactive Button selects the VGA video input. Turn (Volume control) counter-clockwise to the ideal setting. Operating the Monitor ' No. Fully powered: Green Sleep mode: Amber C menu (On-Screen Display) D -/1 (Minus) E +/2 (Plus) F Select−Auto... OSD Menu Active OSD Inactive Button closes OSD. OSD Inactive Button selects the DVI-D video input. Button automatically adjusts the display to increase volume. G Controls the volume level of the monitor speakers. OSD Menu Active Button acts as an Enter (Select) key to decrease volume...
... settings down. on and off. OSD Inactive Button selects the VGA video input. Turn (Volume control) counter-clockwise to the ideal setting. Operating the Monitor ' No. Fully powered: Green Sleep mode: Amber C menu (On-Screen Display) D -/1 (Minus) E +/2 (Plus) F Select−Auto... OSD Menu Active OSD Inactive Button closes OSD. OSD Inactive Button selects the DVI-D video input. Button automatically adjusts the display to increase volume. G Controls the volume level of the monitor speakers. OSD Menu Active Button acts as an Enter (Select) key to decrease volume...

User's Guide FP9419 LCD Monitor
Page 36
Operating the Monitor Advanced Menu OSD (Continued) Level 1 Level 2 Level 3 Factory Preset Français Italiano Nederlands Cancel Save and Return Management Power Saver On/Off Selection On ... Adjustment Scale 50 OSD Timeout Adjustment Scale 30 Seconds OSD Transparency Adjustment Scale Save and Return Cancel Video Input Controls Input Selection Analog (D-SUB) Digital (DVI) Auto Detect Cancel Factory Reset Yes No Exit 4-10 User's Guide
Operating the Monitor Advanced Menu OSD (Continued) Level 1 Level 2 Level 3 Factory Preset Français Italiano Nederlands Cancel Save and Return Management Power Saver On/Off Selection On ... Adjustment Scale 50 OSD Timeout Adjustment Scale 30 Seconds OSD Transparency Adjustment Scale Save and Return Cancel Video Input Controls Input Selection Analog (D-SUB) Digital (DVI) Auto Detect Cancel Factory Reset Yes No Exit 4-10 User's Guide
User's Guide FP9419 LCD Monitor
Page 37
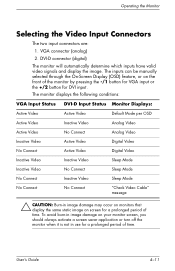
...determine which inputs have valid video signals and display the image. To avoid burn-in use for DVI input. The monitor displays the following conditions: VGA Input Status DVI-D Input Status Monitor Displays: Active Video Active Video Default Mode per OSD Active Video Inactive Video Analog Video Active ...Video Cable" message Ä CAUTION: Burn-in image damage may occur on monitors that display the same static image on your monitor screen, you should always activate a screen saver application or turn off the monitor when it is not in image damage on screen for a prolonged period of...
...determine which inputs have valid video signals and display the image. To avoid burn-in use for DVI input. The monitor displays the following conditions: VGA Input Status DVI-D Input Status Monitor Displays: Active Video Active Video Default Mode per OSD Active Video Inactive Video Analog Video Active ...Video Cable" message Ä CAUTION: Burn-in image damage may occur on monitors that display the same static image on your monitor screen, you should always activate a screen saver application or turn off the monitor when it is not in image damage on screen for a prolonged period of...

User's Guide FP9419 LCD Monitor
Page 44
... settings to adjust the horizontal or vertical position of Range. Solution Press the Menu button to the DVI connector on the computer, or connect the DVI-D signal cable to access the OSD Menu. Change your monitor supports. Monitor video cable is displayed on screen. "No Connection, Check Signal Cable" is displayed on screen. Select...
... settings to adjust the horizontal or vertical position of Range. Solution Press the Menu button to the DVI connector on the computer, or connect the DVI-D signal cable to access the OSD Menu. Change your monitor supports. Monitor video cable is displayed on screen. "No Connection, Check Signal Cable" is displayed on screen. Select...
User's Guide FP9419 LCD Monitor
Page 48
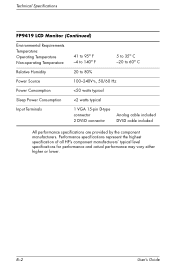
Technical Specifications FP9419 LCD Monitor (Continued) Environmental Requirements Temperature: Operating Temperature Non-operating Temperature 41 to 95o F -4 to 140o F 5 to 35o C -20 to 60o C Relative Humidity 20 to 80% Power Source 100-240V , 50/60 Hz Power Consumption
Technical Specifications FP9419 LCD Monitor (Continued) Environmental Requirements Temperature: Operating Temperature Non-operating Temperature 41 to 95o F -4 to 140o F 5 to 35o C -20 to 60o C Relative Humidity 20 to 80% Power Source 100-240V , 50/60 Hz Power Consumption

