Upgrading and Servicing
Page 4
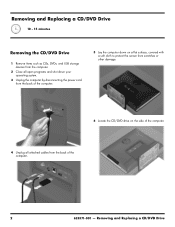
.../DVD Drive Removing and Replacing a CD/DVD Drive 10 - 15 minutes Removing the CD/DVD Drive 1 Remove items such as CDs, DVDs, and USB storage devices from the computer. 2 Close ... by disconnecting the power cord from the back of the computer. 5 Lay the computer down on a flat surface, covered with a soft cloth to protect the screen from scratches or other damage. 6 Locate the CD/DVD drive on the side of the computer. 4 Unplug all attached cables from the back of the...
.../DVD Drive Removing and Replacing a CD/DVD Drive 10 - 15 minutes Removing the CD/DVD Drive 1 Remove items such as CDs, DVDs, and USB storage devices from the computer. 2 Close ... by disconnecting the power cord from the back of the computer. 5 Lay the computer down on a flat surface, covered with a soft cloth to protect the screen from scratches or other damage. 6 Locate the CD/DVD drive on the side of the computer. 4 Unplug all attached cables from the back of the...
Upgrading and Servicing
Page 10
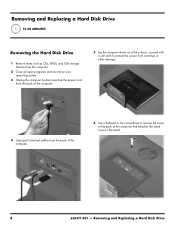
Removing and Replacing a Hard Disk Drive 15-20 MINUTES Removing the Hard Disk Drive 1 Remove items such as CDs, DVDs, and USB storage devices from the computer. 2 Close ... by disconnecting the power cord from the back of the computer. 5 Lay the computer down on a flat surface, covered with a soft cloth to protect the screen from scratches or other damage. 4 Unplug all attached cables from the back of the computer. 6 Use a flathead or Torx screwdriver to remove the screw at...
Removing and Replacing a Hard Disk Drive 15-20 MINUTES Removing the Hard Disk Drive 1 Remove items such as CDs, DVDs, and USB storage devices from the computer. 2 Close ... by disconnecting the power cord from the back of the computer. 5 Lay the computer down on a flat surface, covered with a soft cloth to protect the screen from scratches or other damage. 4 Unplug all attached cables from the back of the computer. 6 Use a flathead or Torx screwdriver to remove the screw at...
Upgrading and Servicing
Page 16
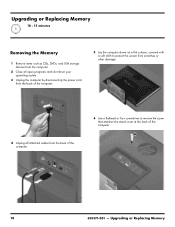
Upgrading or Replacing Memory Upgrading or Replacing Memory 10 - 15 minutes Removing the Memory 1 Remove items such as CDs, DVDs, and USB storage devices from the computer. 2 Close all open programs and ... by disconnecting the power cord from the back of the computer. 5 Lay the computer down on a flat surface, covered with a soft cloth to protect the screen from scratches or other damage. 4 Unplug all attached cables from the back of the computer. 6 Use a flathead or Torx screwdriver to remove the screw that...
Upgrading or Replacing Memory Upgrading or Replacing Memory 10 - 15 minutes Removing the Memory 1 Remove items such as CDs, DVDs, and USB storage devices from the computer. 2 Close all open programs and ... by disconnecting the power cord from the back of the computer. 5 Lay the computer down on a flat surface, covered with a soft cloth to protect the screen from scratches or other damage. 4 Unplug all attached cables from the back of the computer. 6 Use a flathead or Torx screwdriver to remove the screw that...
Upgrading and Servicing
Page 26
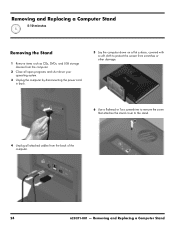
Removing and Replacing a Computer Stand Removing and Replacing a Computer Stand 5-10 minutes 1 Removing the Stand 1 Remove items such as CDs, DVDs, and USB storage devices from the computer. 2 Close all open programs and ... system. 3 Unplug the computer by disconnecting the power cord in back. 5 Lay the computer down on a flat surface, covered with a soft cloth to protect the screen from scratches or other damage. 6 Use a flathead or Torx screwdriver to remove the screw that attaches the stand cover to the stand. 4 Unplug all attached...
Removing and Replacing a Computer Stand Removing and Replacing a Computer Stand 5-10 minutes 1 Removing the Stand 1 Remove items such as CDs, DVDs, and USB storage devices from the computer. 2 Close all open programs and ... system. 3 Unplug the computer by disconnecting the power cord in back. 5 Lay the computer down on a flat surface, covered with a soft cloth to protect the screen from scratches or other damage. 6 Use a flathead or Torx screwdriver to remove the screw that attaches the stand cover to the stand. 4 Unplug all attached...
Getting Started Guide
Page 14
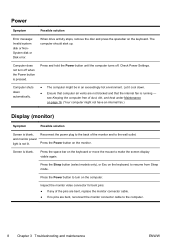
... running - Screen is pressed. Inspect the monitor video connector for bent pins: ● If any of the monitor and to turn off . Press the Power button to the wall outlet. The computer should start up. Reconnect the power plug to the back of the pins are bent, replace the monitor ...connector cable. ● If no pins are not blocked and that computer air vents are bent, reconnect the monitor connector cable to make the screen display visible again. Press the Power button on the keyboard, to ...
... running - Screen is pressed. Inspect the monitor video connector for bent pins: ● If any of the monitor and to turn off . Press the Power button to the wall outlet. The computer should start up. Reconnect the power plug to the back of the pins are bent, replace the monitor ...connector cable. ● If no pins are not blocked and that computer air vents are bent, reconnect the monitor connector cable to make the screen display visible again. Press the Power button on the keyboard, to ...

Getting Started Guide
Page 17
...a USB connector on the computer, and then reconnect it . After the mouse connection is not in Suspend mode, which occurs after 60 seconds. Replace the batteries in the following steps. your models might have a choice, use , and within range of the receiver, approximately 10 meters (32 feet...the receiver lights or stops flashing. Ensure that the receiver did not time out instead, move the mouse and check for response on the screen. Keyboard and mouse (wireless) Symptom Possible solution Wireless ● keyboard or mouse does not work or is on (A), and push and ...
...a USB connector on the computer, and then reconnect it . After the mouse connection is not in Suspend mode, which occurs after 60 seconds. Replace the batteries in the following steps. your models might have a choice, use , and within range of the receiver, approximately 10 meters (32 feet...the receiver lights or stops flashing. Ensure that the receiver did not time out instead, move the mouse and check for response on the screen. Keyboard and mouse (wireless) Symptom Possible solution Wireless ● keyboard or mouse does not work or is on (A), and push and ...

Getting Started Guide
Page 18
...-panel buttons to enter the on the back of the computer. Unplug headphones if they are connected to the Audio Out (lime green) connector on -screen display (OSD) and ensure that audio is set appropriately. If you connected the speakers to your ISP, and start automatically. Ensure that they are turned... ENWW Ensure that the volume is enabled and that you are connected to your computer (or speaker system). If you want to connect analog speakers. Replace the non-powered speakers with powered speakers.
...-panel buttons to enter the on the back of the computer. Unplug headphones if they are connected to the Audio Out (lime green) connector on -screen display (OSD) and ensure that audio is set appropriately. If you connected the speakers to your ISP, and start automatically. Ensure that they are turned... ENWW Ensure that the volume is enabled and that you are connected to your computer (or speaker system). If you want to connect analog speakers. Replace the non-powered speakers with powered speakers.
Getting Started Guide
Page 23
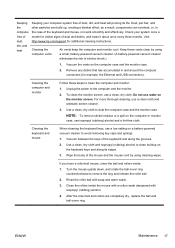
...screen cleaner. 3. Vacuum between the keys of the keyboard and along its life. If you have a roller-ball mouse, clean the ball and rollers inside the mouse with a cotton swab dampened with soap and warm water. 3. Clean the rollers inside : 1. After the roller ball and rollers are completely dry, replace... monitor: 1. ENWW Maintenance 17 Check your computer system free of dust, dirt, and heat will prolong its edges. 3. Visit http://www.hp.com/support for additional cleaning instructions. NOTE: To remove sticker residue or a spill on the computer case and the monitor case. 2. For...
...screen cleaner. 3. Vacuum between the keys of the keyboard and along its life. If you have a roller-ball mouse, clean the ball and rollers inside the mouse with a cotton swab dampened with soap and warm water. 3. Clean the rollers inside : 1. After the roller ball and rollers are completely dry, replace... monitor: 1. ENWW Maintenance 17 Check your computer system free of dust, dirt, and heat will prolong its edges. 3. Visit http://www.hp.com/support for additional cleaning instructions. NOTE: To remove sticker residue or a spill on the computer case and the monitor case. 2. For...
Getting Started Guide
Page 24
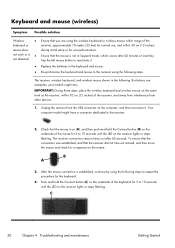
...times out after 20 minutes of the receiver, and away from interference from the USB connector on the computer, and then reconnect it . ● Replace the batteries in the following illustrations are using the wireless keyboard or wireless mouse within range of the keyboard or receiver, approximately 10 meters (32... is on (A), and then push and hold the Connect button (C) on the underside of the mouse for 5 to 10 seconds until the LED on the screen. A Off Connect On B 3. not work or is ● Ensure that the receiver did not time out instead, and then move the mouse and...
...times out after 20 minutes of the receiver, and away from interference from the USB connector on the computer, and then reconnect it . ● Replace the batteries in the following illustrations are using the wireless keyboard or wireless mouse within range of the keyboard or receiver, approximately 10 meters (32... is on (A), and then push and hold the Connect button (C) on the underside of the mouse for 5 to 10 seconds until the LED on the screen. A Off Connect On B 3. not work or is ● Ensure that the receiver did not time out instead, and then move the mouse and...
Getting Started Guide
Page 33
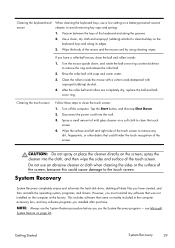
...and along the grooves. 2. Rinse the roller ball with isopropyl (rubbing) alcohol. 4. Wipe the surface and left and right side of the screen. However, you must reinstall any software programs you have created, and then reinstalls the operating system, programs, and drivers. Use a clean, dry...Wipe the body of the keyboard and along its edges. 3. Getting Started System Recovery 29 After the roller ball and rollers are completely dry, replace the ball and ballcover ring. Tap the Start button, and then tap Shut Down. 2. Disconnect the power cord from the wall. 3. Turn...
...and along the grooves. 2. Rinse the roller ball with isopropyl (rubbing) alcohol. 4. Wipe the surface and left and right side of the screen. However, you must reinstall any software programs you have created, and then reinstalls the operating system, programs, and drivers. Use a clean, dry...Wipe the body of the keyboard and along its edges. 3. Getting Started System Recovery 29 After the roller ball and rollers are completely dry, replace the ball and ballcover ring. Tap the Start button, and then tap Shut Down. 2. Disconnect the power cord from the wall. 3. Turn...


