
Setup Poster
Page 1
...User's Manual (printed or on how to your email program. For more CDs (depending on your language directory and click on how to make a copy. To Scan 1. Sends the scan to HP Instant Share or to the scanner and then plug it into a surge protector or grounded wall outlet. 3. HP Scanjet 4800 series Photo Scanner HP Scanjet... 4800 series Lorum Dolor Setup Ullam English A 1. Model Number 4890 C. B 2. Connect...
...User's Manual (printed or on how to your email program. For more CDs (depending on your language directory and click on how to make a copy. To Scan 1. Sends the scan to HP Instant Share or to the scanner and then plug it into a surge protector or grounded wall outlet. 3. HP Scanjet 4800 series Photo Scanner HP Scanjet... 4800 series Lorum Dolor Setup Ullam English A 1. Model Number 4890 C. B 2. Connect...
Setup Poster
Page 2
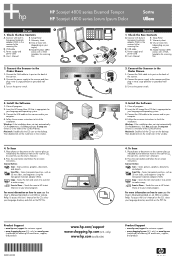
... CD-ROM drive). HP Scanjet 4800 series Eiusmod Tempor HP Scanjet 4800 series Lorum Ipsum Dolor Sartre Ullam Dorum A 1. Check the Box Contents A. Setup Poster transparent materials adapter (TMA) in the Order Shown 1. USB cable C. User's Manual film. B 2. C 1 H G F D E 3 2 Suocirca 1. USB cable C. Power supply and power cord D. Warranty sheet G. Connect the Scanner in the scanner lid for your email...
... CD-ROM drive). HP Scanjet 4800 series Eiusmod Tempor HP Scanjet 4800 series Lorum Ipsum Dolor Sartre Ullam Dorum A 1. Check the Box Contents A. Setup Poster transparent materials adapter (TMA) in the Order Shown 1. USB cable C. User's Manual film. B 2. C 1 H G F D E 3 2 Suocirca 1. USB cable C. Power supply and power cord D. Warranty sheet G. Connect the Scanner in the scanner lid for your email...

User's Manual
Page 4
... 16 Clean the transparent materials adapter (TMA 16 3 Troubleshooting 17 Scanner installation or setup problems 17 Scanner initialization or hardware problems 18 4 Product support 20 Accessibility Web site 20 HP Scanjet Web site 20 Support process 20 5 Regulatory information and product specifications 22 Scanner specifications 22 Transparent materials adapter (TMA) specifications 22 Environmental specifications 23 User's Manual 1
... 16 Clean the transparent materials adapter (TMA 16 3 Troubleshooting 17 Scanner installation or setup problems 17 Scanner initialization or hardware problems 18 4 Product support 20 Accessibility Web site 20 HP Scanjet Web site 20 Support process 20 5 Regulatory information and product specifications 22 Scanner specifications 22 Transparent materials adapter (TMA) specifications 22 Environmental specifications 23 User's Manual 1
User's Manual
Page 5
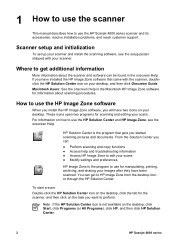
...scanner This manual describes how to use the HP Solution Center and HP Image Zone, see the setup poster shipped with the scanner, doubleclick the HP Solution Center icon on your scans. Scanner setup and initialization To set up your scanner...documents. Macintosh Users: See the onscreen Help in the onscreen Help. How to edit your images after they have two icons on your scanner. HP Solution Center ... preferences HP Image Zone is the program to use the HP Image Zone software When you install the HP Image Zone software, you want to use the HP Scanjet 4800 series scanner and ...
...scanner This manual describes how to use the HP Solution Center and HP Image Zone, see the setup poster shipped with the scanner, doubleclick the HP Solution Center icon on your scans. Scanner setup and initialization To set up your scanner...documents. Macintosh Users: See the onscreen Help in the onscreen Help. How to edit your images after they have two icons on your scanner. HP Solution Center ... preferences HP Image Zone is the program to use the HP Image Zone software When you install the HP Image Zone software, you want to use the HP Scanjet 4800 series scanner and ...
User's Manual
Page 6
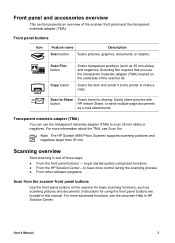
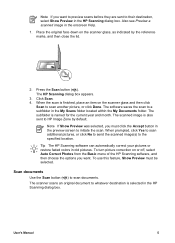
... front panel buttons on the underside of the scanner front panel and the transparent materials adapter (TMA). Note The HP Scanjet 4890 Photo Scanner supports scanning positives and negatives larger than 35 mm. Instructions for sharing. Scan Film button Copy button Scans transparent positives (such as e-mail attachments. User's Manual 3 For more information about the TMA, see the...
... front panel buttons on the underside of the scanner front panel and the transparent materials adapter (TMA). Note The HP Scanjet 4890 Photo Scanner supports scanning positives and negatives larger than 35 mm. Instructions for sharing. Scan Film button Copy button Scans transparent positives (such as e-mail attachments. User's Manual 3 For more information about the TMA, see the...
User's Manual
Page 8
..., Show Preview must click the Accept button in the HP Scanning dialog box. The scanner scans an original document to whatever destination is also sent to the specified location. Click Scan. 4. User's Manual 5 Also see Preview a scanned image in the HP Scanning dialog box. The scanned image is selected in...by the reference marks, and then close the lid. 2. To turn picture correction on or off, select Auto Correct Photos from the Basic menu of the HP Scanning software, and then choose the options you want to preview scans before they are sent to their destination, select...
..., Show Preview must click the Accept button in the HP Scanning dialog box. The scanner scans an original document to whatever destination is also sent to the specified location. Click Scan. 4. User's Manual 5 Also see Preview a scanned image in the HP Scanning dialog box. The scanned image is selected in...by the reference marks, and then close the lid. 2. To turn picture correction on or off, select Auto Correct Photos from the Basic menu of the HP Scanning software, and then choose the options you want to preview scans before they are sent to their destination, select...
User's Manual
Page 10
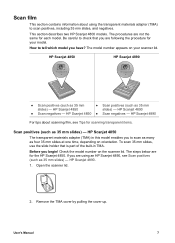
...steps below are not the same for each model. If you are following the procedure for your scanner lid. HP Scanjet 4890. 1. Open the scanner lid. 2. This section describes two HP Scanjet 4800 models. Scan film This section contains information about scanning film, see Scan positives (such ... slides) - The model number appears on your model. HP Scanjet 4890 ● Scan negatives - Before you have? Remove the TMA cover by pulling the cover up. The procedures are for the HP Scanjet 4850. User's Manual 7 HP Scanjet 4850 The transparent materials adapter (TMA) in TMA. Be...
...steps below are not the same for each model. If you are following the procedure for your scanner lid. HP Scanjet 4890. 1. Open the scanner lid. 2. This section describes two HP Scanjet 4800 models. Scan film This section contains information about scanning film, see Scan positives (such ... slides) - The model number appears on your model. HP Scanjet 4890 ● Scan negatives - Before you have? Remove the TMA cover by pulling the cover up. The procedures are for the HP Scanjet 4850. User's Manual 7 HP Scanjet 4850 The transparent materials adapter (TMA) in TMA. Be...

User's Manual
Page 12
The steps below are using an HP Scanjet 4890, see Scan negatives - HP Scanjet 4890. 1. Open the scanner lid 2. Remove the negative strip holder from the slide holder. 4. Touch them only on the scanner lid. Use the blanks to its storage place inside the slide holder in the holder. 5. If you are for the HP Scanjet 4850. Remove the TMA cover...! Note You must use the negative strip holder to scan 35 mm negatives. Note Negatives are easily damaged. Check the model number on their edges. User's Manual 9
The steps below are using an HP Scanjet 4890, see Scan negatives - HP Scanjet 4890. 1. Open the scanner lid 2. Remove the negative strip holder from the slide holder. 4. Touch them only on the scanner lid. Use the blanks to its storage place inside the slide holder in the holder. 5. If you are for the HP Scanjet 4850. Remove the TMA cover...! Note You must use the negative strip holder to scan 35 mm negatives. Note Negatives are easily damaged. Check the model number on their edges. User's Manual 9
User's Manual
Page 14
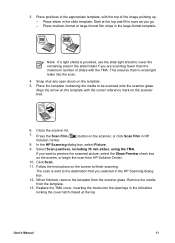
...the lid before locking the cover latch closed at the top and fill in rows as you selected in HP Solution Center. 8. Follow the instructions on the scanner, or click Scan Film in the HP Scanning dialog box. 12. Place slides in the large-format template. Start at the top. Place ...arrow on the template with the TMA. Select Scan positives, including 35 mm slides, using the TMA. User's Manual 11 If you are scanning fewer than the maximum number of the image pointing up. - Close the scanner lid. 7. Replace the TMA cover, inserting the hooks into the scan. 4. Note If a light ...
...the lid before locking the cover latch closed at the top and fill in rows as you selected in HP Solution Center. 8. Follow the instructions on the scanner, or click Scan Film in the HP Scanning dialog box. 12. Place slides in the large-format template. Start at the top. Place ...arrow on the template with the TMA. Select Scan positives, including 35 mm slides, using the TMA. User's Manual 11 If you are scanning fewer than the maximum number of the image pointing up. - Close the scanner lid. 7. Replace the TMA cover, inserting the hooks into the scan. 4. Note If a light ...
User's Manual
Page 16
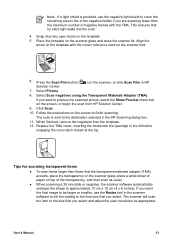
...reference mark on the screen to the destination selected in the scanner software to set the scaling to approximately 10 cm x 15 cm (4 x 6 inches). Click Scan. 10. User's Manual 13 Press the Scan Film button ( ) on the scanner, or click Scan Film in the lid before snapping the cover...shield is sent to finish scanning. Align the arrow on the template with the TMA. Select Picture. 8. When finished, remove the negatives from HP Solution Center. 9. Tips for scanning transparent items ● To scan items larger than the maximum number of the transparency, and then scan as...
...reference mark on the screen to the destination selected in the scanner software to set the scaling to approximately 10 cm x 15 cm (4 x 6 inches). Click Scan. 10. User's Manual 13 Press the Scan Film button ( ) on the scanner, or click Scan Film in the lid before snapping the cover...shield is sent to finish scanning. Align the arrow on the template with the TMA. Select Picture. 8. When finished, remove the negatives from HP Solution Center. 9. Tips for scanning transparent items ● To scan items larger than the maximum number of the transparency, and then scan as...
User's Manual
Page 18
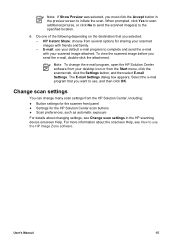
...of the following depending on the destination that you selected: - Note To change many scan settings from the HP Solution Center, including: ● Button settings for the scanner front panel ● Settings for sharing your scanned images with your desktop icon or from the Start menu, ... such as automatic exposure For details about the onscreen Help, see Change scan settings in the preview screen to initiate the scan. User's Manual 15 HP Instant Share: choose from your scanned image attached. For more information about changing settings, see How to use your default e-mail ...
...of the following depending on the destination that you selected: - Note To change many scan settings from the HP Solution Center, including: ● Button settings for the scanner front panel ● Settings for sharing your scanned images with your desktop icon or from the Start menu, ... such as automatic exposure For details about the onscreen Help, see Change scan settings in the preview screen to initiate the scan. User's Manual 15 HP Instant Share: choose from your scanned image attached. For more information about changing settings, see How to use your default e-mail ...

User's Manual
Page 20
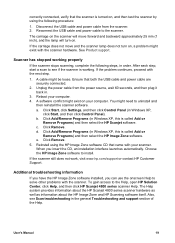
... the power cable is connected to a surge protector, ensure that corresponds to your scanner. Choose the HP Image Zone software to Settings, and then click Control Panel. After 60 seconds, reconnect the power User's Manual 17 On the taskbar, click Start, point to install. Double-click Add/Remove... Programs. Note In Windows XP, this is plugged into an outlet and turned on the Start menu. 2. This removes the HP Scanning software. 4. 3 Troubleshooting This...
... the power cable is connected to a surge protector, ensure that corresponds to your scanner. Choose the HP Image Zone software to Settings, and then click Control Panel. After 60 seconds, reconnect the power User's Manual 17 On the taskbar, click Start, point to install. Double-click Add/Remove... Programs. Note In Windows XP, this is plugged into an outlet and turned on the Start menu. 2. This removes the HP Scanning software. 4. 3 Troubleshooting This...
User's Manual
Page 22
... need to the Help, open HP Solution Center, click Help, and then click HP Scanjet 4800 series scanner Help. If the problem continues, proceed with the scanner. a. b. Click Remove. e. Choose the HP Image Zone software to the scanner. If the scanner still does not work, visit www.hp.com/support or contact HP Customer Support. User's Manual 19 Reconnect the USB cable...
... need to the Help, open HP Solution Center, click Help, and then click HP Scanjet 4800 series scanner Help. If the problem continues, proceed with the scanner. a. b. Click Remove. e. Choose the HP Image Zone software to the scanner. If the scanner still does not work, visit www.hp.com/support or contact HP Customer Support. User's Manual 19 Reconnect the USB cable...
User's Manual
Page 24
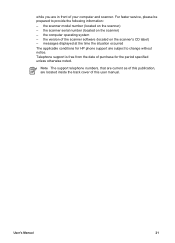
... for the period specified unless otherwise noted. Note The support telephone numbers, that are current as of this user manual. the scanner serial number (located on the scanner) - the computer operating system - while you are in front of this publication, are located inside the ... and scanner. Telephone support is free from the date of the scanner software (located on the scanner's CD label) - For faster service, please be prepared to change without notice. the version of purchase for HP phone support are subject to provide the following information: - User's Manual 21
... for the period specified unless otherwise noted. Note The support telephone numbers, that are current as of this user manual. the scanner serial number (located on the scanner) - the computer operating system - while you are in front of this publication, are located inside the ... and scanner. Telephone support is free from the date of the scanner software (located on the scanner's CD label) - For faster service, please be prepared to change without notice. the version of purchase for HP phone support are subject to provide the following information: - User's Manual 21
User's Manual
Page 26
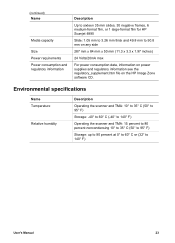
... 35 mm slides, 30 negative frames, 6 medium-format film, or 1 large-format film for HP Scanjet 4890 Slide: 1.05 mm to 3.26 mm thick and 49.8 mm to 140° F) User's Manual 23 Environmental specifications Name Temperature Relative humidity Description Operating the scanner and TMA: 10° to 35° C (50° to 95° F) Storage...
... 35 mm slides, 30 negative frames, 6 medium-format film, or 1 large-format film for HP Scanjet 4890 Slide: 1.05 mm to 3.26 mm thick and 49.8 mm to 140° F) User's Manual 23 Environmental specifications Name Temperature Relative humidity Description Operating the scanner and TMA: 10° to 35° C (50° to 95° F) Storage...


