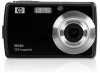
HP CA340 Digital Camera - Quick Start Guide
Page 3
Lens 8. Operation Lamp 11. Tripod Hole 1 Power Button 4. Self-timer Lamp 9. Flash Button / Macro Button / DISP/ OK Button 16. Shutter Button 2. Microphone 7. LCD Monitor 10. Speaker 5. Battery Cover The memory card slot is located beneath the battery cover, adjacent to the battery compartment. 19. Playback Button 14. Mode Button 17. Zoom Button 12. Menu Button 15. ASM / Delete Button 18. Getting Started Full User Manual located on installation CD. File name: CA340 Manual_ENG Parts of the Camera 1. Flash 3. USB/AV Terminal 6. Strap Ring 13.
HP CA340 Digital Camera - Quick Start Guide
Page 4
Setting the Display Language / Date & Time When using the camera. Press or to select [LANGUAGE] then press or the OK button to choose a language and set the camera to close the menu. 2 Press or to select a language and press or the OK button to apply the setting. 4 Press the MENU button to the Setup Menu. 2 Select [ Language]. Setting the Display Language 1 Turn the power on, and set the date & time before using the camera for the first time after purchasing, be sure to launch the submenu. 3 Select a language.
HP CA340 Digital Camera - Quick Start Guide
Page 5
.... Caution Once the date, time and language have been set, changing the batteries or removing the SD card will need to be re-set the camera to the Setup Menu. 2 Select [ Date & Time].
HP CA340 Digital Camera - Quick Start Guide
Page 6
Inserting the Batteries 1 Open the battery cover. Insert two AA-size batteries with the positive (+) and negative (-) poles matching the directions indicated inside the battery room. 3 Close the battery cover. Caution To ensure the camera displays battery level correctly, after batteries are loaded, set the battery type in the direction indicated by the arrow. 2 Insert the batteries. Slide the battery cover in Setup Menu to match the batteries used: Alkaline / NiMH / Lithium / Qxyride 4
HP CA340 Digital Camera - Quick Start Guide
Page 7
... ( ) button to switch to show the scene mode palette. 3 Select a mode. Press the MODE button ( ) to the REC mode. Selecting the REC mode 1 Set the camera to the PLAY mode. Switching between REC mode and PLAYBACK mode In REC mode, press the PLAYBACK button ( ) to switch to the REC mode 2 Launch... the mode palette. Use the four-way control to select a desired mode and press the OK button to replay, delete, or edit images on the LCD monitor. And using the PLAYBACK mode to confirm the setting. 5 Changing the Mode You can record images and voices in the REC mode.
HP CA340 Digital Camera - Quick Start Guide
Page 8
REC menu 1 Turn the power on, and set the camera to save the settings and close the menu. 6 Press or to change the setting. 5 Press the MENU or the OK button to the REC mode. 2 Open the REC menu. Press or button to make the desired settings. Using the Menus When a menu is displayed, the four-way control and the OK button are used to select a menu item. 4 Change the setting. Press the MENU button to display the menu. 3 Select an item.
HP CA340 Digital Camera - Quick Start Guide
Page 9
... menu. Setup menu 1 Turn the power on whether you are in the REC mode or the PLAY- The menu displays depends on , and set the camera to the REC or PLAYBACK mode. 2 Press the MENU button to close the menu. 7
HP CA340 Digital Camera - Quick Start Guide
Page 10
Getting Help Should you have a technical support question or your HP Digital Camera require service within 5 business days. If service is received by this service center, a replacement unit will be responsible for shipping charges when shipping the product ...
HP CA340 Digital Camera - User Manual
Page 2
...remain at least one or more of the following two conditions: 1.) this device may not cause harmful interference, and 2.) this camera in accordance with FCC regulations. However, there is operated correctly. If this equipment does cause harmful interference to radio or television reception.... Maintenance and repairs should be used in any interference received, including interference that may cause unsatisfactory operation. Never use the camera with the limits for repair. y Consult the dealer or an experienced radio/TV technician for compliance could damage your own....
HP CA340 Digital Camera - User Manual
Page 3
... 5 INSERTING THE MEMORY CARD 6 ABOUT CAMERA MEMORY 6 DCF PROTOCOL 6 SETTING THE DISPLAY LANGUAGE / DATE & TIME 7 SETTING THE DISPLAY LANGUAGE 7 SETTING THE DATE & TIME 7 USING THE LCD MONITOR 9 REC MODE 9 PLAYBACK MODE 10 CHANGING THE LCD STATUS 11 BASIC OPERATION 12 TURNING THE POWER ON AND OFF 12 POWER SAVING FUNCTION 12 CHANGING THE MODE 13 SWITCHING...
HP CA340 Digital Camera - User Manual
Page 4
... PHOTO FRAME 49 COPYING THE FILES 50 SETTING THE DPOF 51 CHOOSING A STARTUP IMAGE 52 MAKING CONNECTIONS 53 CONNECTING THE CAMERA TO A PC 53 USING THE CARD READER 53 CONNECTING THE CAMERA TO A COMPUTER WITH THE USB CABLE 53 APPENDIX 54 ABOUT THE FOLDER & FILE NAME 54 FOLDER STRUCTURE 54 FILE NAMING...
HP CA340 Digital Camera - User Manual
Page 5
... images. This indicates the reference page. 1 Appendix This section describes the troubleshooting and the camera specification. Playback This section explains playback, delete, and edit functions of this camera. Basic Recording This section explains how to record still images, movies, and audio files. ...Making Connections This section tells you should be read before using this camera. Getting Started Using This Menu Getting Started This section contains information you how to connect this user's manual are explained below...
HP CA340 Digital Camera - User Manual
Page 6
Do not swing the camera around by the strap. 2 Unpacking Camera USB Cable Strap 2 x AA Batteries Software Installation CD-ROM Quick Start Guide Caution Actual accessories may be different.
HP CA340 Digital Camera - User Manual
Page 9
.... Replace all batteries at the same time. Use of time. Never mix old and new batteries. The camera body may cause the lens to use compatible batteries listed on the LCD screen when the batteries are loaded, set the battery type in the direction indicated by an incorrect type dispose... of the battery may feel warm after batteries are nearly exhausted. Be sure to use the camera for an extended period of any ...
HP CA340 Digital Camera - User Manual
Page 10
.... When purchasing a card, please check the card's specifications and take the camera with the label facing up and the arrow pointing in. Images that are stored on DCF-compatible cameras from other manufacturers. 6 About Camera Memory This camera is located beneath the battery cover, adjacent to release it. 3 Close the... battery cover. If the memory card is not inserted in the camera, all cards may be viewed on the memory card. Slide the battery cover in the internal memory. Insert the card with you. ...
HP CA340 Digital Camera - User Manual
Page 11
...the OK button to close the menu. For date stamp setting ( page 39). 7 Setting the Display Language 1 Turn the power on , and set the camera to the Setup Menu ( page 18). 2 Select [ Date & Time]. Press or to move the cursor between settings. Holding down or changes the values ...continuously. Press or Tips to change the value of the cursor located. Setting the Display Language / Date & Time When using the camera for the first time after purchasing, be sure to launch the submenu. 3 Select a language. Press or to select [LANGUAGE] then press or the...
HP CA340 Digital Camera - User Manual
Page 14
PLAYBACK mode 1 Playback mode ( page 13) 7 Recording info ( page 11) 2 Protect ( page 46) 8 Histogram 3 Voice memo ( page 36) 9 Captured date & time 4 File number / Total 10 Voice memo control ( page 36) 5 Battery ( page 5) 11 DPOF ( page 51) 6 Storage media 12 Resolution ( page 27) Caution y Some information may not display correctly if you display images captured by other camera model. 10
HP CA340 Digital Camera - User Manual
Page 16
... mode ( page 13). Press any button other than the power button to turn on the camera in the REC mode. Basic Operation Turning the Power On and Off 1 Press the POWER button ( ) to turn on the LCD monitor. Press the PLAYBACK button ( ) to turn off . Press the POWER ( ) or the PLAYBACK (... ) button to a computer or printer with the USB cable 12 The power turns on the LCD monitor ( ). 2 Press the POWER button ( ) again to turn on the camera in Setup menu ( page 19). Tips You can change the power save feature will turn the power off...
HP CA340 Digital Camera - User Manual
Page 17
... switch to the REC mode. 2 Launch the mode palette. In PLAYBACK mode, you can replay, delete, or edit images. Selecting the REC mode 1 Set the camera to the PLAY mode. Movie For recording movie clips. Q Mode Allows beginners to show the scene mode palette. 3 Select a mode. Voice REC For recording audio... the Mode In REC mode, you can record images and sounds. Press the MODE button ( ) to take pictures easily. 13 Display Title Program Description The camera makes settings suitable for the shooting conditions.
HP CA340 Digital Camera - User Manual
Page 18
Backlight Shooting the image of the subject. Food Higher saturation makes food more appetizing. The camera detects the shooting conditions and automatically switches to save it or not. Sunset Enhance the red hue for the wide scenic views. Building Enhance the ...