
HP CA340 Digital Camera - User Manual
Page 3
... LOW BATTERY INDICATOR 5 ABOUT BATTERY TYPE 5 INSERTING THE MEMORY CARD 6 ABOUT CAMERA MEMORY 6 DCF PROTOCOL 6 SETTING THE DISPLAY LANGUAGE / DATE & TIME 7 SETTING THE DISPLAY LANGUAGE 7 SETTING THE DATE & TIME 7 USING THE LCD MONITOR 9 REC MODE 9 PLAYBACK MODE 10 CHANGING THE LCD STATUS 11 BASIC OPERATION 12 TURNING THE POWER ON AND OFF 12 POWER SAVING FUNCTION 12 CHANGING THE MODE 13 SWITCHING BETWEEN REC MODE AND PLAYBACK MODE 13 SELECTING THE REC MODE 13 SELECTING THE ASM MODE 15 USING THE MENUS 16 REC MENU 16 SETUP MENU 18 BASIC RECORDING 21...
... LOW BATTERY INDICATOR 5 ABOUT BATTERY TYPE 5 INSERTING THE MEMORY CARD 6 ABOUT CAMERA MEMORY 6 DCF PROTOCOL 6 SETTING THE DISPLAY LANGUAGE / DATE & TIME 7 SETTING THE DISPLAY LANGUAGE 7 SETTING THE DATE & TIME 7 USING THE LCD MONITOR 9 REC MODE 9 PLAYBACK MODE 10 CHANGING THE LCD STATUS 11 BASIC OPERATION 12 TURNING THE POWER ON AND OFF 12 POWER SAVING FUNCTION 12 CHANGING THE MODE 13 SWITCHING BETWEEN REC MODE AND PLAYBACK MODE 13 SELECTING THE REC MODE 13 SELECTING THE ASM MODE 15 USING THE MENUS 16 REC MENU 16 SETUP MENU 18 BASIC RECORDING 21...

HP CA340 Digital Camera - User Manual
Page 5
... user's manual are explained below: Caution This indicates cautions that should know before using this camera. Appendix This section describes the troubleshooting and the camera specification. Getting Started Using This Menu Getting Started This section contains information you how to connect this camera to record still images, movies, and audio files. Basic Operation This section explains all recording features of still images, movies and audio files. Tips This indicates the useful information when using these functions. Basic Recording...
... user's manual are explained below: Caution This indicates cautions that should know before using this camera. Appendix This section describes the troubleshooting and the camera specification. Getting Started Using This Menu Getting Started This section contains information you how to connect this camera to record still images, movies, and audio files. Basic Operation This section explains all recording features of still images, movies and audio files. Tips This indicates the useful information when using these functions. Basic Recording...

HP CA340 Digital Camera - User Manual
Page 16
... camera without the start-up and operating sound by pressing and holding the POWER ( ) or the PLAYBACK ( ) button over 1.5 seconds. The power turns on the LCD monitor ( ). 2 Press the POWER button ( ) again to a computer or printer with the USB cable 12 Press any button other than the power button to turn off . The power save setting in green. The power turns on, and an image displays on , the lens extends and the LED lights in Setup menu ( page 19). Switch between REC mode and PLAYBACK mode...
... camera without the start-up and operating sound by pressing and holding the POWER ( ) or the PLAYBACK ( ) button over 1.5 seconds. The power turns on the LCD monitor ( ). 2 Press the POWER button ( ) again to a computer or printer with the USB cable 12 Press any button other than the power button to turn off . The power save setting in green. The power turns on, and an image displays on , the lens extends and the LED lights in Setup menu ( page 19). Switch between REC mode and PLAYBACK mode...

HP CA340 Digital Camera - User Manual
Page 23
... Setup menu list Menu Item Sounds Auto Review Functions [Shutter]: Sets the shutter sound on and off. [Start-up]: Sets a type of the start-up sound. 3 different sound options provided. [Beep]: Sets the operation sound on and off automatically for avoiding the file name duplication when images are downloaded to a computer ( page 55). You can review images on a television with a supplied AV cable ( page 53). Reset file numbering each time the memory card is turned off . [Volume]: Adjusts the volume of the shutter sound, start-up sound, beep and playback sound...
... Setup menu list Menu Item Sounds Auto Review Functions [Shutter]: Sets the shutter sound on and off. [Start-up]: Sets a type of the start-up sound. 3 different sound options provided. [Beep]: Sets the operation sound on and off automatically for avoiding the file name duplication when images are downloaded to a computer ( page 55). You can review images on a television with a supplied AV cable ( page 53). Reset file numbering each time the memory card is turned off . [Volume]: Adjusts the volume of the shutter sound, start-up sound, beep and playback sound...

HP CA340 Digital Camera - User Manual
Page 24
...(Pictures, videos, and sound recordings) will be deleted including protected files. To ensure the camera displays battery level correctly, set the type to initial default. To erase all data stored in the memory card if you are using a card, or all data stored in the internal memory if there is starting format. Alkaline / NiMH / Lithium / Qxyride Resets the entire menu and button operation settings to match the batteries used. Sets a recorded image as the start-up image Format LCD Save Battery Type Reset All Functions [Computer] / [Printer]: Sets the USB mode to conserve battery power...
...(Pictures, videos, and sound recordings) will be deleted including protected files. To ensure the camera displays battery level correctly, set the type to initial default. To erase all data stored in the memory card if you are using a card, or all data stored in the internal memory if there is starting format. Alkaline / NiMH / Lithium / Qxyride Resets the entire menu and button operation settings to match the batteries used. Sets a recorded image as the start-up image Format LCD Save Battery Type Reset All Functions [Computer] / [Printer]: Sets the USB mode to conserve battery power...

HP CA340 Digital Camera - User Manual
Page 30
... Tracking: Off / On Photo Frame: 10 frames can be controlled as last mode used. 26 Using the Q mode The Q mode provides a simplified camera interface. You can use only the basic settings in Q mode. (**)Utility setting: Use the same setting as below: Quality: S.Fine Highlight: Off Metering: Multi Sharpness: Normal Fixed setting White balance: Auto Effect: Off (*) ISO: Auto Date Stamp: Date & Time Exposure: Auto Digital Zoom: Off AEB: Off Shutter sound File No. Larger icons and fewer controls make it easier to take pictures anytime, especially for...
... Tracking: Off / On Photo Frame: 10 frames can be controlled as last mode used. 26 Using the Q mode The Q mode provides a simplified camera interface. You can use only the basic settings in Q mode. (**)Utility setting: Use the same setting as below: Quality: S.Fine Highlight: Off Metering: Multi Sharpness: Normal Fixed setting White balance: Auto Effect: Off (*) ISO: Auto Date Stamp: Date & Time Exposure: Auto Digital Zoom: Off AEB: Off Shutter sound File No. Larger icons and fewer controls make it easier to take pictures anytime, especially for...

HP CA340 Digital Camera - User Manual
Page 33
... continuous shooting or movie recording. 1 Turn the power on, and set the camera to the REC mode ( page 13). 2 Press the flash button ( ) to change the flash mode. Caution The flash charging time may increase when the battery is pressed, the flash icon ( ) changes. Using the Flash The flash is not only for taking pictures when there is insufficient light, but also when the subject is in shade or in dark situation. 3 Press shutter button to take a picture. Auto flash: Flash fires automatically when shooting...
... continuous shooting or movie recording. 1 Turn the power on, and set the camera to the REC mode ( page 13). 2 Press the flash button ( ) to change the flash mode. Caution The flash charging time may increase when the battery is pressed, the flash icon ( ) changes. Using the Flash The flash is not only for taking pictures when there is insufficient light, but also when the subject is in shade or in dark situation. 3 Press shutter button to take a picture. Auto flash: Flash fires automatically when shooting...

HP CA340 Digital Camera - User Manual
Page 35
... to take continuous shooting. Use or button to take a picture. Double: Record two images in a shot after pressing the shutter release button 10 and 12 seconds. Burst: Keep pressing the shutter button fully to select [Drive mode] from the time the shutter button is shot. Using the Self-timer & Burst Use the self-timer to set the camera to the time the image is pressed to the REC mode ( page 13). 2 Open the REC menu ( page 16). Use the burst to record continuous still images shooting. 1 Turn the power on...
... to take continuous shooting. Use or button to take a picture. Double: Record two images in a shot after pressing the shutter release button 10 and 12 seconds. Burst: Keep pressing the shutter button fully to select [Drive mode] from the time the shutter button is shot. Using the Self-timer & Burst Use the self-timer to set the camera to the time the image is pressed to the REC mode ( page 13). 2 Open the REC menu ( page 16). Use the burst to record continuous still images shooting. 1 Turn the power on...

HP CA340 Digital Camera - User Manual
Page 55
...-way control to select DPOF ( ) and press the OK button. 3s Press or to specify the number of copies to select images on the memory card for printing on a direct print function compatible printer. 1 Turn the power on, and set the camera to set from 0 to turn off date stamp. Press Mode button to the PLAYBACK mode ( page 13). 2 Open the menu. This is extremely convenient for sending the images to a photo developing service or for printing and specify the number of print copies...
...-way control to select DPOF ( ) and press the OK button. 3s Press or to specify the number of copies to select images on the memory card for printing on a direct print function compatible printer. 1 Turn the power on, and set the camera to set from 0 to turn off date stamp. Press Mode button to the PLAYBACK mode ( page 13). 2 Open the menu. This is extremely convenient for sending the images to a photo developing service or for printing and specify the number of print copies...
HP CA340 Digital Camera - User Manual
Page 59
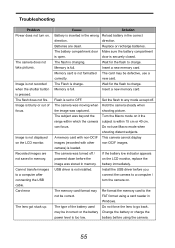
... flash to charge. Hold the camera steady when shooting picture. Do not force the lens to a computer after connecting the USB cable. Cannot transfer images to go back. Wait for the flash to any mode except off / powered down before the image was turned off . If the battery low indicator appears on the LCD monitor. The Flash is not installed. Install the USB driver before using a card reader in the correct direction. The type of focus. Re-format the memory card...
... flash to charge. Hold the camera steady when shooting picture. Do not force the lens to a computer after connecting the USB cable. Cannot transfer images to go back. Wait for the flash to any mode except off / powered down before the image was turned off . If the battery low indicator appears on the LCD monitor. The Flash is not installed. Install the USB driver before using a card reader in the correct direction. The type of focus. Re-format the memory card...
HP CA340 Digital Camera - Datasheet
Page 1
... features such as smile detection, blink detection, face detection, red eye removal, different scene modes, and more. With its 10 mega-pixel resolution, 3X optical zoom, and 4X digital zoom, it makes it easy to change without notice. It uses 2-AA size batteries, and brings convenience to ISO 3200 Box Contents HP CA340 Digital Camera Wrist strap 0.8 meter USB cable Two AA batteries Quick Start Guide Software install and Electronic User Manual CD-ROM Warranty document Warranty One...
... features such as smile detection, blink detection, face detection, red eye removal, different scene modes, and more. With its 10 mega-pixel resolution, 3X optical zoom, and 4X digital zoom, it makes it easy to change without notice. It uses 2-AA size batteries, and brings convenience to ISO 3200 Box Contents HP CA340 Digital Camera Wrist strap 0.8 meter USB cable Two AA batteries Quick Start Guide Software install and Electronic User Manual CD-ROM Warranty document Warranty One...
HP CA350 Digital Camera/ HP CB350 Digital Camera - User's Manual
Page 78
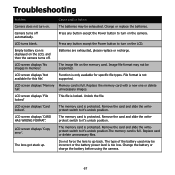
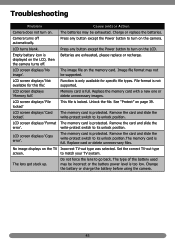
... format is protected. LCD screen displays 'Card locked'. The type of the battery used may be supported. LCD turns blank. LCD screen displays 'Not available for specific file types. Remove the card and slide the writeprotect switch to turn on the camera. The memory card is not supported. Press any button except the Power button to go back. LCD screen displays 'Memory Memory card is locked. unnecessary images. Charge or replace the batteries. Batteries are exhausted, please replace or recharge. Replace the memory card with a new one or delete...
... format is protected. LCD screen displays 'Card locked'. The type of the battery used may be supported. LCD turns blank. LCD screen displays 'Not available for specific file types. Remove the card and slide the writeprotect switch to turn on the camera. The memory card is not supported. Press any button except the Power button to go back. LCD screen displays 'Memory Memory card is locked. unnecessary images. Charge or replace the batteries. Batteries are exhausted, please replace or recharge. Replace the memory card with a new one or delete...

HP PB360t/PW360t Digital Camera - User's Manual
Page 3
Shooting mode Screen Layout 7 Playback Mode Screen Layout 12 Changing the LCD Screen Display 14 Using Quick-Set Bar 15 Recording Photos, Videos and Voices 18 Taking Photos...18 Using the Stabilizer...18 To adjust the optical zoom 18 To adjust the digital zoom 18 Using Intelligent Scene Mode 22 To activate Intelligent Scene 22 Using Smile Detection Mode 23 Using Blink Detection Mode 24 Setting Flash...25 Setting Snapshot Menu 26 Resolution...26 Quality...27 ISO...27 White Balance...27 AF Area...28 Photo Frame...29 Sharpness...29 Saturation...29...
Shooting mode Screen Layout 7 Playback Mode Screen Layout 12 Changing the LCD Screen Display 14 Using Quick-Set Bar 15 Recording Photos, Videos and Voices 18 Taking Photos...18 Using the Stabilizer...18 To adjust the optical zoom 18 To adjust the digital zoom 18 Using Intelligent Scene Mode 22 To activate Intelligent Scene 22 Using Smile Detection Mode 23 Using Blink Detection Mode 24 Setting Flash...25 Setting Snapshot Menu 26 Resolution...26 Quality...27 ISO...27 White Balance...27 AF Area...28 Photo Frame...29 Sharpness...29 Saturation...29...

HP PB360t/PW360t Digital Camera - User's Manual
Page 46
... Recording 1. During playback, use the to display the video toolbar. 4. Save changes to rewind or fast forward the movie. 6. See picture on the LCD screen to control volume. Press the T/W button to trim image. 5. The LCD screen displays the movie frame image in Single navigation mode. Tap to increase/decrease volume. 5. Playing Video 27/27 1. Select video to play video. 3. Tap anywhere on the LCD screen to play . 2. Tap to the current file. Tap anywhere on the LCD screen to control volume. During playback, use the to play recording. 3. Save...
... Recording 1. During playback, use the to display the video toolbar. 4. Save changes to rewind or fast forward the movie. 6. See picture on the LCD screen to control volume. Press the T/W button to trim image. 5. The LCD screen displays the movie frame image in Single navigation mode. Tap to increase/decrease volume. 5. Playing Video 27/27 1. Select video to play video. 3. Tap anywhere on the LCD screen to play . 2. Tap to the current file. Tap anywhere on the LCD screen to control volume. During playback, use the to play recording. 3. Save...

HP PB360t/PW360t Digital Camera - User's Manual
Page 54
.... 1/2 Setting Date & Time Use the Date & Time function to set an idle time after which the camera automatically sets to sleep mode to save and apply changes. Setting Auto Power Save The Power Save function allows you to define the three shortcut icons on the Shooting Mode Quick-Set Bar. The Hot key A 12M interface appears. P ISO 12M AUTO 4. AF ISO AUTO SET 1 45 Tap SET to adjust date and time value. 2. Hot Key P 1. From the Settings menu, tap Hot Key. Tap an icon on captured images. This function is...
.... 1/2 Setting Date & Time Use the Date & Time function to set an idle time after which the camera automatically sets to sleep mode to save and apply changes. Setting Auto Power Save The Power Save function allows you to define the three shortcut icons on the Shooting Mode Quick-Set Bar. The Hot key A 12M interface appears. P ISO 12M AUTO 4. AF ISO AUTO SET 1 45 Tap SET to adjust date and time value. 2. Hot Key P 1. From the Settings menu, tap Hot Key. Tap an icon on captured images. This function is...
HP PB360t/PW360t Digital Camera - User's Manual
Page 59
... supported. Replace card or delete unneces-sary files. Function is only available for this file'. File format is protected. Do not force the lens to its unlock position.The memory card is protected. Battery is locked. This file is exhausted, please recharge as illustrated on page 4 The image file on the memory card. The memory card is too low. Remove the card and slide the write-protect switch to turn on the camera. The type of the battery used may be exhausted. LCD screen displays 'Format error'. Troubleshooting Problem Camera...
... supported. Replace card or delete unneces-sary files. Function is only available for this file'. File format is protected. Do not force the lens to its unlock position.The memory card is protected. Battery is locked. This file is exhausted, please recharge as illustrated on page 4 The image file on the memory card. The memory card is too low. Remove the card and slide the write-protect switch to turn on the camera. The type of the battery used may be exhausted. LCD screen displays 'Format error'. Troubleshooting Problem Camera...

HP SB360 Digital Camera - User's Manual
Page 2
...Camera & battery recycle notice vi Camera on operating notice vi Using this Menu...vii Photography Terms and Definitions vii Package Contents...1 Camera Views...1 Front View...1 Back View...2 Top View...2 Bottom View...2 Left View...2 Navigation Control...3 Attaching the Wrist Strap 3 Inserting the Battery...3 Inserting an SD/SDHC Memory Card 4 Charging the Battery...5 Initial Settings...5 Setting the Language...5 Setting the Date & Time 6 Modes...6 Shooting mode...6 Playback mode...6 Switching between Shooting mode and Playback Mode 6 Selecting the Shooting mode options 6 LCD...
...Camera & battery recycle notice vi Camera on operating notice vi Using this Menu...vii Photography Terms and Definitions vii Package Contents...1 Camera Views...1 Front View...1 Back View...2 Top View...2 Bottom View...2 Left View...2 Navigation Control...3 Attaching the Wrist Strap 3 Inserting the Battery...3 Inserting an SD/SDHC Memory Card 4 Charging the Battery...5 Initial Settings...5 Setting the Language...5 Setting the Date & Time 6 Modes...6 Shooting mode...6 Playback mode...6 Switching between Shooting mode and Playback Mode 6 Selecting the Shooting mode options 6 LCD...
HP SB360 Digital Camera - User's Manual
Page 3
......18 White Balance...18 ISO...19 Metering...19 Color Mode...19 Using the Record Menu 21 Setting the Scene Mode 21 Using Smile Capture Scene 24 Using Blink Detection Mode 26 Using Aperture Priority Mode 26 Using Manual Exposure Mode 27 Setting the Self-Timer/Burst 28 Setting the AEB...29 Setting the AF Area...29 Setting the AF Lamp...29 Setting Sharpness...30 Setting Saturation...30 Setting Contrast...30 Setting the Digital Zoom 31 Setting the Date Stamp 31 Setting Auto Review...32 Setting the Active Z-Lighting 32 Recording Movies...33 Setting the Movie Size...
......18 White Balance...18 ISO...19 Metering...19 Color Mode...19 Using the Record Menu 21 Setting the Scene Mode 21 Using Smile Capture Scene 24 Using Blink Detection Mode 26 Using Aperture Priority Mode 26 Using Manual Exposure Mode 27 Setting the Self-Timer/Burst 28 Setting the AEB...29 Setting the AF Area...29 Setting the AF Lamp...29 Setting Sharpness...30 Setting Saturation...30 Setting Contrast...30 Setting the Digital Zoom 31 Setting the Date Stamp 31 Setting Auto Review...32 Setting the Active Z-Lighting 32 Recording Movies...33 Setting the Movie Size...

HP SB360 Digital Camera - User's Manual
Page 46
... W button to resume. 7. Press the key to play the voice recording. 4. To capture screenshot image from a movie clip 1. SHUTTER 00:00:05 WT Note This feature does not function when the memory card is full or the folder cannot be created. Press the key to pause playback. 6. The LCD monitor displays the movie frame image in Single navigation mode. When viewing a voice recording file, the LCD monitor displays the screen layout of movie...
... W button to resume. 7. Press the key to play the voice recording. 4. To capture screenshot image from a movie clip 1. SHUTTER 00:00:05 WT Note This feature does not function when the memory card is full or the folder cannot be created. Press the key to pause playback. 6. The LCD monitor displays the movie frame image in Single navigation mode. When viewing a voice recording file, the LCD monitor displays the screen layout of movie...
HP SB360 Digital Camera - User's Manual
Page 57
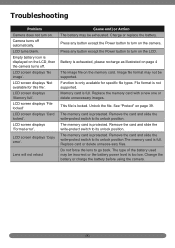
.... Troubleshooting Problem Cause and/or Action Camera does not turn on the camera. Camera turns off . Press any button except the Power button to match your TV system. LCD turns blank. Empty battery icon is full. LCD screen displays 'No image'. The image file on the LCD, then the camera turns off automatically. Image file format may be exhausted. Replace the memory card with a new one or delete unnecessary images. LCD screen displays 'File locked' This file is protected. Unlock the file. The memory card is locked. LCD screen displays 'Copy error...
.... Troubleshooting Problem Cause and/or Action Camera does not turn on the camera. Camera turns off . Press any button except the Power button to match your TV system. LCD turns blank. Empty battery icon is full. LCD screen displays 'No image'. The image file on the LCD, then the camera turns off automatically. Image file format may be exhausted. Replace the memory card with a new one or delete unnecessary images. LCD screen displays 'File locked' This file is protected. Unlock the file. The memory card is locked. LCD screen displays 'Copy error...


