
User's Guide q1859, q2009, q2159 LCD Display
Page 5
... use 3-1 Preparing the monitor for wall-mounting 3-2 Connecting the VGA (Analog) Cable 3-5 To connect the VGA cable...3-5 Audio and Video Cables and Adapters 3-6 Connecting the Audio Cable...3-7 Connecting the Power Cable ...3-8 Cable Management...3-9 Adjusting the Tilt...3-10 Operating the Monitor 4-1 CD Software and Utilities ...4-1 Installing Drivers...4-1 Installing the monitor driver software from the CD 4-1 Downloading updated drivers from the Internet 4-1 Using the Auto Adjustment Function 4-2 Side-Panel Controls...4-3 Using the On-Screen Display (OSD) ...4-4 OSD Menu Selections...
... use 3-1 Preparing the monitor for wall-mounting 3-2 Connecting the VGA (Analog) Cable 3-5 To connect the VGA cable...3-5 Audio and Video Cables and Adapters 3-6 Connecting the Audio Cable...3-7 Connecting the Power Cable ...3-8 Cable Management...3-9 Adjusting the Tilt...3-10 Operating the Monitor 4-1 CD Software and Utilities ...4-1 Installing Drivers...4-1 Installing the monitor driver software from the CD 4-1 Downloading updated drivers from the Internet 4-1 Using the Auto Adjustment Function 4-2 Side-Panel Controls...4-3 Using the On-Screen Display (OSD) ...4-4 OSD Menu Selections...
User's Guide q1859, q2009, q2159 LCD Display
Page 6
Table of Contents Technical Specifications B-1 Compaq LCD Monitors...B-1 Preset Video Modes ...B-3 LCD Monitor Quality and Pixel Policy...B-4 Power Cord Set Requirements ...B-4 Agency Regulatory Notices C-1 Federal Communications Commission Notice C-1 Modifications...C-1 Cables ...C-1 Declaration of Conformity for Products Marked with FCC Logo, United States Only C-1 Materials Disposal ...C-2 Chemical Substances ...C-2 Canadian Notice ...C-2 Avis Canadien ...C-2 European Union Regulatory Notice ...C-2 Disposal of Waste Equipment by Users in Private Households in the...
Table of Contents Technical Specifications B-1 Compaq LCD Monitors...B-1 Preset Video Modes ...B-3 LCD Monitor Quality and Pixel Policy...B-4 Power Cord Set Requirements ...B-4 Agency Regulatory Notices C-1 Federal Communications Commission Notice C-1 Modifications...C-1 Cables ...C-1 Declaration of Conformity for Products Marked with FCC Logo, United States Only C-1 Materials Disposal ...C-2 Chemical Substances ...C-2 Canadian Notice ...C-2 Avis Canadien ...C-2 European Union Regulatory Notice ...C-2 Disposal of Waste Equipment by Users in Private Households in the...
User's Guide q1859, q2009, q2159 LCD Display
Page 7
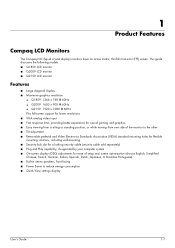
...; VGA analog video input ■ Fast response time, providing better experience for casual gaming and graphics ■ Easy viewing from a sitting or standing position, or while moving from one side of the monitor to the other ■ Tilt adjustment ■ Removable pedestal and Video Electronics Standards Association (VESA) standard mounting holes for flexible mounting solutions, including wall-mounting ■ Security lock slot for a locking security cable (security cable sold separately) ■ Plug...
...; VGA analog video input ■ Fast response time, providing better experience for casual gaming and graphics ■ Easy viewing from a sitting or standing position, or while moving from one side of the monitor to the other ■ Tilt adjustment ■ Removable pedestal and Video Electronics Standards Association (VESA) standard mounting holes for flexible mounting solutions, including wall-mounting ■ Security lock slot for a locking security cable (security cable sold separately) ■ Plug...
User's Guide q1859, q2009, q2159 LCD Display
Page 10
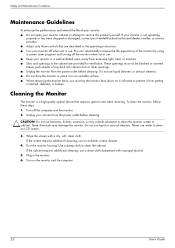
... or covered. Do not use an antistatic screen cleaner. 4. Dust the monitor housing. Turn on a soft area to clean the monitor screen or cabinet. Unplug your monitor is a high-quality optical device that are provided for ventilation. If the screen requires additional cleaning, use liquid or aerosol cleaners. These openings must lay the monitor face down on the monitor and the computer. 2-2 User's Guide Cleaning the Monitor The monitor is...
... or covered. Do not use an antistatic screen cleaner. 4. Dust the monitor housing. Turn on a soft area to clean the monitor screen or cabinet. Unplug your monitor is a high-quality optical device that are provided for ventilation. If the screen requires additional cleaning, use liquid or aerosol cleaners. These openings must lay the monitor face down on the monitor and the computer. 2-2 User's Guide Cleaning the Monitor The monitor is...

User's Guide q1859, q2009, q2159 LCD Display
Page 11
... touching or applying pressure to assemble the monitor. Set the monitor screen face down while preparing it snaps into place. You may need a straight-slot screwdriver to secure some cables. Turn off the computer and other attached devices. 3. Installing the monitor base User's Guide 3-1 Connect the monitor cables after you have installed the monitor. Make sure all contents are included. Prepare a flat area to the LCD screen; doing so can install the monitor on a flat, soft...
... touching or applying pressure to assemble the monitor. Set the monitor screen face down while preparing it snaps into place. You may need a straight-slot screwdriver to secure some cables. Turn off the computer and other attached devices. 3. Installing the monitor base User's Guide 3-1 Connect the monitor cables after you have installed the monitor. Make sure all contents are included. Prepare a flat area to the LCD screen; doing so can install the monitor on a flat, soft...
User's Guide q1859, q2009, q2159 LCD Display
Page 19
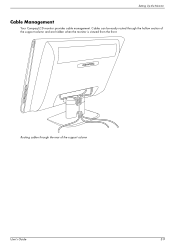
Cables can be easily routed through the rear of the support column and are hidden when the monitor is viewed from the front. Routing cables through the hollow section of the support column User's Guide 3-9 Setting Up the Monitor Cable Management Your Compaq LCD monitor provides cable management.
Cables can be easily routed through the rear of the support column and are hidden when the monitor is viewed from the front. Routing cables through the hollow section of the support column User's Guide 3-9 Setting Up the Monitor Cable Management Your Compaq LCD monitor provides cable management.
User's Guide q1859, q2009, q2159 LCD Display
Page 21
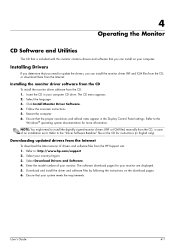
... the model number of your computer CD drive. User's Guide 4-1 Follow the onscreen instructions. 5. NOTE: You might need to update the drivers, you can install the monitor driver INF and ICM files from the CD, or download them from the CD, in English only). Insert the CD in the Display Control Panel settings. Restart the computer. 6. Refer to install the digitally signed monitor drivers (INF or ICM files) manually from the Internet. Downloading updated drivers...
... the model number of your computer CD drive. User's Guide 4-1 Follow the onscreen instructions. 5. NOTE: You might need to update the drivers, you can install the monitor driver INF and ICM files from the CD, or download them from the CD, in English only). Insert the CD in the Display Control Panel settings. Restart the computer. 6. Refer to install the digitally signed monitor drivers (INF or ICM files) manually from the Internet. Downloading updated drivers...
User's Guide q1859, q2009, q2159 LCD Display
Page 22
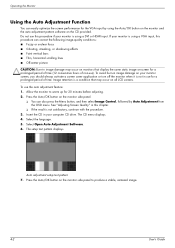
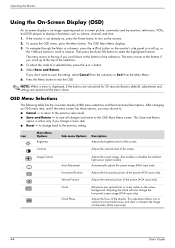
.... Auto adjustment setup test pattern 7. To avoid burn-in your monitor screen, you should always activate a screen saver application or turn off the monitor when it is a condition that may occur on monitors that display the same static image on the monitor side panel. ❏ You can also press the Menu button, and then select Image Control, followed by using a DVI or HDMI input. Allow the monitor to produce a stable, centered image. 4-2 User's Guide Press...
.... Auto adjustment setup test pattern 7. To avoid burn-in your monitor screen, you should always activate a screen saver application or turn off the monitor when it is a condition that may occur on monitors that display the same static image on the monitor side panel. ❏ You can also press the Menu button, and then select Image Control, followed by using a DVI or HDMI input. Allow the monitor to produce a stable, centered image. 4-2 User's Guide Press...
User's Guide q1859, q2009, q2159 LCD Display
Page 23
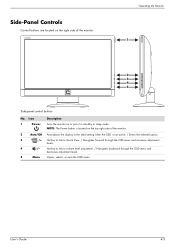
... the monitor. 2 Auto/OK Auto-adjusts the display to the ideal setting when the OSD is located on or puts it in standby or sleep mode. Hot key to link to Quick View. / Navigates forward through the OSD menu and decreases adjustment levels. 5 Menu Opens, selects, or exits the OSD menu. User's Guide 4-3 Icon 1 Power Description Turns the monitor on the top right side of the monitor: Operating the Monitor 1 2 3 4 5 Side-panel control buttons No. NOTE: The Power button is...
... the monitor. 2 Auto/OK Auto-adjusts the display to the ideal setting when the OSD is located on or puts it in standby or sleep mode. Hot key to link to Quick View. / Navigates forward through the OSD menu and decreases adjustment levels. 5 Menu Opens, selects, or exits the OSD menu. User's Guide 4-3 Icon 1 Power Description Turns the monitor on the top right side of the monitor: Operating the Monitor 1 2 3 4 5 Side-panel control buttons No. NOTE: The Power button is...
User's Guide q1859, q2009, q2159 LCD Display
Page 24
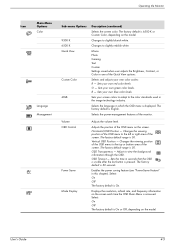
... to the bottom if you don't want to save all changes and return to turn on , press the Power button to the OSD Main Menu screen. Image Control Auto Adjustment Horizontal Position Vertical Position Clock Clock Phase Adjusts the screen image. The menu moves to remove any vertical bars or strips visible on -screen display (OSD) menu selections and their functional descriptions. Adjusts the vertical position of the display. Adjusts the focus of the picture (VGA input only). If you scroll up , or the...
... to the bottom if you don't want to save all changes and return to turn on , press the Power button to the OSD Main Menu screen. Image Control Auto Adjustment Horizontal Position Vertical Position Clock Clock Phase Adjusts the screen image. The menu moves to remove any vertical bars or strips visible on -screen display (OSD) menu selections and their functional descriptions. Adjusts the vertical position of the display. Adjusts the focus of the picture (VGA input only). If you scroll up , or the...
User's Guide q1859, q2009, q2159 LCD Display
Page 25
...own blue color levels. Volume OSD Control Power Saver Mode Display Adjusts the volume level. Horizontal OSD Position - Adjust to slightly blueish white. User's Guide 4-5 Changes to view the background information through the OSD. Sets your screen colors to adapt to slightly reddish white. Enables the power saving feature (see "Power-Saver Feature" in the image technology industry. The factory default range is 6500 K or Custom Color, depending on the screen each time the OSD Main Menu is English. The factory default is accessed. Displays the resolution, refresh rate...
...own blue color levels. Volume OSD Control Power Saver Mode Display Adjusts the volume level. Horizontal OSD Position - Adjust to slightly blueish white. User's Guide 4-5 Changes to view the background information through the OSD. Sets your screen colors to adapt to slightly reddish white. Enables the power saving feature (see "Power-Saver Feature" in the image technology industry. The factory default range is 6500 K or Custom Color, depending on the screen each time the OSD Main Menu is English. The factory default is accessed. Displays the resolution, refresh rate...
User's Guide q1859, q2009, q2159 LCD Display
Page 26
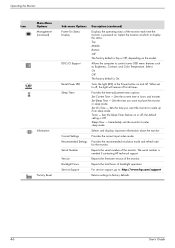
... resolution mode and refresh rate for the monitor. Select the location at all times. Allows the computer to enter sleep mode. Immediately sets the monitor to control some OSD menu features such as Brightness, Contrast, and Color Temperature. Reports the total hours of the monitor. Timer - Reports the firmware version of backlight operation. Sleep Now - Provides the current input video mode. Reports the serial number of the monitor. For service support, go to: http://www.hp.com/support Returns settings...
... resolution mode and refresh rate for the monitor. Select the location at all times. Allows the computer to enter sleep mode. Immediately sets the monitor to control some OSD menu features such as Brightness, Contrast, and Color Temperature. Reports the total hours of the monitor. Timer - Reports the firmware version of backlight operation. Sleep Now - Provides the current input video mode. Reports the serial number of the monitor. For service support, go to: http://www.hp.com/support Returns settings...
User's Guide q1859, q2009, q2159 LCD Display
Page 27
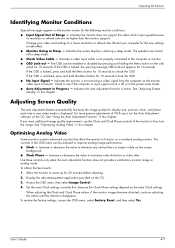
... support the video card's input signal because its resolution or refresh rate are turned off or in the power-saver mode. ■ Auto Adjustment in this chapter. The speakers are set higher than the monitor supports. If the OSD is unlocked, press and hold the Menu button for 20 minutes before adjusting. 2. Two controls in this chapter. Indicates a video input cable is locked, the warning message OSD Lock-out appears for the following monitor conditions: ■ Input Signal Out of VGA input, run the Auto Adjustment software...
... support the video card's input signal because its resolution or refresh rate are turned off or in the power-saver mode. ■ Auto Adjustment in this chapter. The speakers are set higher than the monitor supports. If the OSD is unlocked, press and hold the Menu button for 20 minutes before adjusting. 2. Two controls in this chapter. Indicates a video input cable is locked, the warning message OSD Lock-out appears for the following monitor conditions: ■ Input Signal Out of VGA input, run the Auto Adjustment software...
User's Guide q1859, q2009, q2159 LCD Display
Page 28
... either the horizontal sync signal or the vertical sync signal. The monitor also supports a power-saver mode that is connected to work. Refer to your computer for instructions on your computer documentation for this feature to computers that have energy-saver features. 4-8 User's Guide NOTE: The energy-saver feature works only when the monitor is controlled by the computer. The monitor uses minimum power. When the monitor is green and the monitor uses the normal...
... either the horizontal sync signal or the vertical sync signal. The monitor also supports a power-saver mode that is connected to work. Refer to your computer for instructions on your computer documentation for this feature to computers that have energy-saver features. 4-8 User's Guide NOTE: The energy-saver feature works only when the monitor is controlled by the computer. The monitor uses minimum power. When the monitor is green and the monitor uses the normal...
User's Guide q1859, q2009, q2159 LCD Display
Page 31
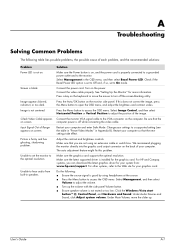
... Power LED option is set to Off and, if so, set the monitor to the monitor. Connect the video cable properly. Connect the monitor VGA signal cable to the VGA connector on , and the power cord is properly connected to a grounded power outlet and to the optimal resolution. Restart your settings to access the OSD menu. Make sure the graphics card supports the optimal resolution. User's Guide A-1 Screen is fuzzy and has ghosting, shadowing problem. Solution Make sure the Power button is on the computer. Adjust the contrast and brightness controls...
... Power LED option is set to Off and, if so, set the monitor to the monitor. Connect the video cable properly. Connect the monitor VGA signal cable to the VGA connector on , and the power cord is properly connected to a grounded power outlet and to the optimal resolution. Restart your settings to access the OSD menu. Make sure the graphics card supports the optimal resolution. User's Guide A-1 Screen is fuzzy and has ghosting, shadowing problem. Solution Make sure the Power button is on the computer. Adjust the contrast and brightness controls...
User's Guide q1859, q2009, q2159 LCD Display
Page 32
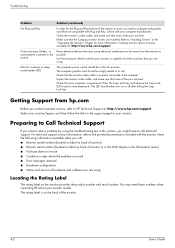
... links to work, you contact customer service, refer to HP Technical Support at : http://www.hp.com/support Picture bounces, flickers, or wave pattern is properly connected to "Installing Drivers" in its slot. The rating label is operational: Press the Caps Lock key and observe the Caps Lock LED found on the monitor provides the product number and serial number. Use the maximum refresh rate that your monitor. Make sure that the monitor video cable is present...
... links to work, you contact customer service, refer to HP Technical Support at : http://www.hp.com/support Picture bounces, flickers, or wave pattern is properly connected to "Installing Drivers" in its slot. The rating label is operational: Press the Caps Lock key and observe the Caps Lock LED found on the monitor provides the product number and serial number. Use the maximum refresh rate that your monitor. Make sure that the monitor video cable is present...

User's Guide q1859, q2009, q2159 LCD Display
Page 33
... or lower. Compaq LCD Monitors Face treatment: Glare polarizer with hard coating Input Terminals: ■ VGA connector Specifications model Q1859 Display Type: Viewable Image Size: Tilt: Maximum Weight (unpacked): Dimensions (h x w x d): Maximum Graphics Resolution: Text Mode: Dot Pitch: Horizontal Frequency (analog mode): Vertical Frequency (analog mode): Environmental Requirements Temperature (independent of altitude) Operating Temperature: Non-Operating Temperature: Relative Humidity (non-condensing): Operating Humidity: Non-Operating Humidity: Power Source: Power Consumption: Sleep Power...
... or lower. Compaq LCD Monitors Face treatment: Glare polarizer with hard coating Input Terminals: ■ VGA connector Specifications model Q1859 Display Type: Viewable Image Size: Tilt: Maximum Weight (unpacked): Dimensions (h x w x d): Maximum Graphics Resolution: Text Mode: Dot Pitch: Horizontal Frequency (analog mode): Vertical Frequency (analog mode): Environmental Requirements Temperature (independent of altitude) Operating Temperature: Non-Operating Temperature: Relative Humidity (non-condensing): Operating Humidity: Non-Operating Humidity: Power Source: Power Consumption: Sleep Power...
User's Guide q1859, q2009, q2159 LCD Display
Page 34
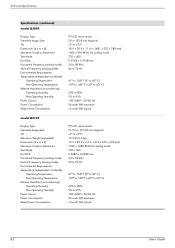
Technical Specifications Specifications (continued) model Q2009 Display Type: Viewable Image Size: Tilt: Dimensions (h x w x d): Maximum Graphics Resolution: Text Mode: Dot Pitch: Horizontal Frequency (analog mode): Vertical Frequency (analog mode): Environmental Requirements Temperature (independent of altitude) Operating Temperature: Non-Operating Temperature: Relative Humidity (non-condensing): Operating Humidity: Non-Operating Humidity: Power Source: Power Consumption: Sleep Power Consumption: TFT LCD active matrix 20 in. (50.8 cm) diagonal -5o to +25o 18.9 x 20.6 x 11.4 in. (481 x 523 ...
Technical Specifications Specifications (continued) model Q2009 Display Type: Viewable Image Size: Tilt: Dimensions (h x w x d): Maximum Graphics Resolution: Text Mode: Dot Pitch: Horizontal Frequency (analog mode): Vertical Frequency (analog mode): Environmental Requirements Temperature (independent of altitude) Operating Temperature: Non-Operating Temperature: Relative Humidity (non-condensing): Operating Humidity: Non-Operating Humidity: Power Source: Power Consumption: Sleep Power Consumption: TFT LCD active matrix 20 in. (50.8 cm) diagonal -5o to +25o 18.9 x 20.6 x 11.4 in. (481 x 523 ...
User's Guide q1859, q2009, q2159 LCD Display
Page 36
... a power cord that is provided with the monitor meets the requirements for use in the country/region where you have cosmetic imperfections that country/region. B-4 User's Guide The first is not likely to the HP Web site at a supported resolution and refresh rate, from the product. Technical Specifications LCD Monitor Quality and Pixel Policy Your Compaq LCD Monitor uses high-precision technology, manufactured according to high standards, to the plug...
... a power cord that is provided with the monitor meets the requirements for use in the country/region where you have cosmetic imperfections that country/region. B-4 User's Guide The first is not likely to the HP Web site at a supported resolution and refresh rate, from the product. Technical Specifications LCD Monitor Quality and Pixel Policy Your Compaq LCD Monitor uses high-precision technology, manufactured according to high standards, to the plug...

User's Guide q1859, q2009, q2159 LCD Display
Page 43
... CD 4-1 specifications B-1 - A-2 U unpacking 3-1 V video and audio cables and adapters 3-6 W wall-mounting 3-2 User's Guide D-1 B-4 tilt adjustment 3-10 troubleshooting A-1 - A adjustments tilt 3-10 audio and video cables and adapters 3-6 C cable management 3-9 cleaning 2-2 connecting audio cable 3-7 power cable 3-8 VGA 3-5 F features 1-1 I installing 3-1 - 3-10 M maintenance cleaning 2-2 guidelines 2-2 monitor conditions Auto Adjustment in Progress 4-7 Check Video Cable 4-7 Input Signal Out of Range 4-7 Monitor Going to Sleep 4-7 No Input Signal 4-7 OSD Lock-out 4-7 monitor operation...
... CD 4-1 specifications B-1 - A-2 U unpacking 3-1 V video and audio cables and adapters 3-6 W wall-mounting 3-2 User's Guide D-1 B-4 tilt adjustment 3-10 troubleshooting A-1 - A adjustments tilt 3-10 audio and video cables and adapters 3-6 C cable management 3-9 cleaning 2-2 connecting audio cable 3-7 power cable 3-8 VGA 3-5 F features 1-1 I installing 3-1 - 3-10 M maintenance cleaning 2-2 guidelines 2-2 monitor conditions Auto Adjustment in Progress 4-7 Check Video Cable 4-7 Input Signal Out of Range 4-7 Monitor Going to Sleep 4-7 No Input Signal 4-7 OSD Lock-out 4-7 monitor operation...


