HP Notebook Reference Guide
Page 75
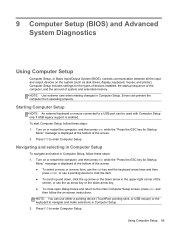
... a menu item, use the tab key and the keyboard arrow keys and then press enter, or use a pointing device to click the item. ● To scroll up and down, click the up arrow key or the down arrow in Computer Setup, follow these steps: 1. NOTE: You can prevent the computer from...
... a menu item, use the tab key and the keyboard arrow keys and then press enter, or use a pointing device to click the item. ● To scroll up and down, click the up arrow key or the down arrow in Computer Setup, follow these steps: 1. NOTE: You can prevent the computer from...
Getting Started HP Notebook
Page 6
... models only 27 Using the TouchPad ...27 Turning the TouchPad off and on 28 Navigating ...28 Selecting ...29 Using TouchPad gestures 29 Scrolling 30 Pinching/Zooming 30 Rotating 31 Flicking 31 5 Maintenance ...32 Inserting or removing the battery ...32 Removing or replacing the service door... display 44 Cleaning the sides and cover 44 Cleaning the TouchPad and keyboard 45 6 Backup and recovery ...46 Creating recovery media with HP Recovery Disc Creator 47 Creating recovery media ...47 Backing up your information ...47 Performing a system recovery ...48 Using the Windows recovery tools...
... models only 27 Using the TouchPad ...27 Turning the TouchPad off and on 28 Navigating ...28 Selecting ...29 Using TouchPad gestures 29 Scrolling 30 Pinching/Zooming 30 Rotating 31 Flicking 31 5 Maintenance ...32 Inserting or removing the battery ...32 Removing or replacing the service door... display 44 Cleaning the sides and cover 44 Cleaning the TouchPad and keyboard 45 6 Backup and recovery ...46 Creating recovery media with HP Recovery Disc Creator 47 Creating recovery media ...47 Backing up your information ...47 Performing a system recovery ...48 Using the Windows recovery tools...
Getting Started HP Notebook
Page 36
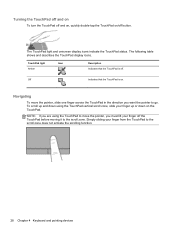
...from the TouchPad to go. NOTE: If you are using the TouchPad vertical scroll zone, slide your finger off . Navigating To move the pointer, you want the pointer to the scroll zone does not activate the scrolling function. 28 Chapter 4 Keyboard and pointing devices The following table shows and... the TouchPad display icons. TouchPad light Amber Icon Description Indicates that the TouchPad is off the TouchPad before moving it to the scroll zone. To scroll up or down using the TouchPad to move the pointer, slide one finger across the TouchPad in the direction you must lift...
...from the TouchPad to go. NOTE: If you are using the TouchPad vertical scroll zone, slide your finger off . Navigating To move the pointer, you want the pointer to the scroll zone does not activate the scrolling function. 28 Chapter 4 Keyboard and pointing devices The following table shows and... the TouchPad display icons. TouchPad light Amber Icon Description Indicates that the TouchPad is off the TouchPad before moving it to the scroll zone. To scroll up or down using the TouchPad to move the pointer, slide one finger across the TouchPad in the direction you must lift...
Getting Started HP Notebook
Page 38
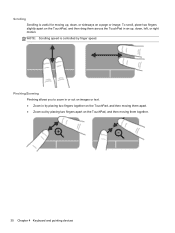
... two fingers slightly apart on the TouchPad, and then drag them together. 30 Chapter 4 Keyboard and pointing devices Scrolling Scrolling is controlled by placing two fingers apart on the TouchPad, and then moving them apart. ● Zoom out by finger speed. Pinching/Zooming Pinching allows ...you to zoom in or out on images or text. ● Zoom in an up , down , left, or right motion. NOTE: Scrolling speed is useful for moving up , down , or sideways on the TouchPad, and then moving them across the TouchPad in by placing two fingers together...
... two fingers slightly apart on the TouchPad, and then drag them together. 30 Chapter 4 Keyboard and pointing devices Scrolling Scrolling is controlled by placing two fingers apart on the TouchPad, and then moving them apart. ● Zoom out by finger speed. Pinching/Zooming Pinching allows ...you to zoom in or out on images or text. ● Zoom in an up , down , left, or right motion. NOTE: Scrolling speed is useful for moving up , down , or sideways on the TouchPad, and then moving them across the TouchPad in by placing two fingers together...
Getting Started HP Notebook
Page 39
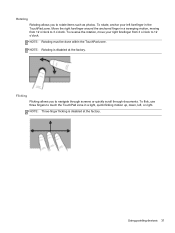
... factory. NOTE: Rotating must be done within the TouchPad zone. To rotate, anchor your right forefinger from 12 o'clock to navigate through screens or quickly scroll through documents.
... factory. NOTE: Rotating must be done within the TouchPad zone. To rotate, anchor your right forefinger from 12 o'clock to navigate through screens or quickly scroll through documents.
Getting Started HP Notebook
Page 64
... applications 9 Windows logo 9 L labels Bluetooth 52 HP Mobile Broadband Module 52 Microsoft Certificate of Authenticity 52...identifying 14 RJ-45 (network) jack, identifying 11 S screen brightness keys 24 screen image, switching 24 scrolling TouchPad gesture 30 security cable slot, identifying 11 serial number 52 serial number, computer 52 serial port, ...46 system restore points 46 T TouchPad buttons 4, 5 on/off button 4, 7 using 27 TouchPad gestures pinching 30 scrolling 30 zooming 30 TouchPad light, identifying 6 TouchPad zone identifying 4 traveling with the computer 52 U upgrade bay 11 ...
... applications 9 Windows logo 9 L labels Bluetooth 52 HP Mobile Broadband Module 52 Microsoft Certificate of Authenticity 52...identifying 14 RJ-45 (network) jack, identifying 11 S screen brightness keys 24 screen image, switching 24 scrolling TouchPad gesture 30 security cable slot, identifying 11 serial number 52 serial number, computer 52 serial port, ...46 system restore points 46 T TouchPad buttons 4, 5 on/off button 4, 7 using 27 TouchPad gestures pinching 30 scrolling 30 zooming 30 TouchPad light, identifying 6 TouchPad zone identifying 4 traveling with the computer 52 U upgrade bay 11 ...


