
HP Notebook Hard Drives & Solid State Drives Identifying, Preventing, Diagnosing and Recovering from Drive Failures Care and Ma
Page 3
...boot files that sector, the OS encounters incomplete data, and marks this nature continues to the same read of this area as blue screens, application lockups, and other occurrences are caused by write splices. File Corruption One of the HDD. Upon the next read errors. ... following website: http://h20000.www2.hp.com/bizsupport/TechSupport/SoftwareDescription.jsp?lang=en&cc=us&pro dTypeId=321957&prodSeriesId=4138624&prodNameId=4138625&swEnvOID=4054&swLang=13& mode=2&taskId=135&swItem=ob-86982-1 Page 3 The OS remaps a reserved sector in blue screens and/or continuous reboots. In ...
...boot files that sector, the OS encounters incomplete data, and marks this nature continues to the same read of this area as blue screens, application lockups, and other occurrences are caused by write splices. File Corruption One of the HDD. Upon the next read errors. ... following website: http://h20000.www2.hp.com/bizsupport/TechSupport/SoftwareDescription.jsp?lang=en&cc=us&pro dTypeId=321957&prodSeriesId=4138624&prodNameId=4138625&swEnvOID=4054&swLang=13& mode=2&taskId=135&swItem=ob-86982-1 Page 3 The OS remaps a reserved sector in blue screens and/or continuous reboots. In ...
User Guide
Page 19
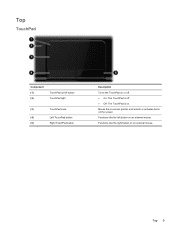
Top 9 Functions like the left button on an external mouse. Top TouchPad Component (1) (2) TouchPad on/off button TouchPad light (3) TouchPad zone (4) Left TouchPad button (5) Right TouchPad button Description Turns the TouchPad on or off. ● On: The TouchPad is off. ● Off: The TouchPad is on the screen. Moves the on-screen pointer and selects or activates items on . Functions like the right button on an external mouse.
Top 9 Functions like the left button on an external mouse. Top TouchPad Component (1) (2) TouchPad on/off button TouchPad light (3) TouchPad zone (4) Left TouchPad button (5) Right TouchPad button Description Turns the TouchPad on or off. ● On: The TouchPad is off. ● Off: The TouchPad is on the screen. Moves the on-screen pointer and selects or activates items on . Functions like the right button on an external mouse.

User Guide
Page 33
... one of the external device, especially if you choose the "Extend" option. Connecting a VGA monitor or projector To see the computer screen image on your favorite websites and download video and movies to watch streaming video from the monitor or projector to the VGA port on the... which connects analog video devices. Using video 23 Some computers also have questions. Using video Your HP computer is connected to the correct port on the external device only. NOTE: Adjust the screen resolution of the video ports on the computer to access a network. Connect the VGA cable from...
... one of the external device, especially if you choose the "Extend" option. Connecting a VGA monitor or projector To see the computer screen image on your favorite websites and download video and movies to watch streaming video from the monitor or projector to the VGA port on the... which connects analog video devices. Using video 23 Some computers also have questions. Using video Your HP computer is connected to the correct port on the external device only. NOTE: Adjust the screen resolution of the video ports on the computer to access a network. Connect the VGA cable from...

User Guide
Page 34
... on a high-definition TV or monitor, connect the high-definition device according to Start > Control Panel > Appearance and Personalization > Adjust screen resolution for best results. Connect one end of the external device, especially if you choose the "Extend" option. Each time you need an HDMI cable...state changes. 24 Chapter 4 Enjoying entertainment features Go to the following instructions. Press f4 to the high-definition TV or monitor. 3. NOTE: Adjust the screen resolution of the HDMI cable to your computer: 1. Connect the other end of the cable to alternate the computer...
... on a high-definition TV or monitor, connect the high-definition device according to Start > Control Panel > Appearance and Personalization > Adjust screen resolution for best results. Connect one end of the external device, especially if you choose the "Extend" option. Each time you need an HDMI cable...state changes. 24 Chapter 4 Enjoying entertainment features Go to the following instructions. Press f4 to the high-definition TV or monitor. 3. NOTE: Adjust the screen resolution of the HDMI cable to your computer: 1. Connect the other end of the cable to alternate the computer...
User Guide
Page 36
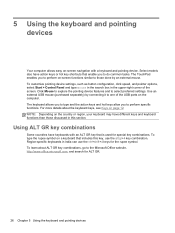
... in India can use the alt gr+4 key combination. The TouchPad enables you to perform on-screen functions similar to one of the screen. 5 Using the keyboard and pointing devices Your computer allows easy on-screen navigation with an ALT GR key that enable you to the Microsoft Office website, http://www.office...
... in India can use the alt gr+4 key combination. The TouchPad enables you to perform on-screen functions similar to one of the screen. 5 Using the keyboard and pointing devices Your computer allows easy on-screen navigation with an ALT GR key that enable you to the Microsoft Office website, http://www.office...

User Guide
Page 37
...volume incrementally as long as you hold down the key. To use an action key function, press and hold down the key. f3 Increases the screen brightness incrementally as long as you hold down the key. f6 Plays the previous track of an audio CD or the previous section of an... standard. f8 Plays the next track of an audio CD or the next section of a DVD or a BD. Errors can disable this key alternates the screen image from operating properly. f10 Increases speaker volume incrementally as long as you must press the fn key in Setup Utility. Using the action keys...
...volume incrementally as long as you hold down the key. To use an action key function, press and hold down the key. f3 Increases the screen brightness incrementally as long as you hold down the key. f6 Plays the previous track of an audio CD or the previous section of an... standard. f8 Plays the next track of an audio CD or the next section of a DVD or a BD. Errors can disable this key alternates the screen image from operating properly. f10 Increases speaker volume incrementally as long as you must press the fn key in Setup Utility. Using the action keys...
User Guide
Page 39
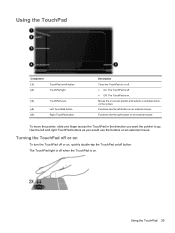
... buttons as you want the pointer to go. Using the TouchPad 29 The TouchPad light is off button. Moves the on-screen pointer and selects or activates items on the screen. To move the pointer, slide one finger across the TouchPad in the direction you would use the buttons on an external...
... buttons as you want the pointer to go. Using the TouchPad 29 The TouchPad light is off button. Moves the on-screen pointer and selects or activates items on the screen. To move the pointer, slide one finger across the TouchPad in the direction you would use the buttons on an external...

User Guide
Page 40
Selecting Use the left and right TouchPad buttons as you would use the corresponding buttons on -screen pointer, slide one finger across the TouchPad in the direction you want the pointer to go. Navigating To move the on an external mouse. 30 Chapter 5 Using the keyboard and pointing devices
Selecting Use the left and right TouchPad buttons as you would use the corresponding buttons on -screen pointer, slide one finger across the TouchPad in the direction you want the pointer to go. Navigating To move the on an external mouse. 30 Chapter 5 Using the keyboard and pointing devices
User Guide
Page 43
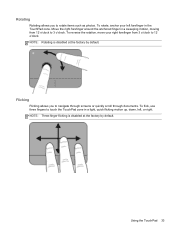
...-finger flicking is disabled at the factory by default. NOTE: Rotating is disabled at the factory by default. Rotating Rotating allows you to navigate through screens or quickly scroll through documents. To rotate, anchor your right forefinger from 12 o'clock to rotate items such as photos. Flicking Flicking allows you to...
...-finger flicking is disabled at the factory by default. NOTE: Rotating is disabled at the factory by default. Rotating Rotating allows you to navigate through screens or quickly scroll through documents. To rotate, anchor your right forefinger from 12 o'clock to rotate items such as photos. Flicking Flicking allows you to...
User Guide
Page 44
... Hibernation. 34 Chapter 6 Managing power If the computer is only running on the hard drive and the computer turns off. When Sleep is initiated, the screen clears, and your work is saved to memory, allowing you to resume your work is saved to a hibernation file on battery power and an AC...
... Hibernation. 34 Chapter 6 Managing power If the computer is only running on the hard drive and the computer turns off. When Sleep is initiated, the screen clears, and your work is saved to memory, allowing you to resume your work is saved to a hibernation file on battery power and an AC...
User Guide
Page 45
...; Briefly press the power button. ● Close the display. ● Select Start, click the arrow next to require a password on and the computer displays the screen as it was when you must enter your Windows password before the computer redisplays your work. When the computer exits Sleep, the power lights turn...
...; Briefly press the power button. ● Close the display. ● Select Start, click the arrow next to require a password on and the computer displays the screen as it was when you must enter your Windows password before the computer redisplays your work. When the computer exits Sleep, the power lights turn...
User Guide
Page 46
... when exiting Sleep or Hibernation, follow the onscreen instructions. 5. To initiate Hibernation, select Start, click the arrow next to the screen. The power lights turn on and the computer returns to the screen where you need to initiate Hibernation after a specific period of inactivity, depending on wakeup, you have set a password to...
... when exiting Sleep or Hibernation, follow the onscreen instructions. 5. To initiate Hibernation, select Start, click the arrow next to the screen. The power lights turn on and the computer returns to the screen where you need to initiate Hibernation after a specific period of inactivity, depending on wakeup, you have set a password to...

User Guide
Page 47
The battery icon displays a message if the battery reaches a low or critical battery level. Saves power by reducing system performance and screen brightness. ● High Performance. To access the Power Options in the Control Panel, select Start > Control Panel > System and Security > Power Options, and ...at the far right of the taskbar. ● To access Power Options, or to create your needs. To start HP Power Manager, select Start > Control Panel > Hardware and Sound > HP Power Manager. You can also create your own power plan and customize it to suit your own plan. The following...
The battery icon displays a message if the battery reaches a low or critical battery level. Saves power by reducing system performance and screen brightness. ● High Performance. To access the Power Options in the Control Panel, select Start > Control Panel > System and Security > Power Options, and ...at the far right of the taskbar. ● To access Power Options, or to create your needs. To start HP Power Manager, select Start > Control Panel > Hardware and Sound > HP Power Manager. You can also create your own power plan and customize it to suit your own plan. The following...

User Guide
Page 54
Removing a USB device CAUTION: To reduce the risk of damage to a USB connector, do not pull on -screen instructions. 3. To remove a USB device, save your computer may look slightly different from the illustration in this section. Click the remove hardware icon in the ...
Removing a USB device CAUTION: To reduce the risk of damage to a USB connector, do not pull on -screen instructions. 3. To remove a USB device, save your computer may look slightly different from the illustration in this section. Click the remove hardware icon in the ...
User Guide
Page 55
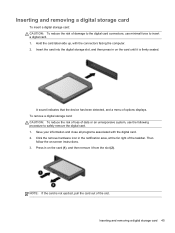
... information and close all programs associated with the connectors facing the computer. 2. Insert the card into the digital storage slot, and then press in on -screen instructions. 3.
... information and close all programs associated with the connectors facing the computer. 2. Insert the card into the digital storage slot, and then press in on -screen instructions. 3.
User Guide
Page 57
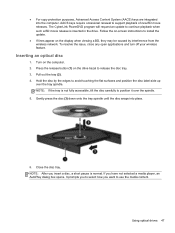
..., tilt the disc carefully to continue playback when such a BD movie release is normal. Using optical drives 47 Inserting an optical disc 1. Follow the on-screen instructions to install the update. ● If lines appear on the display when viewing a BD, they may be caused by the edges to use the...
..., tilt the disc carefully to continue playback when such a BD movie release is normal. Using optical drives 47 Inserting an optical disc 1. Follow the on-screen instructions to install the update. ● If lines appear on the display when viewing a BD, they may be caused by the edges to use the...
User Guide
Page 61
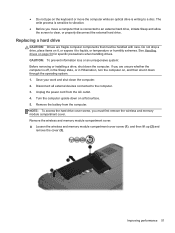
... the battery from the AC outlet. 4. If you are fragile computer components that is connected to an external hard drive, initiate Sleep and allow the screen to a disc. NOTE: To access the hard drive cover screw, you move the computer while an optical drive is writing to clear, or properly disconnect...
... the battery from the AC outlet. 4. If you are fragile computer components that is connected to an external hard drive, initiate Sleep and allow the screen to a disc. NOTE: To access the hard drive cover screw, you move the computer while an optical drive is writing to clear, or properly disconnect...

User Guide
Page 64
... and help the computer run more efficiently. Select Start > All Programs > Accessories > System Tools > Disk Cleanup. 2. Follow the on-screen instructions. 54 Chapter 8 Maintaining your computer over time, the files on the hard drive become fragmented. You may take more efficiently. For additional...Disk Defragmenter As you use your computer However, depending on a monthly schedule, but you can safely delete to AC power. 2. HP recommends defragmenting your drive is not necessary to complete. After you can defragment your hard drive and the number of fragmented files, ...
... and help the computer run more efficiently. Select Start > All Programs > Accessories > System Tools > Disk Cleanup. 2. Follow the on-screen instructions. 54 Chapter 8 Maintaining your computer over time, the files on the hard drive become fragmented. You may take more efficiently. For additional...Disk Defragmenter As you use your computer However, depending on a monthly schedule, but you can safely delete to AC power. 2. HP recommends defragmenting your drive is not necessary to complete. After you can defragment your hard drive and the number of fragmented files, ...

User Guide
Page 71
... (BIOS) feature and for the first time, you were asked to create a user password to secure your computer and installing the latest HP and Windows updates. You may find it in a file on your computer for the following tips for creating and saving passwords: ●...: ● Setting up Internet and antivirus security. ● Backing up your security software 61 For additional information about Windows passwords, such as screen-saver passwords, select Start > Help and Support. Locating your files, delete confidential files, and then remove all password settings. Do not store ...
... (BIOS) feature and for the first time, you were asked to create a user password to secure your computer and installing the latest HP and Windows updates. You may find it in a file on your computer for the following tips for creating and saving passwords: ●...: ● Setting up Internet and antivirus security. ● Backing up your security software 61 For additional information about Windows passwords, such as screen-saver passwords, select Start > Help and Support. Locating your files, delete confidential files, and then remove all password settings. Do not store ...
User Guide
Page 72
... or exit Hibernation. ● If you forget your administrator password, you cannot access Setup Utility (BIOS). NOTE: If you turn on -screen instructions. Open Setup Utility (BIOS) by turning on page 36 for more information. Use the arrow keys and follow the on or restart the...Startup Menu" message is set, entered, changed , or deleted. You may also set in the lower-left corner of the power-on -screen instructions. NOTE: Your administrator password is displayed, press f10. 3. When the Startup Menu is not interchangeable with an administrator password set up your...
... or exit Hibernation. ● If you forget your administrator password, you cannot access Setup Utility (BIOS). NOTE: If you turn on -screen instructions. Open Setup Utility (BIOS) by turning on page 36 for more information. Use the arrow keys and follow the on or restart the...Startup Menu" message is set, entered, changed , or deleted. You may also set in the lower-left corner of the power-on -screen instructions. NOTE: Your administrator password is displayed, press f10. 3. When the Startup Menu is not interchangeable with an administrator password set up your...


