User Guide - Windows 7
Page 6
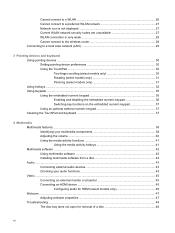
...36 Enabling and disabling the embedded numeric keypad 36 Switching key functions on the embedded numeric keypad 37 Using an optional external numeric keypad 37 Cleaning the TouchPad and keyboard 37 4 Multimedia Multimedia features ...38 Identifying your multimedia components 38 Adjusting the volume ...40 Using the media activity functions 41 Using the media activity hotkeys 41 Multimedia software ...42 Using multimedia software 42 Installing multimedia software from a disc 42 Audio ...43 Connecting external audio devices 43 Checking your audio functions 43 Video ...45 Connecting an...
...36 Enabling and disabling the embedded numeric keypad 36 Switching key functions on the embedded numeric keypad 37 Using an optional external numeric keypad 37 Cleaning the TouchPad and keyboard 37 4 Multimedia Multimedia features ...38 Identifying your multimedia components 38 Adjusting the volume ...40 Using the media activity functions 41 Using the media activity hotkeys 41 Multimedia software ...42 Using multimedia software 42 Installing multimedia software from a disc 42 Audio ...43 Connecting external audio devices 43 Checking your audio functions 43 Video ...45 Connecting an...
User Guide - Windows 7
Page 12
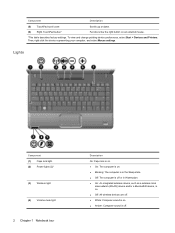
... . Lights Component (1) Caps lock light (2) Power lights (2)* (3) Wireless light (4) Volume mute light 2 Chapter 1 Notebook tour Description On: Caps lock is on. ● On: The computer is on. ● Blinking: The computer is in the Sleep state. ● Off: The computer is off or in Hibernation. ● On: An integrated wireless device, such as a wireless local area network (WLAN) device and/or a Bluetooth® device, is on an external mouse. *This table describes factory settings...
... . Lights Component (1) Caps lock light (2) Power lights (2)* (3) Wireless light (4) Volume mute light 2 Chapter 1 Notebook tour Description On: Caps lock is on. ● On: The computer is on. ● Blinking: The computer is in the Sleep state. ● Off: The computer is off or in Hibernation. ● On: An integrated wireless device, such as a wireless local area network (WLAN) device and/or a Bluetooth® device, is on an external mouse. *This table describes factory settings...
User Guide - Windows 7
Page 21
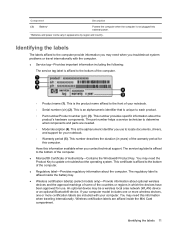
... country. The service tag label is affixed to update or troubleshoot the operating system. You may need this information available when you troubleshoot system problems or travel internationally with your notebook. ◦ Serial number (s/n) (2). This is the product name affixed to determine what components and parts are affixed inside the battery bay. ● Wireless certification label(s) (select models only)-Provide information about optional wireless devices and the approval...
... country. The service tag label is affixed to update or troubleshoot the operating system. You may need this information available when you troubleshoot system problems or travel internationally with your notebook. ◦ Serial number (s/n) (2). This is the product name affixed to determine what components and parts are affixed inside the battery bay. ● Wireless certification label(s) (select models only)-Provide information about optional wireless devices and the approval...
User Guide - Windows 7
Page 36
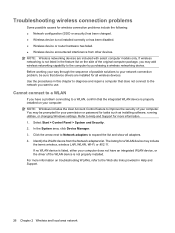
... area network For more information on troubleshooting WLANs, refer to Help and Support for more information. 1. Cannot connect to expand the list and show all wireless devices. Select Start > Control Panel > System and Security. 2. Click the arrow next to Network adapters to a WLAN If you have an integrated WLAN device, or the driver of the WLAN device is not properly installed. NOTE: Wireless networking devices are installed for all adapters. 4. Use the...
... area network For more information on troubleshooting WLANs, refer to Help and Support for more information. 1. Cannot connect to expand the list and show all wireless devices. Select Start > Control Panel > System and Security. 2. Click the arrow next to Network adapters to a WLAN If you have an integrated WLAN device, or the driver of the WLAN device is not properly installed. NOTE: Wireless networking devices are installed for all adapters. 4. Use the...
User Guide - Windows 7
Page 40
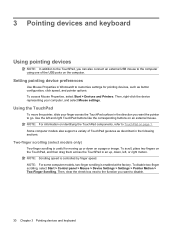
.... To disable two-finger scrolling, select Start > Control panel > Mouse > Device Settings > Settings > Pointer Motion > Two-Finger Scrolling. NOTE: For some computer models, two-finger scrolling is controlled by finger speed. Then, clear the check box next to the function you can also connect an external USB mouse to the computer using one of TouchPad gestures as button configuration, click speed, and pointer options. To access Mouse Properties, select Start > Devices and Printers. 3 Pointing devices and keyboard Using pointing devices NOTE: In...
.... To disable two-finger scrolling, select Start > Control panel > Mouse > Device Settings > Settings > Pointer Motion > Two-Finger Scrolling. NOTE: For some computer models, two-finger scrolling is controlled by finger speed. Then, clear the check box next to the function you can also connect an external USB mouse to the computer using one of TouchPad gestures as button configuration, click speed, and pointer options. To access Mouse Properties, select Start > Devices and Printers. 3 Pointing devices and keyboard Using pointing devices NOTE: In...
User Guide - Windows 7
Page 42
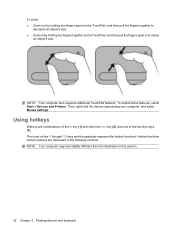
... enable these features, select Start > Devices and Printers. Then, right-click the device representing your computer, and select Mouse settings. Hotkey functions and procedures are combinations of the fn key (1) and either the esc key (2), and one of the function keys (3). Using hotkeys Hotkeys are discussed in the following sections. To pinch: ● Zoom out by holding two fingers together on the f1 through f12 keys...
... enable these features, select Start > Devices and Printers. Then, right-click the device representing your computer, and select Mouse settings. Hotkey functions and procedures are combinations of the fn key (1) and either the esc key (2), and one of the function keys (3). Using hotkeys Hotkeys are discussed in the following sections. To pinch: ● Zoom out by holding two fingers together on the f1 through f12 keys...

User Guide - Windows 7
Page 47
... pressing the keypad key. ● To use a vacuum cleaner attachment to whether num lock is on or off. (Num lock is turned off at the factory.) For example: ● When num lock is on, most keypad keys type numbers. ● When num lock is off , most external numeric keypads function differently according to clean the keyboard. Cleaning the TouchPad and keyboard 37 Switching key functions on the embedded numeric...
... pressing the keypad key. ● To use a vacuum cleaner attachment to whether num lock is on or off. (Num lock is turned off at the factory.) For example: ● When num lock is on, most keypad keys type numbers. ● When num lock is off , most external numeric keypads function differently according to clean the keyboard. Cleaning the TouchPad and keyboard 37 Switching key functions on the embedded numeric...
User Guide - Windows 7
Page 63
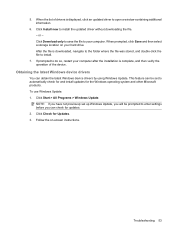
... location on -screen instructions. Click Install now to install. 7. If prompted to do so, restart your hard drive. When the list of the device. Click Check for the Windows operating system and other Microsoft products. This feature can be prompted to open a window containing additional information. 6. or - Click Download only to save the file to automatically check for and install updates for Updates. 3. Click Start > All Programs > Windows Update. To use Windows Update...
... location on -screen instructions. Click Install now to install. 7. If prompted to do so, restart your hard drive. When the list of the device. Click Check for the Windows operating system and other Microsoft products. This feature can be prompted to open a window containing additional information. 6. or - Click Download only to save the file to automatically check for and install updates for Updates. 3. Click Start > All Programs > Windows Update. To use Windows Update...
User Guide - Windows 7
Page 74
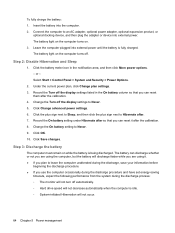
... the current power plan, click Change plan settings. 3. Step 3: Discharge the battery The computer must remain on the computer turns off the display settings to an AC adapter, optional power adapter, optional expansion product, or optional docking device, and then plug the adapter or device into external power until the battery is being discharged. The battery light on while the battery is fully charged. Click Save changes. Step 2: Disable Hibernation and Sleep 1. Change the On battery setting to Hibernate...
... the current power plan, click Change plan settings. 3. Step 3: Discharge the battery The computer must remain on the computer turns off the display settings to an AC adapter, optional power adapter, optional expansion product, or optional docking device, and then plug the adapter or device into external power until the battery is being discharged. The battery light on while the battery is fully charged. Click Save changes. Step 2: Disable Hibernation and Sleep 1. Change the On battery setting to Hibernate...

User Guide - Windows 7
Page 75
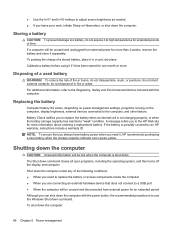
... discharged. Click Change advanced power settings. 5. Click Save changes. Under the current power plan, click Change plan settings. 3. When the battery is discharged, the battery light turns off wireless and local area network (LAN) connections and exit modem applications when you are not using them. ● Disconnect external devices that are not plugged into external power and maintain external power until the battery is off, turn off . 2. The battery light begins to blink when the battery has discharged...
... discharged. Click Change advanced power settings. 5. Click Save changes. Under the current power plan, click Change plan settings. 3. When the battery is discharged, the battery light turns off wireless and local area network (LAN) connections and exit modem applications when you are not using them. ● Disconnect external devices that are not plugged into external power and maintain external power until the battery is off, turn off . 2. The battery light begins to blink when the battery has discharged...
User Guide - Windows 7
Page 76
... power management settings, programs running on the computer, display brightness, external devices connected to use the Windows Shut down the computer with this computer. If the battery is shut down command closes all open programs, including the operating system, and then turns off the display and computer. Shutting down the computer CAUTION: Unsaved information will be lost when the computer is possibly covered by an HP warranty, instructions...
... power management settings, programs running on the computer, display brightness, external devices connected to use the Windows Shut down the computer with this computer. If the battery is shut down command closes all open programs, including the operating system, and then turns off the display and computer. Shutting down the computer CAUTION: Unsaved information will be lost when the computer is possibly covered by an HP warranty, instructions...
User Guide - Windows 7
Page 86
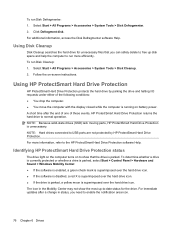
Using Disk Cleanup Disk Cleanup searches the hard drive for the drive. Follow the on battery power. For additional information, access the Disk Defragmenter software Help. A short time after a change in the Mobility Center may not show that you need to normal operation. NOTE: Because solid-state drives (SSD) lack moving parts, HP ProtectSmart Hard Drive Protection is superimposed over the hard drive icon. Identifying HP ProtectSmart Hard Drive Protection status The drive light on the computer...
Using Disk Cleanup Disk Cleanup searches the hard drive for the drive. Follow the on battery power. For additional information, access the Disk Defragmenter software Help. A short time after a change in the Mobility Center may not show that you need to normal operation. NOTE: Because solid-state drives (SSD) lack moving parts, HP ProtectSmart Hard Drive Protection is superimposed over the hard drive icon. Identifying HP ProtectSmart Hard Drive Protection status The drive light on the computer...

User Guide - Windows 7
Page 111
... password At the Enter Password prompt, type your administrator password, and then press enter. After 3 unsuccessful attempts to select Exit > Exit Saving Changes. Open Setup Utility by turning on password is not displayed as it must restart the computer and try again. To save your changes and exit Setup Utility, use of the computer. A power-on or restarting the computer. Using passwords 101 or - When the Startup Menu is set, entered, changed, or deleted. Power-on password...
... password At the Enter Password prompt, type your administrator password, and then press enter. After 3 unsuccessful attempts to select Exit > Exit Saving Changes. Open Setup Utility by turning on password is not displayed as it must restart the computer and try again. To save your changes and exit Setup Utility, use of the computer. A power-on or restarting the computer. Using passwords 101 or - When the Startup Menu is set, entered, changed, or deleted. Power-on password...

User Guide - Windows 7
Page 126
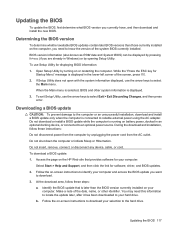
... system BIOS is connected to Help and Support for a system BIOS update by identifying the BIOS version currently installed on the HP Web site at http://www.hp.com. 3. Refer to a network, consult the network administrator before installing any software updates, especially system BIOS updates. B Software updates Updated versions of the software provided with the hardware devices, and provides for tasks such as installing applications, running utilities, or changing Windows settings. Identify your computer model, product category, and series...
... system BIOS is connected to Help and Support for a system BIOS update by identifying the BIOS version currently installed on the HP Web site at http://www.hp.com. 3. Refer to a network, consult the network administrator before installing any software updates, especially system BIOS updates. B Software updates Updated versions of the software provided with the hardware devices, and provides for tasks such as installing applications, running utilities, or changing Windows settings. Identify your computer model, product category, and series...
User Guide - Windows 7
Page 127
... BIOS update you need this information to locate the update later, after it has been downloaded to your selection to reliable external power using the AC adapter. Updating the BIOS 117 While the "Press the ESC key for Startup Menu" message is running on -screen instructions to identify your computer. If Setup Utility does not open with the system information displayed, use the arrow keys to select Exit > Exit Discarding Changes, and then press enter...
... BIOS update you need this information to locate the update later, after it has been downloaded to your selection to reliable external power using the AC adapter. Updating the BIOS 117 While the "Press the ESC key for Startup Menu" message is running on -screen instructions to identify your computer. If Setup Utility does not open with the system information displayed, use the arrow keys to select Exit > Exit Discarding Changes, and then press enter...
User Guide - Windows 7
Page 129
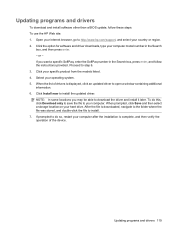
... select a storage location on your operating system. 5. Updating programs and drivers 119 If you may be able to http://www.hp.com/support, and select your computer model number in the Search box, press enter, and follow these steps: To use the HP Web site: 1. Click the option for software and driver downloads, type your country or region. 2. Open your Internet browser, go to download the driver and install it later.
... select a storage location on your operating system. 5. Updating programs and drivers 119 If you may be able to http://www.hp.com/support, and select your computer model number in the Search box, press enter, and follow these steps: To use the HP Web site: 1. Click the option for software and driver downloads, type your country or region. 2. Open your Internet browser, go to download the driver and install it later.
User Guide - Windows 7
Page 130
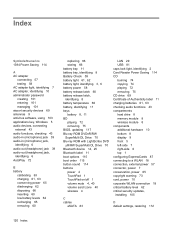
... ROM with LightScribe DVD ±R/RW SuperMulti DL Drive 70 Bluetooth device 14, 25 Bluetooth label 11 boot options 115 boot order 115 button sound 114 buttons power 4 TouchPad 1 TouchPad on/off 1 volume mute 4, 40 volume scroll zone 40 wireless 4 C cables eSATA 83 LAN 29 USB 81 caps lock light, identifying 2 Card Reader Power Saving 114 CD burning 74 copying 74 playing 72 removing 75 CD drive 69 Certificate of Authenticity label 11 charging batteries 61, 63 checking audio functions 43 compartments hard drive 8 memory module 8 wireless module 8 components additional hardware...
... ROM with LightScribe DVD ±R/RW SuperMulti DL Drive 70 Bluetooth device 14, 25 Bluetooth label 11 boot options 115 boot order 115 button sound 114 buttons power 4 TouchPad 1 TouchPad on/off 1 volume mute 4, 40 volume scroll zone 40 wireless 4 C cables eSATA 83 LAN 29 USB 81 caps lock light, identifying 2 Card Reader Power Saving 114 CD burning 74 copying 74 playing 72 removing 75 CD drive 69 Certificate of Authenticity label 11 charging batteries 61, 63 checking audio functions 43 compartments hard drive 8 memory module 8 wireless module 8 components additional hardware...
User Guide - Windows 7
Page 131
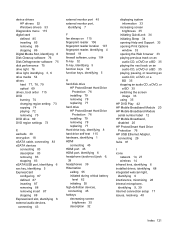
... 88 ExpressCard slot, identifying 6 external audio devices, connecting 43 external monitor port 45 external monitor port, identifying 7 F fan always on 115 fingerprint reader 106 fingerprint reader location 107 fingerprint reader, identifying 4 firewall 18 firewall software, using 104 fn key 32 fn key, identifying 5 function keys 32 function keys, identifying 5 H hard disk drive HP ProtectSmart Hard Drive Protection 76 installing 79 removing 78 replacing 77 hard drive HP ProtectSmart Hard Drive Protection 76 installing 79 removing 78 replacing 77 Hard drive bay, identifying 8 hard drive self...
... 88 ExpressCard slot, identifying 6 external audio devices, connecting 43 external monitor port 45 external monitor port, identifying 7 F fan always on 115 fingerprint reader 106 fingerprint reader location 107 fingerprint reader, identifying 4 firewall 18 firewall software, using 104 fn key 32 fn key, identifying 5 function keys 32 function keys, identifying 5 H hard disk drive HP ProtectSmart Hard Drive Protection 76 installing 79 removing 78 replacing 77 hard drive HP ProtectSmart Hard Drive Protection 76 installing 79 removing 78 replacing 77 Hard drive bay, identifying 8 hard drive self...
User Guide - Windows 7
Page 132
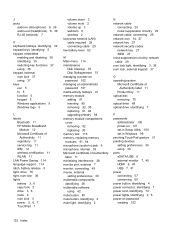
... support 114 latch, battery release 8 light, drive 76 light, num lock 36 lights battery 3, 6 caps lock 2 drive 3, 6 mute 2 num lock 3 power 2, 6, 7 TouchPad 1 volume down 3 volume mute 2 volume up 3 webcam 9 wireless 2 local area network (LAN) cable required 29 connecting cable 29 low battery level 62 M Main menu 114 maintenance Disk Cleanup 76 Disk Defragmenter 75 managing a power-on password 102 managing an administrator password 101 media activity hotkeys 41 memory module adding 91 inserting 95 removing 92, 95 replacing 91, 94 upgrading primary 94 memory module compartment cover removing...
... support 114 latch, battery release 8 light, drive 76 light, num lock 36 lights battery 3, 6 caps lock 2 drive 3, 6 mute 2 num lock 3 power 2, 6, 7 TouchPad 1 volume down 3 volume mute 2 volume up 3 webcam 9 wireless 2 local area network (LAN) cable required 29 connecting cable 29 low battery level 62 M Main menu 114 maintenance Disk Cleanup 76 Disk Defragmenter 75 managing a power-on password 102 managing an administrator password 101 media activity hotkeys 41 memory module adding 91 inserting 95 removing 92, 95 replacing 91, 94 upgrading primary 94 memory module compartment cover removing...
User Guide - Windows 7
Page 133
... software, updating 116 solid-state drive (SSD) 68 speakers 39 storing battery 66 SuperMulti LightScribe DVD±RW and CD-RW Combo Drive with DL support 70 System Configuration menu 114 system information, displaying 112, 114 T temperature 66 TouchPad buttons 1 gestures 30 identifying 1 scrolling regions 2 using 30 TouchPad gestures pinching 31 rotating 31 scrolling 30 zooming 31 TouchPad light, identifying 1 TouchPad on/off button 1 traveling with the computer 66 troubleshooting device driver 52 disc...
... software, updating 116 solid-state drive (SSD) 68 speakers 39 storing battery 66 SuperMulti LightScribe DVD±RW and CD-RW Combo Drive with DL support 70 System Configuration menu 114 system information, displaying 112, 114 T temperature 66 TouchPad buttons 1 gestures 30 identifying 1 scrolling regions 2 using 30 TouchPad gestures pinching 31 rotating 31 scrolling 30 zooming 31 TouchPad light, identifying 1 TouchPad on/off button 1 traveling with the computer 66 troubleshooting device driver 52 disc...


