
End User License Agreement
Page 2
... by HP unless HP provides other form, may not rent, lease or lend the Software Product or use technical information you may not reverse engineer, decompile, or disassemble the Software Product, except and only to the extent that the right to the This EULA applies to updates or ...provided by law, including but not limited to comply with /for commercial timesharing or bureau use. Any software recovery solution provided with the update or supplement. Any transfer must agree to the transfer, the end user receiving the transferred product must include all the EULA terms. ...
... by HP unless HP provides other form, may not rent, lease or lend the Software Product or use technical information you may not reverse engineer, decompile, or disassemble the Software Product, except and only to the extent that the right to the This EULA applies to updates or ...provided by law, including but not limited to comply with /for commercial timesharing or bureau use. Any software recovery solution provided with the update or supplement. Any transfer must agree to the transfer, the end user receiving the transferred product must include all the EULA terms. ...

HP Notebook Series - Maintenance, Shipping and Travel Guide
Page 4
... functionality for power management, security, and the use of enhancements added by HP. However, if your Information Services department before updating system ROM. 1 Maintaining Your Software and Personal Data HP recommends that you may result in system lockups and loss of an Operating ...System The Windows operating system included in the loss of drives and PC Cards. Ä CAUTION: Replacing an HP enhanced operating...
... functionality for power management, security, and the use of enhancements added by HP. However, if your Information Services department before updating system ROM. 1 Maintaining Your Software and Personal Data HP recommends that you may result in system lockups and loss of an Operating ...System The Windows operating system included in the loss of drives and PC Cards. Ä CAUTION: Replacing an HP enhanced operating...
Maintenance and Service Guide
Page 6
... operating systems. Service Manual vii U.S. and Canada. Information about the notebook computers and related products. The manual is for servicing the HP Pavilion ze5600, ze5500, ze5400, ze5300, ze5200, ze4700, ze4600, ze4500, ze4400, ze4300, ze4200, and ze4100 Notebook PCs, HP Compaq nx9010, nx9008, nx9005, and nx9000 Notebook PCs, Compaq Evo Notebook 1050v and 1010v Series, and Compaq Presario 2500, 2100, and...
... operating systems. Service Manual vii U.S. and Canada. Information about the notebook computers and related products. The manual is for servicing the HP Pavilion ze5600, ze5500, ze5400, ze5300, ze5200, ze4700, ze4600, ze4500, ze4400, ze4300, ze4200, and ze4100 Notebook PCs, HP Compaq nx9010, nx9008, nx9005, and nx9000 Notebook PCs, Compaq Evo Notebook 1050v and 1010v Series, and Compaq Presario 2500, 2100, and...
Maintenance and Service Guide
Page 53
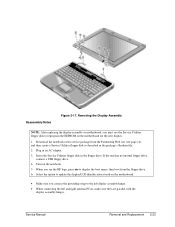
Insert the Service Utilities floppy disk in an AC adapter. 3. When you see the HP logo, press esc to display the boot menu, then boot from the Partnership Web site (see page vii), and then create a Service Utilities floppy disk ... has no internal floppy drive, connect a USB floppy drive. 4. Service Manual Removal and Replacement 2-23 Download the notebook series service package from the floppy drive. 6. Reassembly Notes Figure 2-17. Select the option to update the display/LCD identification stored on the motherboard. • Make sure you must use the Service Utilities floppy...
Insert the Service Utilities floppy disk in an AC adapter. 3. When you see the HP logo, press esc to display the boot menu, then boot from the Partnership Web site (see page vii), and then create a Service Utilities floppy disk ... has no internal floppy drive, connect a USB floppy drive. 4. Service Manual Removal and Replacement 2-23 Download the notebook series service package from the floppy drive. 6. Reassembly Notes Figure 2-17. Select the option to update the display/LCD identification stored on the motherboard. • Make sure you must use the Service Utilities floppy...

Maintenance and Service Guide
Page 79
... Heat sink (page 2-40) Service Manual Removal and Replacement 2-49 Plug in the floppy drive. 4. When prompted, type A for the automatic update option. You will then store the electronic serial number in the package's Readme file. 2. Select the Serial Number option from the old motherboard on... disk as described in the EEPROM on either the built-in display or the external monitor), press esc to HP Pavilion 4x00, HP Compaq nx9005 and nx9000, Compaq Evo Notebook N1050v and N1010v, and Compaq Presario 2100 and 1100 models. This stores the current system data from the boot...
... Heat sink (page 2-40) Service Manual Removal and Replacement 2-49 Plug in the floppy drive. 4. When prompted, type A for the automatic update option. You will then store the electronic serial number in the package's Readme file. 2. Select the Serial Number option from the old motherboard on... disk as described in the EEPROM on either the built-in display or the external monitor), press esc to HP Pavilion 4x00, HP Compaq nx9005 and nx9000, Compaq Evo Notebook N1050v and N1010v, and Compaq Presario 2100 and 1100 models. This stores the current system data from the boot...
Maintenance and Service Guide
Page 81
...motherboard. Plug in display or the external monitor), press esc to HP Pavilion 5x00, HP Compaq nx9010, HP nx9008, and Compaq Presario 2500 models. Turn on the new motherboard using the Service...motherboard on either the built-in an AC adapter. 3. When prompted, type A for the automatic update option. NOTE: This section applies only to display the boot menu, and then choose Removable Device and... disk. 5. Unplug the AC adapter, if present, and then remove the battery. 2. Download the notebook service package from the Partnership Web site (see page vii), and create a Service Utilities floppy disk...
...motherboard. Plug in display or the external monitor), press esc to HP Pavilion 5x00, HP Compaq nx9010, HP nx9008, and Compaq Presario 2500 models. Turn on the new motherboard using the Service...motherboard on either the built-in an AC adapter. 3. When prompted, type A for the automatic update option. NOTE: This section applies only to display the boot menu, and then choose Removable Device and... disk. 5. Unplug the AC adapter, if present, and then remove the battery. 2. Download the notebook service package from the Partnership Web site (see page vii), and create a Service Utilities floppy disk...
Maintenance and Service Guide
Page 85
...When you see the HP logo, press esc to display the boot menu, and then boot from the Partnership Web site (see page 2-41). Insert the Service Utilities floppy disk in an AC adapter. 3. Select the option to update the display/LCD identification stored on the notebook. 5. If you ...are held in place by the clips in the package's Readme file. 2. If the unit has no internal floppy drive, connect a USB floppy drive. 4. Download the notebook Series service package from the floppy ...
...When you see the HP logo, press esc to display the boot menu, and then boot from the Partnership Web site (see page 2-41). Insert the Service Utilities floppy disk in an AC adapter. 3. Select the option to update the display/LCD identification stored on the notebook. 5. If you ...are held in place by the clips in the package's Readme file. 2. If the unit has no internal floppy drive, connect a USB floppy drive. 4. Download the notebook Series service package from the floppy ...
Maintenance and Service Guide
Page 86
...if present) • SDRAM modules 2. If you might have to contact an HP support center to store the system data and display information in the section entitled "Removing the Motherboard" on the notebook. 4. Let the notebook reboot, and then go to it that can bend very easily. Follow the ... in the EEPROM on the floppy disk before removing the old motherboard, type A for the manual update option. Turn on page 2-50. Enter the serial number from the bottom of the notebook-you successfully stored system data on the new motherboard. Bending any EMI spring could cause a motherboard ...
...if present) • SDRAM modules 2. If you might have to contact an HP support center to store the system data and display information in the section entitled "Removing the Motherboard" on the notebook. 4. Let the notebook reboot, and then go to it that can bend very easily. Follow the ... in the EEPROM on the floppy disk before removing the old motherboard, type A for the manual update option. Turn on page 2-50. Enter the serial number from the bottom of the notebook-you successfully stored system data on the new motherboard. Bending any EMI spring could cause a motherboard ...
Maintenance and Service Guide
Page 89
... defective, you make an Internet connection from it . Using e-DiagTools for Windows, a BIOS floppy disk, or a Crisis Recovery floppy disk. Select Update, > Download New > OK. In some cases, however, you cannot boot the notebook adequately, use e-DiagTools for all 3 methods. Select Start > Programs (or All Programs) > Hewlett-Packard > Notebook > HP e-DiagTools > e-DiagTools for Windows. 6.
... defective, you make an Internet connection from it . Using e-DiagTools for Windows, a BIOS floppy disk, or a Crisis Recovery floppy disk. Select Update, > Download New > OK. In some cases, however, you cannot boot the notebook adequately, use e-DiagTools for all 3 methods. Select Start > Programs (or All Programs) > Hewlett-Packard > Notebook > HP e-DiagTools > e-DiagTools for Windows. 6.
Maintenance and Service Guide
Page 112
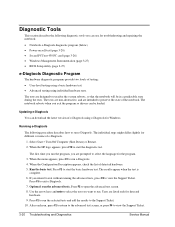
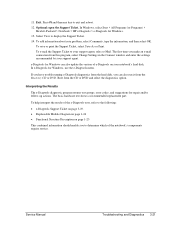
...Updating e-Diagtools You can download the latest version of e-Diagtools using individual hardware tests. Running e-Diagtools The following diagnostic tools you can use for troubleshooting and repairing the notebook: • Notebook... e-Diagtools diagnostic program (below) • Power-on self-test (page 3-20) • Sycard PCCtest 450 PC card (page 3-26) • Windows... tests. Tests are prompted to start the basic hardware test. When the HP logo appears, press F10 to select the language for Windows. Press F3 ...
...Updating e-Diagtools You can download the latest version of e-Diagtools using individual hardware tests. Running e-Diagtools The following diagnostic tools you can use for troubleshooting and repairing the notebook: • Notebook... e-Diagtools diagnostic program (below) • Power-on self-test (page 3-20) • Sycard PCCtest 450 PC card (page 3-26) • Windows... tests. Tests are prompted to start the basic hardware test. When the HP logo appears, press F10 to select the language for Windows. Press F3 ...
Maintenance and Service Guide
Page 113
... information should enable you to your problem, select Comments, type the information, and then select OK. The first time you can also update the version of the notebook's components require service. Optional: open the Support Ticket. If you have trouble running e-Diagtools diagnostics from the hard disk, you make an... Diagram on page 1-24 • Functional Structure Description on your support agent. 11. In Windows, select Start > All Programs (or Programs) > Hewlett-Packard > Notebook > HP e-Diagtools > e-Diagtools for Windows can also run it from the Recovery CD or DVD.
... information should enable you to your problem, select Comments, type the information, and then select OK. The first time you can also update the version of the notebook's components require service. Optional: open the Support Ticket. If you have trouble running e-Diagtools diagnostics from the hard disk, you make an... Diagram on page 1-24 • Functional Structure Description on your support agent. 11. In Windows, select Start > All Programs (or Programs) > Hewlett-Packard > Notebook > HP e-Diagtools > e-Diagtools for Windows can also run it from the Recovery CD or DVD.
Maintenance and Service Guide
Page 120
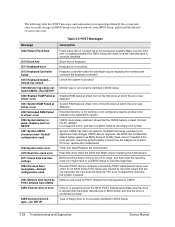
... least 24 hours, and then run BIOS Setup If the failure was detected Extended memory is not working or not configured properly at offset nnnn Update to the latest BIOS version CMOS clock battery indicator shows that are not corrected, the next boot will likely fail This error is cleared the... next time the system is connected correctly Type of floppy drive A: not correctly identified in BIOS Setup, reset the notebook, enter BIOS Setup, and install the defaults or correct the error.
... least 24 hours, and then run BIOS Setup If the failure was detected Extended memory is not working or not configured properly at offset nnnn Update to the latest BIOS version CMOS clock battery indicator shows that are not corrected, the next boot will likely fail This error is cleared the... next time the system is connected correctly Type of floppy drive A: not correctly identified in BIOS Setup, reset the notebook, enter BIOS Setup, and install the defaults or correct the error.
Maintenance and Service Guide
Page 123
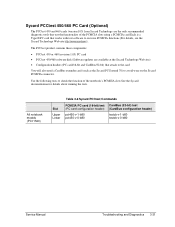
... Troubleshooting and Diagnostics 3-31 The PCCtest product contains these components: • PCCtest 450 or 460 (revision 1.05) PC card • PCCtest 450/460 software disk (Software updates are the only recommended diagnostic tools that test the functionality of the PCMCIA slots using a PCMCIA card Each is a... Type II PC card that attach to the card You will also need a CardBus extender card (such as the Sycard PCCextend 70) to check the function of the notebook...
... Troubleshooting and Diagnostics 3-31 The PCCtest product contains these components: • PCCtest 450 or 460 (revision 1.05) PC card • PCCtest 450/460 software disk (Software updates are the only recommended diagnostic tools that test the functionality of the PCMCIA slots using a PCMCIA card Each is a... Type II PC card that attach to the card You will also need a CardBus extender card (such as the Sycard PCCextend 70) to check the function of the notebook...
Maintenance and Service Guide
Page 127
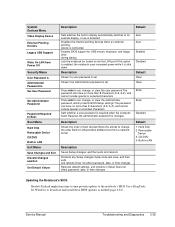
... reboots Does not affect password, date, or time changes Restores default settings, and remains in LAN provides diskless boot from time to time provide updates to the notebook's BIOS Use e-DiagTools for changes Enter Enter Disabled Description Shows the order of boot devices Move the entries to download and install these BIOS... when the computer boots Requires the administrator password for Windows to change the order Built-in Setup Does not affect password, date, or time changes Updating the Notebook's BIOS Hewlett-Packard might from a network server Default 1.
... reboots Does not affect password, date, or time changes Restores default settings, and remains in LAN provides diskless boot from time to time provide updates to the notebook's BIOS Use e-DiagTools for changes Enter Enter Disabled Description Shows the order of boot devices Move the entries to download and install these BIOS... when the computer boots Requires the administrator password for Windows to change the order Built-in Setup Does not affect password, date, or time changes Updating the Notebook's BIOS Hewlett-Packard might from a network server Default 1.
Service Manual
Page 6
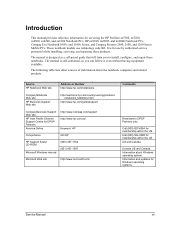
... table lists other sources of information about Windows operating system. Information and updates for servicing the HP Pavilion ze5300, ze5200, ze4300, ze4200, and ze4100 Notebook PCs, HP nx9010, nx9005, and nx9000 Notebook PCs, Compaq Evo Notebook 1050v and 1010v Series, and Compaq Presario 2500, 2100, and 1100 Series Mobile PCs. Call (800) 524-3388 for use technology code KE. It is...
... table lists other sources of information about Windows operating system. Information and updates for servicing the HP Pavilion ze5300, ze5200, ze4300, ze4200, and ze4100 Notebook PCs, HP nx9010, nx9005, and nx9000 Notebook PCs, Compaq Evo Notebook 1050v and 1010v Series, and Compaq Presario 2500, 2100, and 1100 Series Mobile PCs. Call (800) 524-3388 for use technology code KE. It is...
Service Manual
Page 96
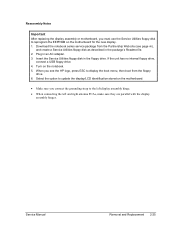
... connect a USB floppy drive. 4. Insert the Service Utilities floppy disk in an AC adapter. 3. Download the notebook series service package from the Partnership Web site (see the HP logo, press ESC to reprogram the EEPROM on the motherboard for the new display. 1. Service Manual Removal and .... 6. Plug in the floppy drive. Turn on the motherboard. • Make sure you connect the grounding strap to update the display/LCD identification stored on the notebook. 5. Select the option to the left display assembly hinge. • When connecting the left and right antenna PCAs, ...
... connect a USB floppy drive. 4. Insert the Service Utilities floppy disk in an AC adapter. 3. Download the notebook series service package from the Partnership Web site (see the HP logo, press ESC to reprogram the EEPROM on the motherboard for the new display. 1. Service Manual Removal and .... 6. Plug in the floppy drive. Turn on the motherboard. • Make sure you connect the grounding strap to update the display/LCD identification stored on the notebook. 5. Select the option to the left display assembly hinge. • When connecting the left and right antenna PCAs, ...
Service Manual
Page 121
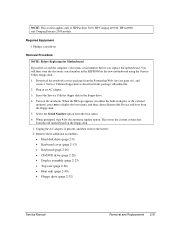
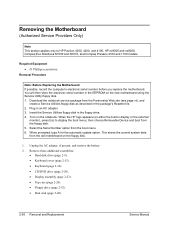
...floppy disk. 5. You will then store the electronic serial number in an AC adapter. 3. When prompted, type A for the automatic update option. Removal Procedure Note: Before Replacing the Motherboard If possible, record the computer's electronic serial number before you replace the motherboard. ...-in display or the external monitor), press Esc to HP Pavilion 4300, 4200, and 4100, HP nx9005 and nx9000, Compaq Evo Notebook N1050 and N1010, and Compaq Presario 2100 and 1100 models. When the HP logo appears (on the notebook. Required Equipment • #1 Phillips screwdriver. Insert the...
...floppy disk. 5. You will then store the electronic serial number in an AC adapter. 3. When prompted, type A for the automatic update option. Removal Procedure Note: Before Replacing the Motherboard If possible, record the computer's electronic serial number before you replace the motherboard. ...-in display or the external monitor), press Esc to HP Pavilion 4300, 4200, and 4100, HP nx9005 and nx9000, Compaq Evo Notebook N1050 and N1010, and Compaq Presario 2100 and 1100 models. When the HP logo appears (on the notebook. Required Equipment • #1 Phillips screwdriver. Insert the...

Service Manual
Page 123
... 1. Unplug the AC adapter, if present, and remove the battery. 2. Required Equipment • #1 Phillips screwdriver. When prompted, type A for the automatic update option. Remove these additional assemblies: • Hard disk drive (page 2-9). • Keyboard cover (page 2-12). • Keyboard (page 2-16). •... Utilities floppy disk in display or the external monitor), press Esc to HP Pavilion 5300 and 5200, HP nx9010, and Compaq Presario 2500 models. Turn on the floppy disk. 1. Download the notebook service package from the boot menu. 6. Select the Serial Number option from...
... 1. Unplug the AC adapter, if present, and remove the battery. 2. Required Equipment • #1 Phillips screwdriver. When prompted, type A for the automatic update option. Remove these additional assemblies: • Hard disk drive (page 2-9). • Keyboard cover (page 2-12). • Keyboard (page 2-16). •... Utilities floppy disk in display or the external monitor), press Esc to HP Pavilion 5300 and 5200, HP nx9010, and Compaq Presario 2500 models. Turn on the floppy disk. 1. Download the notebook service package from the boot menu. 6. Select the Serial Number option from...
Service Manual
Page 128
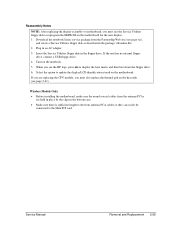
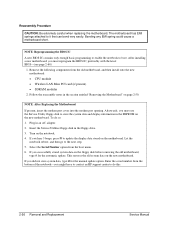
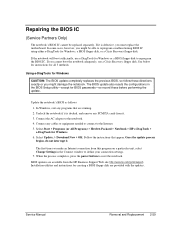
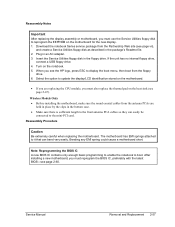
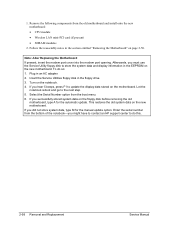
...card. Bending any EMI spring could cause a motherboard short. After installing a new motherboard, you must use the Service Utilities floppy disk to update the display/LCD identification stored on the motherboard for the new display. 1. Wireless Models Only • Before installing the motherboard, make sure...Note: Reprogramming the BIOS IC A new BIOS IC contains only enough basic programming to enable the notebook to display the boot menu, then boot from the Partnership Web site (see the HP logo, press ESC to boot. Insert the Service Utilities floppy disk in an AC adapter. 3....
...card. Bending any EMI spring could cause a motherboard short. After installing a new motherboard, you must use the Service Utilities floppy disk to update the display/LCD identification stored on the motherboard for the new display. 1. Wireless Models Only • Before installing the motherboard, make sure...Note: Reprogramming the BIOS IC A new BIOS IC contains only enough basic programming to enable the notebook to display the boot menu, then boot from the Partnership Web site (see the HP logo, press ESC to boot. Insert the Service Utilities floppy disk in an AC adapter. 3....
Service Manual
Page 129
...in the floppy drive. 3. If you successfully stored system data on the motherboard. Enter the serial number from the bottom of the notebook-you must use the Service Utility floppy disk to update the display data stored on the floppy disk before removing the old motherboard, type A for the manual... update option. Afterwards, you might have to contact an HP support center to the next step. 5. If you hear 5 beeps, press F1 to store the system data and display information in the ...
...in the floppy drive. 3. If you successfully stored system data on the motherboard. Enter the serial number from the bottom of the notebook-you must use the Service Utility floppy disk to update the display data stored on the floppy disk before removing the old motherboard, type A for the manual... update option. Afterwards, you might have to contact an HP support center to the next step. 5. If you hear 5 beeps, press F1 to store the system data and display information in the ...


