HP USB Digital Drive
Page 5
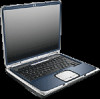
If the status light does not turn on when the connection is successful. The status light on the Digital Drive turns on , remove the Digital Drive from the USB port, then reinsert the USB connector. 4 User Guide To connect the Digital Drive to a USB port directly (with the connector cable in the unextended position): » Insert the USB connector on the Digital Drive into a USB port on your computer.
If the status light does not turn on when the connection is successful. The status light on the Digital Drive turns on , remove the Digital Drive from the USB port, then reinsert the USB connector. 4 User Guide To connect the Digital Drive to a USB port directly (with the connector cable in the unextended position): » Insert the USB connector on the Digital Drive into a USB port on your computer.
HP USB Digital Drive
Page 7
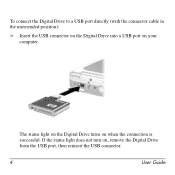
The status light on the Digital Drive turns on your computer. Insert the USB connector on the Digital Drive into a USB port on when the connection is successful. 2. If the status light does not turn on, remove the Digital Drive from the USB port, then reinsert the USB connector. 6 User Guide
The status light on the Digital Drive turns on your computer. Insert the USB connector on the Digital Drive into a USB port on when the connection is successful. 2. If the status light does not turn on, remove the Digital Drive from the USB port, then reinsert the USB connector. 6 User Guide
Reference Guide
Page 3
... 1: Insert the Battery Pack 1-7 Step 2: Connect AC Power 1-8 Step 3: Connect a Phone Line 1-9 Step 4: Turn On the Notebook 1-10 Step 5: Set Up Windows 1-11 2 Basic Operation Operating Your Notebook 2-1 Default Power Settings 2-2 To Reset the Notebook 2-3 To Change the Boot Device 2-3 To Use the TouchPad 2-4 To Use the Tap to Click Function of the TouchPad...
... 1: Insert the Battery Pack 1-7 Step 2: Connect AC Power 1-8 Step 3: Connect a Phone Line 1-9 Step 4: Turn On the Notebook 1-10 Step 5: Set Up Windows 1-11 2 Basic Operation Operating Your Notebook 2-1 Default Power Settings 2-2 To Reset the Notebook 2-3 To Change the Boot Device 2-3 To Use the TouchPad 2-4 To Use the Tap to Click Function of the TouchPad...
Reference Guide
Page 5
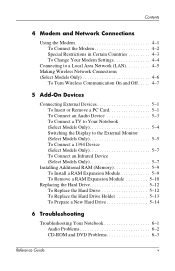
...Area Network (LAN 4-5 Making Wireless Network Connections (Select Models Only 4-6 To Turn Wireless Communication On and Off . . . . . 4-7 5 Add-On Devices Connecting External Devices 5-1 To Insert or Remove a PC Card 5-1 To Connect an Audio Device 5-3 To Connect a TV to Your Notebook (Select Models Only 5-4 Switching the Display to the External Monitor (Select ...12 To Replace the Hard Drive 5-12 To Replace the Hard Drive Holder 5-13 To Prepare a New Hard Drive 5-14 6 Troubleshooting Troubleshooting Your Notebook 6-1 Audio Problems 6-2 CD-ROM and DVD Problems 6-3 Reference Guide v
...Area Network (LAN 4-5 Making Wireless Network Connections (Select Models Only 4-6 To Turn Wireless Communication On and Off . . . . . 4-7 5 Add-On Devices Connecting External Devices 5-1 To Insert or Remove a PC Card 5-1 To Connect an Audio Device 5-3 To Connect a TV to Your Notebook (Select Models Only 5-4 Switching the Display to the External Monitor (Select ...12 To Replace the Hard Drive 5-12 To Replace the Hard Drive Holder 5-13 To Prepare a New Hard Drive 5-14 6 Troubleshooting Troubleshooting Your Notebook 6-1 Audio Problems 6-2 CD-ROM and DVD Problems 6-3 Reference Guide v
Reference Guide
Page 8
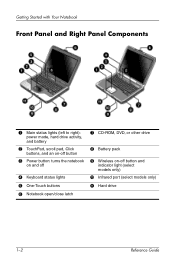
Infrared port (select models only) q Hard drive 1-2 Reference Guide Getting Started with Your Notebook Front Panel and Right Panel Components 1 Main status lights (left to right): power mode, hard drive activity, and battery 2 TouchPad, scroll pad, Click buttons, and an on-off button 3 Power button: turns the notebook on and off 4 Keyboard status lights 5 One-Touch buttons 6 Notebook open/close latch 7 CD-ROM, DVD, or other drive 8 Battery pack 9 Wireless on-off button and indicator light (select models only) -
Infrared port (select models only) q Hard drive 1-2 Reference Guide Getting Started with Your Notebook Front Panel and Right Panel Components 1 Main status lights (left to right): power mode, hard drive activity, and battery 2 TouchPad, scroll pad, Click buttons, and an on-off button 3 Power button: turns the notebook on and off 4 Keyboard status lights 5 One-Touch buttons 6 Notebook open/close latch 7 CD-ROM, DVD, or other drive 8 Battery pack 9 Wireless on-off button and indicator light (select models only) -
Reference Guide
Page 13
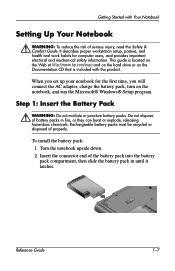
... the battery pack into the battery pack compartment, then slide the battery pack in fire, or they can burst or explode, releasing hazardous chemicals. Turn the notebook upside down. 2. Insert the connector end of battery packs in until it latches. It describes proper workstation setup, posture, and health and work...the first time, you will connect the AC adapter, charge the battery pack, turn on the Documentation CD that is located on the Web at http://www.hp.com/ergo and on the hard drive or on the notebook, and run the Microsoft® Windows® Setup program. When you set ...
... the battery pack into the battery pack compartment, then slide the battery pack in fire, or they can burst or explode, releasing hazardous chemicals. Turn the notebook upside down. 2. Insert the connector end of battery packs in until it latches. It describes proper workstation setup, posture, and health and work...the first time, you will connect the AC adapter, charge the battery pack, turn on the Documentation CD that is located on the Web at http://www.hp.com/ergo and on the hard drive or on the notebook, and run the Microsoft® Windows® Setup program. When you set ...
Reference Guide
Page 16
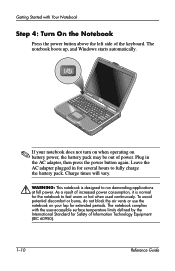
... up, and Windows starts automatically. ✎ If your notebook does not turn on when operating on your lap for the notebook to run demanding applications at full power. Leave the AC adapter plugged in the AC adapter, then press the power button again. As a ... of increased power consumption, it is designed to feel warm or hot when used continuously. Plug in for Safety of the keyboard. The notebook complies with Your Notebook Step 4: Turn On the Notebook Press the power button above the left side of Information Technology Equipment (IEC 60950). 1-10 Reference Guide
... up, and Windows starts automatically. ✎ If your notebook does not turn on when operating on your lap for the notebook to run demanding applications at full power. Leave the AC adapter plugged in the AC adapter, then press the power button again. As a ... of increased power consumption, it is designed to feel warm or hot when used continuously. Plug in for Safety of the keyboard. The notebook complies with Your Notebook Step 4: Turn On the Notebook Press the power button above the left side of Information Technology Equipment (IEC 60950). 1-10 Reference Guide
Reference Guide
Page 17
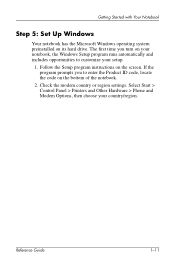
... its hard drive. The first time you to customize your setup. 1. Reference Guide 1-11 Getting Started with Your Notebook Step 5: Set Up Windows Your notebook has the Microsoft Windows operating system preinstalled on the screen. Select Start > Control Panel > Printers and Other Hardware ...> Phone and Modem Options, then choose your notebook, the Windows Setup program runs automatically and includes opportunities to enter the Product ID code, locate the code on the bottom of the notebook. 2. If the program prompts you turn on your country/region.
... its hard drive. The first time you to customize your setup. 1. Reference Guide 1-11 Getting Started with Your Notebook Step 5: Set Up Windows Your notebook has the Microsoft Windows operating system preinstalled on the screen. Select Start > Control Panel > Printers and Other Hardware ...> Phone and Modem Options, then choose your notebook, the Windows Setup program runs automatically and includes opportunities to enter the Product ID code, locate the code on the bottom of the notebook. 2. If the program prompts you turn on your country/region.
Reference Guide
Page 19
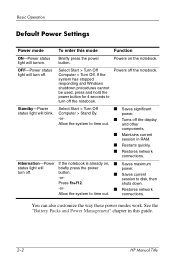
... the way these power modes work. Select Start > Turn Off Computer > Turn Off. Briefly press the power button. Powers off the display Allow the system to turn off the notebook. power. -or- ■ Turns off the notebook. turn off . button. -or- ■ Saves current session...Turn Off ■ Saves significant status light will turnon. If the system has stopped responding and Windows shutdown procedures cannot be used, press and hold the power button for 4 seconds to time out. Basic Operation Default Power Settings Power mode To enter this guide. 2-2 HP...
... the way these power modes work. Select Start > Turn Off Computer > Turn Off. Briefly press the power button. Powers off the display Allow the system to turn off the notebook. power. -or- ■ Turns off the notebook. turn off . button. -or- ■ Saves current session...Turn Off ■ Saves significant status light will turnon. If the system has stopped responding and Windows shutdown procedures cannot be used, press and hold the power button for 4 seconds to time out. Basic Operation Default Power Settings Power mode To enter this guide. 2-2 HP...
Reference Guide
Page 20
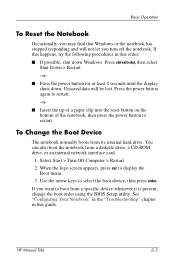
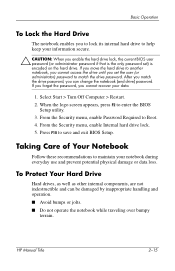
... stopped responding and will be lost. When the logo screen appears, press esc to restart. You can also boot the notebook from its internal hard drive. HP Manual Title 2-3 Press the power button again to restart. -or- ■ Insert the tip of a paper clip into the reset ...button on the bottom of the notebook, then press the power button to display the Boot menu. 3. Select Start > Turn Off Computer > Restart. 2. If you turn off the notebook. ...
... stopped responding and will be lost. When the logo screen appears, press esc to restart. You can also boot the notebook from its internal hard drive. HP Manual Title 2-3 Press the power button again to restart. -or- ■ Insert the tip of a paper clip into the reset ...button on the bottom of the notebook, then press the power button to display the Boot menu. 3. Select Start > Turn Off Computer > Restart. 2. If you turn off the notebook. ...
Reference Guide
Page 21
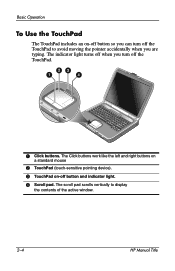
The Click buttons work like the left and right buttons on a standard mouse 2 TouchPad (touch-sensitive pointing device). 3 TouchPad on -off button so you can turn off the TouchPad to display the contents of the active window. 2-4 HP Manual Title The scroll pad scrolls vertically to avoid moving the pointer accidentally when you turn off the TouchPad. 1 Click buttons. The indicator light turns off when you are typing. Basic Operation To Use the TouchPad The TouchPad includes an on -off button and indicator light. 4 Scroll pad.
The Click buttons work like the left and right buttons on a standard mouse 2 TouchPad (touch-sensitive pointing device). 3 TouchPad on -off button so you can turn off the TouchPad to display the contents of the active window. 2-4 HP Manual Title The scroll pad scrolls vertically to avoid moving the pointer accidentally when you turn off the TouchPad. 1 Click buttons. The indicator light turns off when you are typing. Basic Operation To Use the TouchPad The TouchPad includes an on -off button and indicator light. 4 Scroll pad.
Reference Guide
Page 32
...) password to enter the BIOS Setup utility. 3. If you move the hard drive to another notebook, you cannot access the drive until you set ) is encoded on the hard drive. Select Start > Turn Off Computer > Restart. 2. HP Manual Title 2-15 When the logo screen appears, press F2 to match the drive password. From...
...) password to enter the BIOS Setup utility. 3. If you move the hard drive to another notebook, you cannot access the drive until you set ) is encoded on the hard drive. Select Start > Turn Off Computer > Restart. 2. HP Manual Title 2-15 When the logo screen appears, press F2 to match the drive password. From...

Reference Guide
Page 33
...pick up your disk using the Tools tab in the disk Properties window. 2-16 HP Manual Title To Maintain Your Notebook ■ Provide adequate ventilation around and underneath it. ■ Always shut down the notebook or put it in Hibernation mode before transporting it in a carrying case or other ... the notebook on a flat surface, so that air can flow freely around the notebook. To Safeguard Your Data ■ Do not use the notebook outside in the rain or snow (inclement weather). Basic Operation ■ Put the notebook in Standby or shut it down before putting it . This turns off ...
...pick up your disk using the Tools tab in the disk Properties window. 2-16 HP Manual Title To Maintain Your Notebook ■ Provide adequate ventilation around and underneath it. ■ Always shut down the notebook or put it in Hibernation mode before transporting it in a carrying case or other ... the notebook on a flat surface, so that air can flow freely around the notebook. To Safeguard Your Data ■ Do not use the notebook outside in the rain or snow (inclement weather). Basic Operation ■ Put the notebook in Standby or shut it down before putting it . This turns off ...
Reference Guide
Page 34
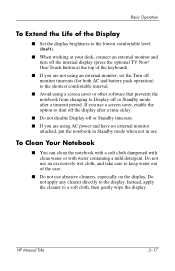
...; When working at the top of the case. ■ Do not use abrasive cleaners, especially on the display. HP Manual Title 2-17 One-Touch button at your desk, connect an external monitor and turn off the display after a timeout period. Instead, apply the cleaner to the display. Do not use . Do not... delay. ■ Do not disable Display-off or Standby timeouts. ■ If you are using AC power and have no external monitor attached, put the notebook in Standby mode when not in use an excessively wet cloth, and take care to keep water out of the keyboard). ■ If you are...
...; When working at the top of the case. ■ Do not use abrasive cleaners, especially on the display. HP Manual Title 2-17 One-Touch button at your desk, connect an external monitor and turn off the display after a timeout period. Instead, apply the cleaner to the display. Do not use . Do not... delay. ■ Do not disable Display-off or Standby timeouts. ■ If you are using AC power and have no external monitor attached, put the notebook in Standby mode when not in use an excessively wet cloth, and take care to keep water out of the keyboard). ■ If you are...
Reference Guide
Page 36
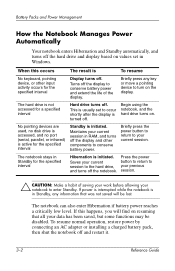
... Hibernation is initiated. Briefly press the power button to return to occur shortly after the display is in RAM, and turns off the notebook. If power is interrupted while the notebook is turned off . Turns off . To resume normal operation, restore power by connecting an AC adapter or installing a charged battery pack, then shut the...
... Hibernation is initiated. Briefly press the power button to return to occur shortly after the display is in RAM, and turns off the notebook. If power is interrupted while the notebook is turned off . Turns off . To resume normal operation, restore power by connecting an AC adapter or installing a charged battery pack, then shut the...

Reference Guide
Page 38
... in this way, you will not be able to turn on indicates the remaining charge (each light represents 20 percent of the battery pack. The notebook first emits a high-pitched beep or displays a warning message. On the battery pack 1. Press the contact pad on again until...and Maintenance > Power Options, then select the Power Meter tab to a Low-Battery Warning The notebook automatically alerts you do not restore power within a short time, the notebook goes into Hibernation. After the notebook enters Hibernation in the AC adapter, you can continue to a critically low level. To Respond...
... in this way, you will not be able to turn on indicates the remaining charge (each light represents 20 percent of the battery pack. The notebook first emits a high-pitched beep or displays a warning message. On the battery pack 1. Press the contact pad on again until...and Maintenance > Power Options, then select the Power Meter tab to a Low-Battery Warning The notebook automatically alerts you do not restore power within a short time, the notebook goes into Hibernation. After the notebook enters Hibernation in the AC adapter, you can continue to a critically low level. To Respond...
Reference Guide
Page 40
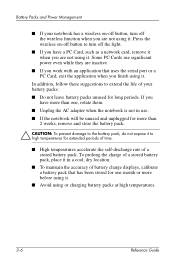
...; Do not leave battery packs unused for extended periods of time. ■ High temperatures accelerate the self-discharge rate of a stored battery pack. Some PC Cards use . ■ If the notebook will be unused and unplugged for more than one, rotate them. ■ Unplug the AC adapter when the...you work with an application that uses the serial port or a PC Card, exit the application when you have more before using it. ■ Avoid using it . To prolong the charge of your notebook has a wireless on -off button to turn off the light. ■ If you finish using or charging battery...
...; Do not leave battery packs unused for extended periods of time. ■ High temperatures accelerate the self-discharge rate of a stored battery pack. Some PC Cards use . ■ If the notebook will be unused and unplugged for more than one, rotate them. ■ Unplug the AC adapter when the...you work with an application that uses the serial port or a PC Card, exit the application when you have more before using it. ■ Avoid using it . To prolong the charge of your notebook has a wireless on -off button to turn off the light. ■ If you finish using or charging battery...
Reference Guide
Page 48
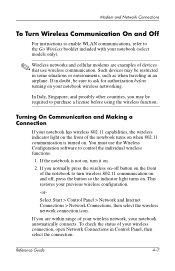
...9998; Wireless networks and cellular modems are within range of your wireless network, your previous wireless configuration. -or- If the notebook is turned on . Such devices may be restricted in some situations or environments, such as when traveling in Control Panel, then select ...wireless functions. 1. To check the status of your notebook has wireless 802.11 capabilities, the wireless indicator light on the front of the notebook to purchase a license before turning on . 2. You must use wireless communication. Turning On Communication and Making a Connection If your wireless ...
...9998; Wireless networks and cellular modems are within range of your wireless network, your previous wireless configuration. -or- If the notebook is turned on . Such devices may be restricted in some situations or environments, such as when traveling in Control Panel, then select ...wireless functions. 1. To check the status of your notebook has wireless 802.11 capabilities, the wireless indicator light on the front of the notebook to purchase a license before turning on . 2. You must use wireless communication. Turning On Communication and Making a Connection If your wireless ...
Reference Guide
Page 49
Modem and Network Connections Turning Off Communication and Ending a Connection 1. Putting the notebook in the taskbar, then select Disable. To turn off the wireless 802.11 communication without turning off the wireless function. 4-8 Reference Guide Close any files that reside on -off button. -orRight-click the wireless network connection icon in Standby or shutting it down also turns off the notebook, press the wireless on other network notebooks. 2.
Modem and Network Connections Turning Off Communication and Ending a Connection 1. Putting the notebook in the taskbar, then select Disable. To turn off the wireless 802.11 communication without turning off the wireless function. 4-8 Reference Guide Close any files that reside on -off button. -orRight-click the wireless network connection icon in Standby or shutting it down also turns off the notebook, press the wireless on other network notebooks. 2.
Reference Guide
Page 52
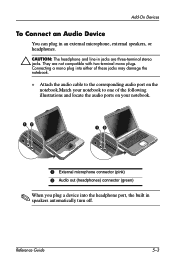
... jacks. Connecting a mono plug into either of these jacks may damage the notebook. » Attach the audio cable to the corresponding audio port on the notebook.Match your notebook to one of the following illustrations and locate the audio ports on your notebook. 1 External microphone connector (pink) 2 Audio out (headphones) connector (green) ✎ When... To Connect an Audio Device You can plug in an external microphone, external speakers, or headphones. Ä CAUTION: The headphone and line-in speakers automatically turn off.
... jacks. Connecting a mono plug into either of these jacks may damage the notebook. » Attach the audio cable to the corresponding audio port on the notebook.Match your notebook to one of the following illustrations and locate the audio ports on your notebook. 1 External microphone connector (pink) 2 Audio out (headphones) connector (green) ✎ When... To Connect an Audio Device You can plug in an external microphone, external speakers, or headphones. Ä CAUTION: The headphone and line-in speakers automatically turn off.


