Pavilion tx2500 Pen - HP Entertainment Notebook PC
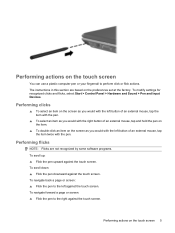
Pavilion tx2500 Pen
View Results Below
Free HP Pavilion tx2500 manuals!
Problems with HP Pavilion tx2500?
Ask a Question
Free HP Pavilion tx2500 manuals!
Problems with HP Pavilion tx2500?
Ask a Question
Related Manual Pages


Similar Questions

Elitebook 2760p Pen Works Not Touch
i have upgraded from windows 7 to windows 8, and windows 7 both pen and touch works, however on win ...
i have upgraded from windows 7 to windows 8, and windows 7 both pen and touch works, however on win ...
(Posted by mkdesigns22 11 years ago)
Hp Elitebook 2760p, Pen Touch Works Not Finger Touch, On Windows 8 Pro
i installed windows 8 pro form windows 7, and win 7, both pen and touch works, however on windows 8 ...
i installed windows 8 pro form windows 7, and win 7, both pen and touch works, however on windows 8 ...
(Posted by mkdesigns22 11 years ago)
