Security - Windows Vista
Page 8
... same password for creating and saving passwords: ● When creating passwords, follow requirements set a password with keyboard number keys, your computer information. Several types of passwords can also use your information. NOTE: Select models include a separate numeric keypad, which functions exactly like the keyboard number keys. ● A password must be entered at a Windows prompt. Use the following guidelines when setting a password in Windows must be entered at a Setup Utility prompt. Use the following topics list Windows and Setup Utility passwords and...
... same password for creating and saving passwords: ● When creating passwords, follow requirements set a password with keyboard number keys, your computer information. Several types of passwords can also use your information. NOTE: Select models include a separate numeric keypad, which functions exactly like the keyboard number keys. ● A password must be entered at a Windows prompt. Use the following guidelines when setting a password in Windows must be entered at a Setup Utility prompt. Use the following topics list Windows and Setup Utility passwords and...
Security - Windows Vista
Page 18
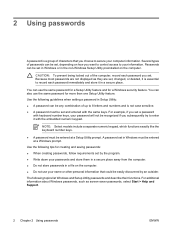
... Access Manager, instead of at least 2 fingers, an error message is the default finger for a different Windows user, log on the screen and then click Start Over. 7. To set up the fingerprint reader for enrolling the first fingerprint. NOTE: The right index finger is displayed. The VeriSoft Access Manager Logon Wizard opens. 3. On the "Services and Applications" page, click I want to register first, on to Windows using...
... Access Manager, instead of at least 2 fingers, an error message is the default finger for a different Windows user, log on the screen and then click Start Over. 7. To set up the fingerprint reader for enrolling the first fingerprint. NOTE: The right index finger is displayed. The VeriSoft Access Manager Logon Wizard opens. 3. On the "Services and Applications" page, click I want to register first, on to Windows using...
HP Pavilion tx1000 Entertainment PC - Maintenance and Service Guide
Page 17
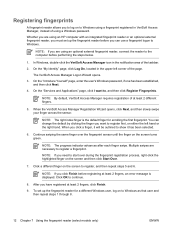
... computer fan starts up automatically to cool internal components. Holds the hard drive, a SIM card (select models only), and a WWAN module (select models only). CAUTION: The WWAN module and WLAN module are not interchangeable. CAUTION: To prevent overheating, do not obstruct vents. Contains the memory module slots. Bottom components Item Component (1) Vents (6) (2) Battery lock latch (3) Hard drive, SIM card, and WWAN bay (4) Optical drive release latch (5) Memory module compartment (6) WLAN module compartment Function Enable airflow...
... computer fan starts up automatically to cool internal components. Holds the hard drive, a SIM card (select models only), and a WWAN module (select models only). CAUTION: The WWAN module and WLAN module are not interchangeable. CAUTION: To prevent overheating, do not obstruct vents. Contains the memory module slots. Bottom components Item Component (1) Vents (6) (2) Battery lock latch (3) Hard drive, SIM card, and WWAN bay (4) Optical drive release latch (5) Memory module compartment (6) WLAN module compartment Function Enable airflow...
HP Pavilion tx1000 Entertainment PC - Maintenance and Service Guide
Page 45
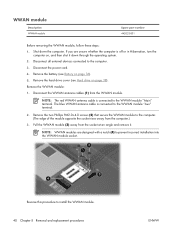
... module. Remove the battery (see Hard drive on , and then shut it . NOTE: WWAN modules are unsure whether the computer is off or in Hibernation, turn the computer on page 38). The blue WWAN antenna cable is connected to the WWAN module "Aux" terminal. 2. NOTE: The red WWAN antenna cable is connected to the WWAN module "Main" terminal. Disconnect all external devices connected to install the WWAN module...
... module. Remove the battery (see Hard drive on , and then shut it . NOTE: WWAN modules are unsure whether the computer is off or in Hibernation, turn the computer on page 38). The blue WWAN antenna cable is connected to the WWAN module "Aux" terminal. 2. NOTE: The red WWAN antenna cable is connected to the WWAN module "Main" terminal. Disconnect all external devices connected to install the WWAN module...
HP Pavilion tx1000 Entertainment PC - Maintenance and Service Guide
Page 83
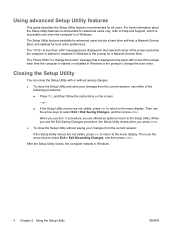
... the Setup Utility is in Windows. To start the Setup Utility, turn on the screen. To set when you restore the factory default settings. For more information about the Setup Utility features recommended for a Network Service Boot. The " to boot from LAN" message that is displayed in the lower-left corner of the screen each time the computer is started or restarted in Windows is the prompt for advanced users only, refer to Help and Support...
... the Setup Utility is in Windows. To start the Setup Utility, turn on the screen. To set when you restore the factory default settings. For more information about the Setup Utility features recommended for a Network Service Boot. The " to boot from LAN" message that is displayed in the lower-left corner of the screen each time the computer is started or restarted in Windows is the prompt for advanced users only, refer to Help and Support...
HP Pavilion tx1000 Entertainment PC - Maintenance and Service Guide
Page 112
... or utility to repair or restore the system if you have not already tried these features, try them before using Recovery Manager. When the installation wizard opens, follow the installation instructions on -screen instructions. Reinstalling preinstalled programs and drivers 1. d. Select Start > Control Panel > Programs > Uninstall a program. Performing a recovery Recovery Manager software allows you to the factory image but cannot restore your personal settings. ● In all cases, if a program has been deleted from discs 1. Recovery Manager replaces...
... or utility to repair or restore the system if you have not already tried these features, try them before using Recovery Manager. When the installation wizard opens, follow the installation instructions on -screen instructions. Reinstalling preinstalled programs and drivers 1. d. Select Start > Control Panel > Programs > Uninstall a program. Performing a recovery Recovery Manager software allows you to the factory image but cannot restore your personal settings. ● In all cases, if a program has been deleted from discs 1. Recovery Manager replaces...
HP Pavilion tx1000 Entertainment PC - Maintenance and Service Guide
Page 128
... boot options 80 boot order 80 bottom components 12 button sound 80 buttons DVD 6 Media 6 Mobility Center 7 next/fast forward 9 optical drive release 10 play/pause 9 previous/rewind 9 rotate 7 stop 9 C cables, service considerations 31 camera location 6 product description 2 camera module illustrated 20 removal 58 spare part number 21, 27, 58 carrying case, spare part number 24, 26 changing the Setup Utility language 77 chipset, product description 1 closing the Setup Utility 79 CMOS clearing 14 components bottom 12 display 6 front 4, 8 keyboard...
... boot options 80 boot order 80 bottom components 12 button sound 80 buttons DVD 6 Media 6 Mobility Center 7 next/fast forward 9 optical drive release 10 play/pause 9 previous/rewind 9 rotate 7 stop 9 C cables, service considerations 31 camera location 6 product description 2 camera module illustrated 20 removal 58 spare part number 21, 27, 58 carrying case, spare part number 24, 26 changing the Setup Utility language 77 chipset, product description 1 closing the Setup Utility 79 CMOS clearing 14 components bottom 12 display 6 front 4, 8 keyboard...
HP Pavilion tx1000 Entertainment PC - Maintenance and Service Guide
Page 129
... Combo Drive precautions 31 removal 42 spare part numbers 19, 23, 27, 42 specifications 84 E electrostatic discharge 32 enhanced SATA support 80 esc key 5 Ethernet, product description 2 expansion port 3 9 ExpressCard slot 10 ExpressCard slot bezel illustrated 22 removal 67 external media cards, product description 2 external monitor port location 9 pin assignments 112 F fan/heat sink assembly removal 71 spare part number 19, 28, 71 feet locations 41 spare part number 19, 28, 41 fingerprint reader 7, 76 fingerprint reader board...
... Combo Drive precautions 31 removal 42 spare part numbers 19, 23, 27, 42 specifications 84 E electrostatic discharge 32 enhanced SATA support 80 esc key 5 Ethernet, product description 2 expansion port 3 9 ExpressCard slot 10 ExpressCard slot bezel illustrated 22 removal 67 external media cards, product description 2 external monitor port location 9 pin assignments 112 F fan/heat sink assembly removal 71 spare part number 19, 28, 71 feet locations 41 spare part number 19, 28, 41 fingerprint reader 7, 76 fingerprint reader board...
HP Pavilion tx1000 Entertainment PC - Maintenance and Service Guide
Page 130
..., 28, 47 keyboard components 5 keypad keys 5 keys esc 5 fn 5 function 5 Windows applications 5 Windows logo 5 L language support 77, 80 left-side components 10 lights battery 7 Digital Media Slot 10 drive 7 power 7, 8 wireless 9 M Main menu 79 mass storage devices, spare part numbers 23 Media button 6 memory map specifications 89 memory module product description 1 removal 43 spare part numbers 19, 28, 43 memory module compartment 12 memory module compartment cover illustrated 22 removal 43 microphone jack location 8 pin assignments 111 microphones 6 Mobility Center button 7 model name 1 modem...
..., 28, 47 keyboard components 5 keypad keys 5 keys esc 5 fn 5 function 5 Windows applications 5 Windows logo 5 L language support 77, 80 left-side components 10 lights battery 7 Digital Media Slot 10 drive 7 power 7, 8 wireless 9 M Main menu 79 mass storage devices, spare part numbers 23 Media button 6 memory map specifications 89 memory module product description 1 removal 43 spare part numbers 19, 28, 43 memory module compartment 12 memory module compartment cover illustrated 22 removal 43 microphone jack location 8 pin assignments 111 microphones 6 Mobility Center button 7 model name 1 modem...
HP Pavilion tx1000 Entertainment PC - Maintenance and Service Guide
Page 131
... top cover removal 59 spare part number 18, 27, 59 TouchPad 4 TouchPad left button 4 TouchPad light 4 TouchPad on/off button 4 TouchPad right button 4 TouchPad scroll zone 4 transporting guidelines 33 TV tuner antenna, spare part number 24, 26 TV tuner, spare part number 24, 26 U Universal Serial Bus (USB) port location 9, 11 pin assignments 114 unknown password 14 USB digital drive, spare part number 25 V vents 10, 11, 12 video memory 80 W Windows applications key 5 Windows logo key 5 wireless light 9 wireless switch 8 wireless, product description 2 WLAN module removal 44 spare part numbers...
... top cover removal 59 spare part number 18, 27, 59 TouchPad 4 TouchPad left button 4 TouchPad light 4 TouchPad on/off button 4 TouchPad right button 4 TouchPad scroll zone 4 transporting guidelines 33 TV tuner antenna, spare part number 24, 26 TV tuner, spare part number 24, 26 U Universal Serial Bus (USB) port location 9, 11 pin assignments 114 unknown password 14 USB digital drive, spare part number 25 V vents 10, 11, 12 video memory 80 W Windows applications key 5 Windows logo key 5 wireless light 9 wireless switch 8 wireless, product description 2 WLAN module removal 44 spare part numbers...
Setup Utility - Windows Vista and XP
Page 8
... started or restarted in Windows. Then use the arrow keys to select Exit > Exit Discarding Changes, and then press enter. After the Setup Utility closes, the computer restarts in Windows is the prompt for advanced users only, refer to the menu display. Using advanced Setup Utility features This guide describes the Setup Utility features recommended for boot order preferences. The Setup Utility features available for advanced users include a hard drive self-test, a Network Service Boot, and settings for all users...
... started or restarted in Windows. Then use the arrow keys to select Exit > Exit Discarding Changes, and then press enter. After the Setup Utility closes, the computer restarts in Windows is the prompt for advanced users only, refer to the menu display. Using advanced Setup Utility features This guide describes the Setup Utility features recommended for boot order preferences. The Setup Utility features available for advanced users include a hard drive self-test, a Network Service Boot, and settings for all users...
Software Update, Backup, and Recovery - Windows Vista
Page 5
... operating system, determines how the computer will interact with your computer model, product category, and series or family. ENWW 1 Access the updates by identifying the BIOS version currently installed on the HP Web site. NOTE Windows® includes the User Account Control feature to improve the security of the software provided with the hardware devices, and provides for tasks such as installing applications, running utilities, or changing Windows settings...
... operating system, determines how the computer will interact with your computer model, product category, and series or family. ENWW 1 Access the updates by identifying the BIOS version currently installed on the HP Web site. NOTE Windows® includes the User Account Control feature to improve the security of the software provided with the hardware devices, and provides for tasks such as installing applications, running utilities, or changing Windows settings...
Software Update, Backup, and Recovery - Windows Vista
Page 6
... network administrator before installing any device, cable, or cord. Make a note of the date, name, or other system information is selected, BIOS and other identifier. You may need this path when you connect your computer: Select Start > Help and Support, and then select the software and drivers update. 2. Follow the instructions on your computer. To use the Setup Utility for your computer to download your hard drive. When the Main menu...
... network administrator before installing any device, cable, or cord. Make a note of the date, name, or other system information is selected, BIOS and other identifier. You may need this path when you connect your computer: Select Start > Help and Support, and then select the software and drivers update. 2. Follow the instructions on your computer. To use the Setup Utility for your computer to download your hard drive. When the Main menu...
Software Update, Backup, and Recovery - Windows Vista
Page 13
... optical drive. 2. Restart the computer if prompted. ENWW Reinstalling software programs and drivers 9 Recovery Manager replaces corrupted system files and reinstalls deleted system files within the program. ● In most cases, if the program you are not listed in the Programs and Features list. Select Start > Control Panel > Programs > Uninstall a program. b. Recovery Manager opens. Reinstalling preinstalled programs and drivers 1. a. b. Click either Software program re-installation or Hardware driver re-installation...
... optical drive. 2. Restart the computer if prompted. ENWW Reinstalling software programs and drivers 9 Recovery Manager replaces corrupted system files and reinstalls deleted system files within the program. ● In most cases, if the program you are not listed in the Programs and Features list. Select Start > Control Panel > Programs > Uninstall a program. b. Recovery Manager opens. Reinstalling preinstalled programs and drivers 1. a. b. Click either Software program re-installation or Hardware driver re-installation...
Pointing Devices and Keyboard - Windows Vista
Page 19
When the embedded numeric keypad is turned off, the num lock light on the computer. Enabling and disabling the embedded numeric keypad Press fn+num lk to an optional expansion product. Using an external numeric keypad Most keys on most keypad keys function like the arrow, page up, or page down keys. Using the embedded numeric keypad The 15 keys of the embedded numeric keypad...
When the embedded numeric keypad is turned off, the num lock light on the computer. Enabling and disabling the embedded numeric keypad Press fn+num lk to an optional expansion product. Using an external numeric keypad Most keys on most keypad keys function like the arrow, page up, or page down keys. Using the embedded numeric keypad The 15 keys of the embedded numeric keypad...
Power Management - Windows Vista
Page 17
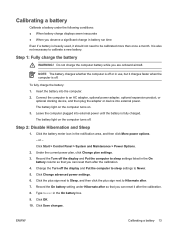
... a month. Click Start > Control Panel > System and Maintenance > Power Options. 2. Connect the computer to Never. 5. Click the battery meter icon in the On battery box. 9. To fully charge the battery: 1. Insert the battery into external power. The battery light on the computer turns on the computer turns off the display and Put the computer to sleep settings to an AC adapter, optional power adapter, optional expansion product, or optional docking device, and then plug the adapter or device into the...
... a month. Click Start > Control Panel > System and Maintenance > Power Options. 2. Connect the computer to Never. 5. Click the battery meter icon in the On battery box. 9. To fully charge the battery: 1. Insert the battery into external power. The battery light on the computer turns on the computer turns off the display and Put the computer to sleep settings to an AC adapter, optional power adapter, optional expansion product, or optional docking device, and then plug the adapter or device into the...
Power Management - Windows Vista
Page 19
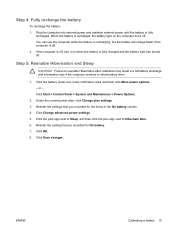
... charged and the battery light has turned off . Click Change advanced power settings. 5. Click Save changes. Click the plus sign next to Sleep, and then click the plus sign next to reenable Hibernation after . 6. Click OK. 8. You can use the computer while the battery is recharging, but the battery will charge faster if the computer is fully recharged. Click Start > Control Panel > System and Maintenance > Power Options. 2. When the battery...
... charged and the battery light has turned off . Click Change advanced power settings. 5. Click Save changes. Click the plus sign next to Sleep, and then click the plus sign next to reenable Hibernation after . 6. Click OK. 8. You can use the computer while the battery is recharging, but the battery will charge faster if the computer is fully recharged. Click Start > Control Panel > System and Maintenance > Power Options. 2. When the battery...

Power Management - Windows Vista
Page 25
... under any of the following conditions: ● When you need to replace the battery or access components inside the computer ● When you are connecting an external hardware device that does not connect to a USB port ● When the computer will be unused and disconnected from external power and remove the battery. Click Shut Down. Click Start, and then click the arrow next to the right...
... under any of the following conditions: ● When you need to replace the battery or access components inside the computer ● When you are connecting an external hardware device that does not connect to a USB port ● When the computer will be unused and disconnected from external power and remove the battery. Click Shut Down. Click Start, and then click the arrow next to the right...

Wireless (Select Models Only) - Windows Vista
Page 11
... prompted for your permission or password for tasks such as installing applications, running utilities, or changing Windows settings. In the left pane, click Device Manager. 3. Identifying a WLAN device To set up your wireless network, identify that the integrated WLAN device is installed on your computer: NOTE Windows includes the User Account Control feature to Windows online Help for more information. 1. ENWW Identifying a WLAN device 7 Identify the WLAN device from the Network adapters list.
... prompted for your permission or password for tasks such as installing applications, running utilities, or changing Windows settings. In the left pane, click Device Manager. 3. Identifying a WLAN device To set up your wireless network, identify that the integrated WLAN device is installed on your computer: NOTE Windows includes the User Account Control feature to Windows online Help for more information. 1. ENWW Identifying a WLAN device 7 Identify the WLAN device from the Network adapters list.
Multimedia - Windows Vista
Page 23
... PDIF 1 S-Video-out 6 M media activity buttons 13 media activity hotkeys 12 media button 4 microphone, internal 1 microphones, supported 2 monitor, connecting 5 multimedia software described 15 using 16 mute button 3 O optical disc inserting 9 removing, with power 10 removing, without power 11 writing to 15 optical drive playing 17 protecting 15 P ports external monitor 5 programs multimedia 15 using 16 projector, connecting 5 protecting playback 17 Q Quick Launch buttons 4 QuickPlay 4 R region codes, DVD 18 S S-Video-out jack 6 S/PDIF digital audio 2 software multimedia 15 using 16 speakers...
... PDIF 1 S-Video-out 6 M media activity buttons 13 media activity hotkeys 12 media button 4 microphone, internal 1 microphones, supported 2 monitor, connecting 5 multimedia software described 15 using 16 mute button 3 O optical disc inserting 9 removing, with power 10 removing, without power 11 writing to 15 optical drive playing 17 protecting 15 P ports external monitor 5 programs multimedia 15 using 16 projector, connecting 5 protecting playback 17 Q Quick Launch buttons 4 QuickPlay 4 R region codes, DVD 18 S S-Video-out jack 6 S/PDIF digital audio 2 software multimedia 15 using 16 speakers...


