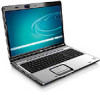
Security - Windows Vista
Page 5
... computer 2 Using passwords Setting passwords in Windows ...3 Setting passwords in Setup Utility ...3 Administrator password ...3 Managing an administrator password 4 Entering an administrator password 4 Power-on password ...4 Managing a power-on password 4 Entering a power-on password 5 3 Using antivirus software 4 Using firewall software 5 Installing critical security updates 6 Installing an optional security cable 7 Using the fingerprint reader (select...
... computer 2 Using passwords Setting passwords in Windows ...3 Setting passwords in Setup Utility ...3 Administrator password ...3 Managing an administrator password 4 Entering an administrator password 4 Power-on password ...4 Managing a power-on password 4 Entering a power-on password 5 3 Using antivirus software 4 Using firewall software 5 Installing critical security updates 6 Installing an optional security cable 7 Using the fingerprint reader (select...
Security - Windows Vista
Page 7
... able to a Windows user account User password Unauthorized removal of risks. Follow the procedures in this guide to use of the computer ● QuickLock ● Power-on password Computer viruses Unauthorized access to data Norton Internet Security software ● Firewall software ● Windows updates Unauthorized access to Setup Utility, BIOS settings...
... able to a Windows user account User password Unauthorized removal of risks. Follow the procedures in this guide to use of the computer ● QuickLock ● Power-on password Computer viruses Unauthorized access to data Norton Internet Security software ● Firewall software ● Windows updates Unauthorized access to Setup Utility, BIOS settings...
Security - Windows Vista
Page 9
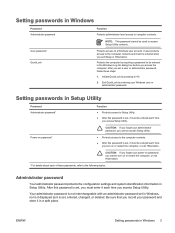
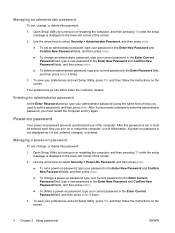
...or administrator password, follow these passwords, refer to the following topics. Protects access to computer contents. After you exit Sleep or Hibernation. Power-on password* CAUTION: If you forget your Windows user or administrator password. ENWW Setting passwords in Windows, nor is it displayed as ...safe place. Be sure that you turn on or restart the computer, or exit Hibernation. *For details about each time you record your power-on password, you access Setup Utility. Protects the computer by requiring a password to the computer contents. ● After this password is ...
...or administrator password, follow these passwords, refer to the following topics. Protects access to computer contents. After you exit Sleep or Hibernation. Power-on password* CAUTION: If you forget your Windows user or administrator password. ENWW Setting passwords in Windows, nor is it displayed as ...safe place. Be sure that you turn on or restart the computer, or exit Hibernation. *For details about each time you record your power-on password, you access Setup Utility. Protects the computer by requiring a password to the computer contents. ● After this password is ...
Security - Windows Vista
Page 10
...Password field, and then press enter 4 times. 3. Your preferences go into effect when the computer restarts. Use the arrow keys to set a power-on password To set , change, or delete this password is set an administrator password, type your password in the Enter New Password and Confirm ...New Password fields, and then press enter. ● To change a power-on password, type your current password in the Enter Current Password field, type a new password in the Enter New Password and Confirm New Password...
...Password field, and then press enter 4 times. 3. Your preferences go into effect when the computer restarts. Use the arrow keys to set a power-on password To set , change, or delete this password is set an administrator password, type your password in the Enter New Password and Confirm ...New Password fields, and then press enter. ● To change a power-on password, type your current password in the Enter Current Password field, type a new password in the Enter New Password and Confirm New Password...

Security - Windows Vista
Page 11
After 3 unsuccessful attempts to enter the password, you used to set the password), and then press enter. Your preferences go into effect when the computer restarts. ENWW Setting passwords in Setup Utility 5 Entering a power-on password At the Enter Password prompt, type your password (using the same keys you must restart the computer and try again.
After 3 unsuccessful attempts to enter the password, you used to set the password), and then press enter. Your preferences go into effect when the computer restarts. ENWW Setting passwords in Setup Utility 5 Entering a power-on password At the Enter Password prompt, type your password (using the same keys you must restart the computer and try again.
Security - Windows Vista
Page 20
... password 5 entering an administrator password 4 F fingerprint reader 10 fingerprint reader location 11 firewall software 7 M managing a power-on password 4 managing an administrator password 4 P passwords administrator 3 power-on 4 set in Setup Utility 3 set in Windows 3 power-on password entering 5 managing 4 Q QuickLock 3 R registering fingerprints 12 S security features 1 passwords 2 security cable 9 Setup Utility passwords set in 3 software...
... password 5 entering an administrator password 4 F fingerprint reader 10 fingerprint reader location 11 firewall software 7 M managing a power-on password 4 managing an administrator password 4 P passwords administrator 3 power-on 4 set in Setup Utility 3 set in Windows 3 power-on password entering 5 managing 4 Q QuickLock 3 R registering fingerprints 12 S security features 1 passwords 2 security cable 9 Setup Utility passwords set in 3 software...
Backup and Recovery - Windows Vista
Page 8
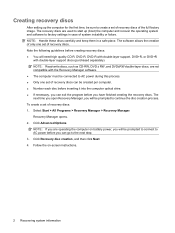
...> Recovery Manager > Recovery Manager. Click Recovery disc creation, and then click Next. 4. To create a set of system instability or failure. Follow the on battery power, you will be prompted to factory settings in a safe place. NOTE: Handle these discs carefully and keep them in case of recovery discs. The next... time you open Recovery Manager, you will be prompted to connect to AC power before you can exit the program before inserting it into the computer optical drive. ● If necessary, you can go to AC...
...> Recovery Manager > Recovery Manager. Click Recovery disc creation, and then click Next. 4. To create a set of system instability or failure. Follow the on battery power, you will be prompted to factory settings in a safe place. NOTE: Handle these discs carefully and keep them in case of recovery discs. The next... time you open Recovery Manager, you will be prompted to connect to AC power before you can exit the program before inserting it into the computer optical drive. ● If necessary, you can go to AC...
Drives - Windows Vista
Page 5
Table of contents 1 Identifying installed drives 2 Handling drives 3 Using an optical drive Inserting an optical disc ...5 Removing an optical disc when running on battery or external power 6 Removing an optical disc when no computer power is available 7 4 Improving hard drive performance Using Disk Defragmenter ...8 Using Disk Cleanup ...8 5 Replacing the hard drive Index ...12 v
Table of contents 1 Identifying installed drives 2 Handling drives 3 Using an optical drive Inserting an optical disc ...5 Removing an optical disc when running on battery or external power 6 Removing an optical disc when no computer power is available 7 4 Improving hard drive performance Using Disk Defragmenter ...8 Using Disk Cleanup ...8 5 Replacing the hard drive Index ...12 v
Drives - Windows Vista
Page 8
... one location to another, initiate Sleep, and allow the screen to media. Before handling a drive, discharge static electricity by touching the unpainted metal surface of power, be sure that must be handled with the procedures to vibration. Before removing or inserting a hard drive, shut down through the operating system. If a drive...
... one location to another, initiate Sleep, and allow the screen to media. Before handling a drive, discharge static electricity by touching the unpainted metal surface of power, be sure that must be handled with the procedures to vibration. Before removing or inserting a hard drive, shut down through the operating system. If a drive...
Drives - Windows Vista
Page 12
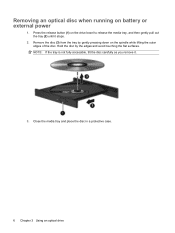
Remove the disc (3) from the tray by the edges and avoid touching the flat surfaces. NOTE: If the tray is not fully accessible, tilt the disc carefully as you remove it stops. 2. Close the media tray and place the disc in a protective case. 6 Chapter 3 Using an optical drive Hold the disc by gently pressing down on battery or external power 1. Removing an optical disc when running on the spindle while lifting the outer edges of the disc. Press the release button (1) on the drive bezel to release the media tray, and then gently pull out the tray (2) until it . 3.
Remove the disc (3) from the tray by the edges and avoid touching the flat surfaces. NOTE: If the tray is not fully accessible, tilt the disc carefully as you remove it stops. 2. Close the media tray and place the disc in a protective case. 6 Chapter 3 Using an optical drive Hold the disc by gently pressing down on battery or external power 1. Removing an optical disc when running on the spindle while lifting the outer edges of the disc. Press the release button (1) on the drive bezel to release the media tray, and then gently pull out the tray (2) until it . 3.
Drives - Windows Vista
Page 13
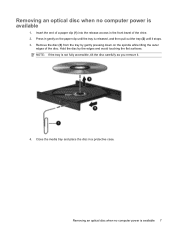
... case. NOTE: If the tray is not fully accessible, tilt the disc carefully as you remove it stops. 3. Removing an optical disc when no computer power is available 1. Remove the disc (3) from the tray by the edges and avoid touching the flat surfaces. Close the media tray and place the disc... bezel of the disc. Press in gently on the spindle while lifting the outer edges of the drive. 2. Removing an optical disc when no computer power is available 7 Hold the disc by gently pressing down on the paper clip until the tray is released, and then pull out the tray (2) until...
... case. NOTE: If the tray is not fully accessible, tilt the disc carefully as you remove it stops. 3. Removing an optical disc when no computer power is available 1. Remove the disc (3) from the tray by the edges and avoid touching the flat surfaces. Close the media tray and place the disc... bezel of the disc. Press in gently on the spindle while lifting the outer edges of the drive. 2. Removing an optical disc when no computer power is available 7 Hold the disc by gently pressing down on the paper clip until the tray is released, and then pull out the tray (2) until...
Drives - Windows Vista
Page 15
... secondary hard drive bay may be empty or may look slightly different from the AC outlet. 5. To remove the hard drive: 1. Unplug the power cord from the illustrations in Hibernation, turn the computer on a flat surface. 9 5 Replacing the hard drive NOTE: Your computer may contain a... second hard drive. Then shut down the computer through the operating system. 3. Shut down on by pressing the power button. Disconnect all external devices connected to the computer. 4. Turn the computer upside down the computer and close the display. Then shut down...
... secondary hard drive bay may be empty or may look slightly different from the AC outlet. 5. To remove the hard drive: 1. Unplug the power cord from the illustrations in Hibernation, turn the computer on a flat surface. 9 5 Replacing the hard drive NOTE: Your computer may contain a... second hard drive. Then shut down the computer through the operating system. 3. Shut down on by pressing the power button. Disconnect all external devices connected to the computer. 4. Turn the computer upside down the computer and close the display. Then shut down...
Drives - Windows Vista
Page 18
optical drive DVD inserting 5 removing, with power 6 removing, without power 7 DVD drive 3 O optical disc inserting 5 removing, with power 6 removing, without power 7 optical drive 3 S software Disk Cleanup 8 Disk Defragmenter 8 H hard disk drive installing 11 removing 9 replacing ...9 replacing 9 M maintenance Disk Cleanup 8 Disk Defragmenter 8 12 Index Index A airport security devices 2 C CD inserting 5 removing, with power 6 removing, without power 7 CD drive 3 D Disk Cleanup software 8 Disk Defragmenter software 8 disk performance 8 drives caring for 2 hard drive 9, 11 optical drive ...
optical drive DVD inserting 5 removing, with power 6 removing, without power 7 DVD drive 3 O optical disc inserting 5 removing, with power 6 removing, without power 7 optical drive 3 S software Disk Cleanup 8 Disk Defragmenter 8 H hard disk drive installing 11 removing 9 replacing ...9 replacing 9 M maintenance Disk Cleanup 8 Disk Defragmenter 8 12 Index Index A airport security devices 2 C CD inserting 5 removing, with power 6 removing, without power 7 CD drive 3 D Disk Cleanup software 8 Disk Defragmenter software 8 disk performance 8 drives caring for 2 hard drive 9, 11 optical drive ...
External Media Cards - Windows Vista
Page 11
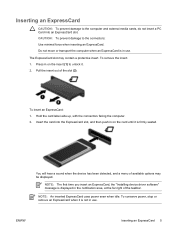
...protective insert. ENWW Inserting an ExpressCard 5 Inserting an ExpressCard CAUTION: To prevent damage to the computer and external media cards, do not insert a PC Card into the ExpressCard slot, and then push in on the insert (1) to the connectors: Use minimal force when inserting an ExpressCard. CAUTION:... To prevent damage to unlock it is displayed in use . To conserve power, stop or remove an ExpressCard when it is in the notification area, at the far right of the taskbar. The ExpressCard slot may ...
...protective insert. ENWW Inserting an ExpressCard 5 Inserting an ExpressCard CAUTION: To prevent damage to the computer and external media cards, do not insert a PC Card into the ExpressCard slot, and then push in on the insert (1) to the connectors: Use minimal force when inserting an ExpressCard. CAUTION:... To prevent damage to unlock it is displayed in use . To conserve power, stop or remove an ExpressCard when it is in the notification area, at the far right of the taskbar. The ExpressCard slot may ...

Memory Modules - Windows Vista
Page 7
... upside down the computer through the operating system. 2. If you must first exit Sleep or Hibernation before installing a memory module. Unplug the power cord from the computer. 8. WARNING! Close the display. 4. Disconnect all batteries before shutdown is possible. Loosen the 2 memory module compartment ...To add or replace a memory module: 1. ENWW 1 The memory capacity of electric shock and damage to the equipment, unplug the power cord and remove all external devices connected to the Lock button, and then click Shut Down. 3. Before beginning any procedure, ensure...
... upside down the computer through the operating system. 2. If you must first exit Sleep or Hibernation before installing a memory module. Unplug the power cord from the computer. 8. WARNING! Close the display. 4. Disconnect all batteries before shutdown is possible. Loosen the 2 memory module compartment ...To add or replace a memory module: 1. ENWW 1 The memory capacity of electric shock and damage to the equipment, unplug the power cord and remove all external devices connected to the Lock button, and then click Shut Down. 3. Before beginning any procedure, ensure...

Memory Modules - Windows Vista
Page 10
Reconnect external power and external devices. 17. Turn on the computer. 4 Replacing a memory module ENWW 16.
Reconnect external power and external devices. 17. Turn on the computer. 4 Replacing a memory module ENWW 16.

Setup Utility - Windows Vista
Page 9
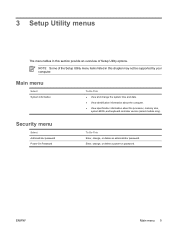
... the Setup Utility menu items listed in this chapter may not be supported by your computer. Security menu Select Administrator password Power-On Password To Do This Enter, change , or delete a power-on password. Main menu 5 Main menu Select System information To Do This ● View and change the system time and...
... the Setup Utility menu items listed in this chapter may not be supported by your computer. Security menu Select Administrator password Power-On Password To Do This Enter, change , or delete a power-on password. Main menu 5 Main menu Select System information To Do This ● View and change the system time and...

Setup Utility - Windows Vista
Page 11
... Configuration menu 6 using 2 using advanced features 4 System Configuration menu 6 system information 5 H hard drive self test 6 L language support 6 M Main menu 5 N navigating in the Setup Utility 2 P passwords 5 power-on password 5 R restoring default settings 3 Index 7
... Configuration menu 6 using 2 using advanced features 4 System Configuration menu 6 system information 5 H hard drive self test 6 L language support 6 M Main menu 5 N navigating in the Setup Utility 2 P passwords 5 power-on password 5 R restoring default settings 3 Index 7
Setup Utility - Windows Vista and XP
Page 9
... the Setup Utility menu items listed in this chapter may not be supported by your computer. Security menu Select Administrator password Power-On Password To Do This Enter, change , or delete a power-on password. Enter, change , or delete an administrator password. ENWW Main menu 5 Main menu Select System information To Do This...
... the Setup Utility menu items listed in this chapter may not be supported by your computer. Security menu Select Administrator password Power-On Password To Do This Enter, change , or delete a power-on password. Enter, change , or delete an administrator password. ENWW Main menu 5 Main menu Select System information To Do This...
Setup Utility - Windows Vista and XP
Page 11
... 5 starting 1 System Configuration menu 6 using 2 using advanced features 4 System Configuration menu 6 system information 5 V video memory 6 L language support 6 M Main menu 5 N navigating in the Setup Utility 2 P passwords 5 power-on password 5 ENWW Index 7
... 5 starting 1 System Configuration menu 6 using 2 using advanced features 4 System Configuration menu 6 system information 5 V video memory 6 L language support 6 M Main menu 5 N navigating in the Setup Utility 2 P passwords 5 power-on password 5 ENWW Index 7


