
Security - Window Vista and Windows 7
Page 8
.... Because most passwords are set, changed, or deleted, it in a secure place. For additional information about Windows passwords, such as they are not displayed as screen-saver passwords, select Start > Help and Support. 2 Chapter 2 Using passwords Use the following sections list Windows and Setup Utility passwords and describe their functions. Passwords can be set in a file on how you want to control access to secure your computer information. 2 Using passwords A password is case sensitive. ● A password set , depending...
.... Because most passwords are set, changed, or deleted, it in a secure place. For additional information about Windows passwords, such as they are not displayed as screen-saver passwords, select Start > Help and Support. 2 Chapter 2 Using passwords Use the following sections list Windows and Setup Utility passwords and describe their functions. Passwords can be set in a file on how you want to control access to secure your computer information. 2 Using passwords A password is case sensitive. ● A password set , depending...

Setup Utility - Windows Vista and Windows 7
Page 7
... displayed, press enter. 4. While the "Press the ESC key for Startup Menu" message is already running , begin at step 2. 1. To exit the Setup Utility without changing any settings, use the arrow keys to select Exit > Exit Discarding Changes, and then press enter. Open the Setup Utility by turning on or restarting the computer. Restoring default settings in the lower-left corner of the screen, press esc. Use the arrow keys to restore the Setup Utility default settings. Open the Setup Utility...
... displayed, press enter. 4. While the "Press the ESC key for Startup Menu" message is already running , begin at step 2. 1. To exit the Setup Utility without changing any settings, use the arrow keys to select Exit > Exit Discarding Changes, and then press enter. Open the Setup Utility by turning on or restarting the computer. Restoring default settings in the lower-left corner of the screen, press esc. Use the arrow keys to restore the Setup Utility default settings. Open the Setup Utility...

Setup Utility - Windows Vista and Windows 7
Page 10
.... Enable/disable the processor Virtualization Technology. Enable/disable Card Reader/1394 Power Saving. Enabled/disable Fan Always On. When enabled, the computer fan will always be on the system memory. 6 Chapter 3 Setup Utility menus Enable/disable LAN Power Saving. Run a diagnostic test on . Run a comprehensive self-test on Key ◦ USB Hard drive ◦ Network adapter Diagnostics menu Select Hard Disk Self Test Secondary Hard Disk Self Test (select models only) Memory Test To do this menu option is in DC mode. Enable/disable the capacitive button tapping sound.
.... Enable/disable the processor Virtualization Technology. Enable/disable Card Reader/1394 Power Saving. Enabled/disable Fan Always On. When enabled, the computer fan will always be on the system memory. 6 Chapter 3 Setup Utility menus Enable/disable LAN Power Saving. Run a diagnostic test on . Run a comprehensive self-test on Key ◦ USB Hard drive ◦ Network adapter Diagnostics menu Select Hard Disk Self Test Secondary Hard Disk Self Test (select models only) Memory Test To do this menu option is in DC mode. Enable/disable the capacitive button tapping sound.
Software Update, Backup and Recovery - Windows Vista
Page 5
...://www.hp.com. 3. Install the updates. 1 Identify your computer model, product category, and series or family. You may be prompted for your permission or password for tasks such as installing applications, running utilities, or changing Windows settings. Refer to a network, consult the network administrator before installing any software updates, especially system BIOS updates. Access the updates on the system ROM. Prepare for data transfer among hardware devices, including the time and date. Updating software Updated versions...
...://www.hp.com. 3. Install the updates. 1 Identify your computer model, product category, and series or family. You may be prompted for your permission or password for tasks such as installing applications, running utilities, or changing Windows settings. Refer to a network, consult the network administrator before installing any software updates, especially system BIOS updates. Access the updates on the system ROM. Prepare for data transfer among hardware devices, including the time and date. Updating software Updated versions...

Software Update, Backup and Recovery - Windows Vista
Page 6
... HP Web site that is selected, BIOS and other identifier. Open the Setup Utility by unplugging the power cord from the computer by turning on the screen to identify your computer and access the BIOS update you currently have and then download and install the new BIOS. When the Main menu is later than those currently installed on battery power, docked in an optional docking device, or connected to reliable external power using the AC adapter...
... HP Web site that is selected, BIOS and other identifier. Open the Setup Utility by unplugging the power cord from the computer by turning on the screen to identify your computer and access the BIOS update you currently have and then download and install the new BIOS. When the Main menu is later than those currently installed on battery power, docked in an optional docking device, or connected to reliable external power using the AC adapter...

Software Update, Backup and Recovery - Windows Vista
Page 8
... download the driver and install it later. Click Install now to step 6. 3. Proceed to install the updated driver. Click your operating system. 5. When prompted, click Save and then select a storage location on your computer model number in the Search box, press enter, and follow these steps: To use the HP Web site: 1. After the file is displayed, click an updated driver to install. 7. Click the option for software and driver downloads, type your hard drive...
... download the driver and install it later. Click Install now to step 6. 3. Proceed to install the updated driver. Click your operating system. 5. When prompted, click Save and then select a storage location on your computer model number in the Search box, press enter, and follow these steps: To use the HP Web site: 1. After the file is displayed, click an updated driver to install. 7. Click the option for software and driver downloads, type your hard drive...
Wireless (Select Models Only) - Windows Vista
Page 24
... device from the Network adapters list. For more information. 1. The listing for a WLAN device may be prompted for your computer. Cannot connect to a WLAN If you have an integrated WLAN device, or the driver for more information on your computer: NOTE: Windows includes the User Account Control feature to improve the security of your permission or password for tasks such as installing software, running utilities, or changing Windows settings...
... device from the Network adapters list. For more information. 1. The listing for a WLAN device may be prompted for your computer. Cannot connect to a WLAN If you have an integrated WLAN device, or the driver for more information on your computer: NOTE: Windows includes the User Account Control feature to improve the security of your permission or password for tasks such as installing software, running utilities, or changing Windows settings...
Drives - Windows Vista
Page 22
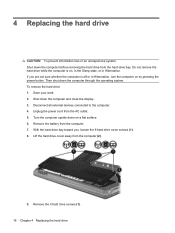
Disconnect all external devices connected to the computer. 4. Remove the battery from the computer (2). 9. Remove the 4 hard drive screws (1). 16 Chapter 4 Replacing the hard drive Do not remove the hard drive while the computer is off or in Hibernation. If you , loosen the 6 hard drive cover screws (1). 8. Shut down the computer through the operating system. Save your work. 2. With the hard drive bay toward you are not sure whether the computer is...
Disconnect all external devices connected to the computer. 4. Remove the battery from the computer (2). 9. Remove the 4 hard drive screws (1). 16 Chapter 4 Replacing the hard drive Do not remove the hard drive while the computer is off or in Hibernation. If you , loosen the 6 hard drive cover screws (1). 8. Shut down the computer through the operating system. Save your work. 2. With the hard drive bay toward you are not sure whether the computer is...

Drives - Windows Vista
Page 31
... file is displayed, click an updated driver to get the latest updates for the Windows operating system and other Microsoft products. 6. This Windows feature can obtain the latest Windows device drivers by User Account Control, click Continue. 5. Open your computer. Click Change settings and select a time for Microsoft Update to check for updates to install Microsoft Update. If prompted to do so, restart your hard drive. Click your computer. Click Download only...
... file is displayed, click an updated driver to get the latest updates for the Windows operating system and other Microsoft products. 6. This Windows feature can obtain the latest Windows device drivers by User Account Control, click Continue. 5. Open your computer. Click Change settings and select a time for Microsoft Update to check for updates to install Microsoft Update. If prompted to do so, restart your hard drive. Click your computer. Click Download only...
Pointing Devices and Keyboard - Windows Vista
Page 11
... operating system Log On window. To use them, are supported by the fn+f4 hotkey: ● LCD (computer display) ● External VGA (most external monitors) ● HDMI (televisions, camcorders, DVD players, VCRs, and video capture cards with HDMI ports) ● Composite video (televisions, camcorders, DVD players, VCRs, and video capture cards with composite-video-in jacks) NOTE: Composite video devices can be connected to the system. When Hibernation is entered. Using hotkeys 5 After you have set up your Internet or network services...
... operating system Log On window. To use them, are supported by the fn+f4 hotkey: ● LCD (computer display) ● External VGA (most external monitors) ● HDMI (televisions, camcorders, DVD players, VCRs, and video capture cards with HDMI ports) ● Composite video (televisions, camcorders, DVD players, VCRs, and video capture cards with composite-video-in jacks) NOTE: Composite video devices can be connected to the system. When Hibernation is entered. Using hotkeys 5 After you have set up your Internet or network services...
HP Pavilion dv7 Entertainment PC - Maintenance and Service Guide
Page 181
... Bluetooth module cable illustrated 34 removal 91 boot options 115 boot order 115 bottom components 16 button components 9 button sound 114 buttons media 9 next/fast forward 10 play/pause 10 power 9 previous/rewind 10 stop 10 volume mute 10 wireless 10 C Cable Kit contents 34 spare part number 20, 34, 41 cables, service considerations 48 Card Reader Power Saving 114 CAT5E cable, spare part number 36, 38 changing the Setup Utility language 112 chipset, product description 1 CMOS clearing 52 components bottom 16 buttons 9 display...
... Bluetooth module cable illustrated 34 removal 91 boot options 115 boot order 115 bottom components 16 button components 9 button sound 114 buttons media 9 next/fast forward 10 play/pause 10 power 9 previous/rewind 10 stop 10 volume mute 10 wireless 10 C Cable Kit contents 34 spare part number 20, 34, 41 cables, service considerations 48 Card Reader Power Saving 114 CAT5E cable, spare part number 36, 38 changing the Setup Utility language 112 chipset, product description 1 CMOS clearing 52 components bottom 16 buttons 9 display...
HP Pavilion dv7 Entertainment PC - Maintenance and Service Guide
Page 182
... display switch 7 displaying system information 112 docking support, product description 5 drive light 13 drives boot order 115 preventing damage 48 DVD±RW and CD-RW Combo Drive precautions 48 removal 57 spare part numbers 28, 35, 40, 57 specifications 121 E electrostatic discharge 49 eSATA/USB port 15 esc key 11 Ethernet, product description 4 exiting the Setup Utility 113 expansion port 3 15 ExpressCard slot 15 ExpressCard slot bezel, illustrated 33 external media cards, product description 5 external monitor port location 15...
... display switch 7 displaying system information 112 docking support, product description 5 drive light 13 drives boot order 115 preventing damage 48 DVD±RW and CD-RW Combo Drive precautions 48 removal 57 spare part numbers 28, 35, 40, 57 specifications 121 E electrostatic discharge 49 eSATA/USB port 15 esc key 11 Ethernet, product description 4 exiting the Setup Utility 113 expansion port 3 15 ExpressCard slot 15 ExpressCard slot bezel, illustrated 33 external media cards, product description 5 external monitor port location 15...
HP Pavilion dv7 Entertainment PC - Maintenance and Service Guide
Page 184
... 2 hard drives 3 keyboard 6 memory module 2 microphone 4 modem 4 operating system 6 optical drives 3 pointing device 6 ports 5 power requirements 6 processors 1 product name 1 security 6 serviceability 6 TV tuner 5 webcam 4 wireless 4 product name 1 R rear components 14 recovering a program or driver 152 recovering from the dedicated recovery partition 156 recovering from the recovery discs 156 recovery 156 recovery discs 156 Recovery Manager 152 recovery partition 156 recovery, system 152 remote control, spare part numbers 36, 39 removal/replacement preliminaries 47 procedures 53 restore...
... 2 hard drives 3 keyboard 6 memory module 2 microphone 4 modem 4 operating system 6 optical drives 3 pointing device 6 ports 5 power requirements 6 processors 1 product name 1 security 6 serviceability 6 TV tuner 5 webcam 4 wireless 4 product name 1 R rear components 14 recovering a program or driver 152 recovering from the dedicated recovery partition 156 recovering from the recovery discs 156 recovery 156 recovery discs 156 Recovery Manager 152 recovery partition 156 recovery, system 152 remote control, spare part numbers 36, 39 removal/replacement preliminaries 47 procedures 53 restore...
Multimedia - Windows Vista
Page 23
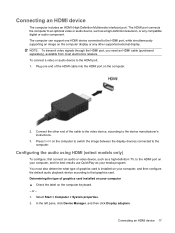
Configuring the audio using HDMI (select models only) To configure, first connect an audio or video device, such as a high-definition TV, to the HDMI port, while simultaneously supporting an image on the computer keyboard. - You must also determine what type of graphics card installed on your computer ▲ Check the label on the computer display or any compatible digital or audio component. Select Start > Computer > System properties. 2. In the left...
Configuring the audio using HDMI (select models only) To configure, first connect an audio or video device, such as a high-definition TV, to the HDMI port, while simultaneously supporting an image on the computer keyboard. - You must also determine what type of graphics card installed on your computer ▲ Check the label on the computer display or any compatible digital or audio component. Select Start > Computer > System properties. 2. In the left...
Multimedia - Windows Vista
Page 48
... 7 Troubleshooting or - If prompted to http://www.microsoft.com. 2. Open your specific product from the models listed. 4. Follow the on your computer operating system, programs, and hardware. 4. Click Security & Updates. 3. Click the Windows Vista® operating system. 5. When the list of drivers is complete, and then verify the operation of the device. This Windows feature can obtain the latest Windows device drivers by User Account Control, click Continue. 5. To use Microsoft Update: 1. Click Install...
... 7 Troubleshooting or - If prompted to http://www.microsoft.com. 2. Open your specific product from the models listed. 4. Follow the on your computer operating system, programs, and hardware. 4. Click Security & Updates. 3. Click the Windows Vista® operating system. 5. When the list of drivers is complete, and then verify the operation of the device. This Windows feature can obtain the latest Windows device drivers by User Account Control, click Continue. 5. To use Microsoft Update: 1. Click Install...
Multimedia - Windows Vista
Page 49
... drive 22 DVD region settings 27 E earbuds 2 external audio devices, connecting 13 external monitor port 16 H HD DVD disc 24 HDMI configuring 17 connecting 17 HDMI port 17 headphone (audio-out) jacks 2 headphones 2 high-definition devices, connecting 17 O optical disc Blu-ray 24 HD DVD 24 inserting 25 removing 29 using 22, 23 optical drive identifying 21 using 21 P ports HDMI 17 ports, external monitor 16 projector, connecting 16 I internal microphone, identifying 2 issues, resolving 33 J jacks audio-in (microphone) 3 audio-out (headphone) 2 M media activity buttons 6 media activity hotkeys...
... drive 22 DVD region settings 27 E earbuds 2 external audio devices, connecting 13 external monitor port 16 H HD DVD disc 24 HDMI configuring 17 connecting 17 HDMI port 17 headphone (audio-out) jacks 2 headphones 2 high-definition devices, connecting 17 O optical disc Blu-ray 24 HD DVD 24 inserting 25 removing 29 using 22, 23 optical drive identifying 21 using 21 P ports HDMI 17 ports, external monitor 16 projector, connecting 16 I internal microphone, identifying 2 issues, resolving 33 J jacks audio-in (microphone) 3 audio-out (headphone) 2 M media activity buttons 6 media activity hotkeys...
Power Management - Windows Vista
Page 7
... computer on the remote control (select models only). ● Activate the TouchPad. NOTE: You cannot initiate any type of networking connection or perform any of the following ways: ● Press the power button briefly. ● If the display is in the Sleep state or in Windows® Control Panel. You can be changed using Power Options in Hibernation. Using power-saving states 1 If the computer is initiated, the power lights blink and the screen clears.
... computer on the remote control (select models only). ● Activate the TouchPad. NOTE: You cannot initiate any type of networking connection or perform any of the following ways: ● Press the power button briefly. ● If the display is in the Sleep state or in Windows® Control Panel. You can be changed using Power Options in Hibernation. Using power-saving states 1 If the computer is initiated, the power lights blink and the screen clears.
Power Management - Windows Vista
Page 20
... battery setting to an AC adapter, optional power adapter, optional expansion product, or optional docking device, and then plug the adapter or device into external power. Step 1: Fully charge the battery WARNING! Step 2: Disable Hibernation and Sleep 1. Under the current power plan, click Change plan settings. 3. Connect the computer to Never. 9. Select Start > Control Panel > System and Maintenance > Power Options. 2. Click the plus sign next to Sleep, and then click the plus sign next to calibrate a new battery. Click Change advanced power settings...
... battery setting to an AC adapter, optional power adapter, optional expansion product, or optional docking device, and then plug the adapter or device into external power. Step 1: Fully charge the battery WARNING! Step 2: Disable Hibernation and Sleep 1. Under the current power plan, click Change plan settings. 3. Connect the computer to Never. 9. Select Start > Control Panel > System and Maintenance > Power Options. 2. Click the plus sign next to Sleep, and then click the plus sign next to calibrate a new battery. Click Change advanced power settings...
Power Management - Windows Vista
Page 21
...; If you are using it on the computer turns off . If the computer is fully charged and the battery light has turned off . Click Change advanced power settings. 5. Select Start > Control Panel > System and Maintenance > Power Options. 2. The battery can use the computer occasionally during the discharge process: ◦ The monitor will not turn off automatically. ◦ Hard drive speed will not occur. The battery light begins to blink when the battery has discharged to...
...; If you are using it on the computer turns off . If the computer is fully charged and the battery light has turned off . Click Change advanced power settings. 5. Select Start > Control Panel > System and Maintenance > Power Options. 2. The battery can use the computer occasionally during the discharge process: ◦ The monitor will not turn off automatically. ◦ Hard drive speed will not occur. The battery light begins to blink when the battery has discharged to...
Power Management - Windows Vista
Page 28
... external hardware device that does not connect to the Lock button. 3. The Shut Down command closes all open programs, including the operating system, and then turns off the display and computer. Click Start, and then click the arrow next to a USB port ● When the computer will be unused and disconnected from external power for at least 5 seconds. ● Disconnect the computer from external power and remove the battery...
... external hardware device that does not connect to the Lock button. 3. The Shut Down command closes all open programs, including the operating system, and then turns off the display and computer. Click Start, and then click the arrow next to a USB port ● When the computer will be unused and disconnected from external power for at least 5 seconds. ● Disconnect the computer from external power and remove the battery...


