
Resolving Start Up and No Boot Problems Checklist
Page 1
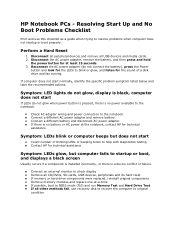
... Start Up and No Boot Problems Checklist Print and use recovery disk to recover the computer to BIOS mode (f10) and run Memory Test and Hard Drive Test If all USB devices and media cards. 2. Reconnect the AC power adapter (do hard reset If memory or hard drive components were replaced, reinstall original components Remove memory modules and replace one-at-a-time If possible, boot to original condition. Symptom: LEDs blink or computer beeps but computer fails to startup or boot, and displays a black screen Usually...
... Start Up and No Boot Problems Checklist Print and use recovery disk to recover the computer to BIOS mode (f10) and run Memory Test and Hard Drive Test If all USB devices and media cards. 2. Reconnect the AC power adapter (do hard reset If memory or hard drive components were replaced, reinstall original components Remove memory modules and replace one-at-a-time If possible, boot to original condition. Symptom: LEDs blink or computer beeps but computer fails to startup or boot, and displays a black screen Usually...
Resolving Start Up and No Boot Problems Checklist
Page 2
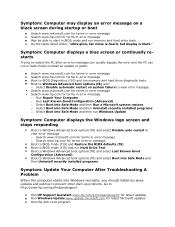
... Run HP Support Assistant www.hp.com/go/helpandsupport for latest updates Run Windows Update www.update.microsoft.com for terms in error message Boot to BIOS mode (f10) and Restore the BIOS defaults (f9) Boot to BIOS mode (f10) and run Hard Drive Test Boot to Windows Advanced boot options (f8) and select Last Known Good Configuration (Advanced) Boot to Windows Advanced boot options (f8) and select Boot into Safe Mode and then Uninstall recently installed programs Symptom: Update Your Computer After Troubleshooting A Problem...
... Run HP Support Assistant www.hp.com/go/helpandsupport for latest updates Run Windows Update www.update.microsoft.com for terms in error message Boot to BIOS mode (f10) and Restore the BIOS defaults (f9) Boot to BIOS mode (f10) and run Hard Drive Test Boot to Windows Advanced boot options (f8) and select Last Known Good Configuration (Advanced) Boot to Windows Advanced boot options (f8) and select Boot into Safe Mode and then Uninstall recently installed programs Symptom: Update Your Computer After Troubleshooting A Problem...

Notebook Essentials - Windows 7
Page 26
... all vents free from external power and remove the battery. The computer and the AC adapter comply with the user-accessible surface temperature limits defined by clicking Start, clicking the arrow next to Shut down . ■ Press and hold the power button for the computer to feel warm to the touch while it may be overheating because a vent is turned on both devices simultaneously...
... all vents free from external power and remove the battery. The computer and the AC adapter comply with the user-accessible surface temperature limits defined by clicking Start, clicking the arrow next to Shut down . ■ Press and hold the power button for the computer to feel warm to the touch while it may be overheating because a vent is turned on both devices simultaneously...
Notebook Essentials - Windows 7
Page 27
... IT administrator. ■ Click Start, click Control Panel, click Network and Internet, click Network and Sharing Center, click Troubleshoot problems, click Internet Connections, and then follow these suggestions if an external device does not function as expected, follow the on-screen instructions. ■ Be sure that the wireless device is turned on and the wireless light on the computer is properly connected to its power adapter and the cable or DSL modem, and that...
... IT administrator. ■ Click Start, click Control Panel, click Network and Internet, click Network and Sharing Center, click Troubleshoot problems, click Internet Connections, and then follow these suggestions if an external device does not function as expected, follow the on-screen instructions. ■ Be sure that the wireless device is turned on and the wireless light on the computer is properly connected to its power adapter and the cable or DSL modem, and that...

HP Pavilion dv3 Entertainment PC - Maintenance and Service Guide
Page 13
..., noise-suppresion Supports 2 Pavilion-branded Dolby/Altec Lansing stereo speakers HP TrueVision low-light VGA camera (fixed, no tilt) with activity LED, 640×480 by 24 frames per second Ethernet Realtek 8111DL integrated 10/100/1000 GB network interface card (NIC) Wireless Integrated wireless local area network (WLAN) options by way of wireless module: Two WLAN antennas built into display assembly Support for the following WLAN formats: ●...
..., noise-suppresion Supports 2 Pavilion-branded Dolby/Altec Lansing stereo speakers HP TrueVision low-light VGA camera (fixed, no tilt) with activity LED, 640×480 by 24 frames per second Ethernet Realtek 8111DL integrated 10/100/1000 GB network interface card (NIC) Wireless Integrated wireless local area network (WLAN) options by way of wireless module: Two WLAN antennas built into display assembly Support for the following WLAN formats: ●...
HP Pavilion dv3 Entertainment PC - Maintenance and Service Guide
Page 21
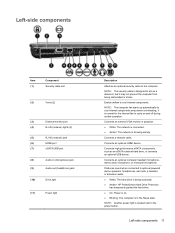
... an optional HDMI device. NOTE: The security cable is designed to the power button. Left-side components Item (1) Component Security cable slot (2) Vents (2) (3) External monitor port (4) RJ-45 (network) lights (2) (5) RJ-45 (network) jack (6) HDMI port (7) eSATA/USB port (8) Audio-in the Sleep state. It is located next to act as an eSATA external hard drive, or connects an optional USB device. NOTE: Another power light is normal for the internal fan to cycle on . ● Blinking: The computer is in (microphone) jack (9) Audio-out (headphone) jack (10) Drive light...
... an optional HDMI device. NOTE: The security cable is designed to the power button. Left-side components Item (1) Component Security cable slot (2) Vents (2) (3) External monitor port (4) RJ-45 (network) lights (2) (5) RJ-45 (network) jack (6) HDMI port (7) eSATA/USB port (8) Audio-in the Sleep state. It is located next to act as an eSATA external hard drive, or connects an optional USB device. NOTE: Another power light is normal for the internal fan to cycle on . ● Blinking: The computer is in (microphone) jack (9) Audio-out (headphone) jack (10) Drive light...
HP Pavilion dv3 Entertainment PC - Maintenance and Service Guide
Page 56
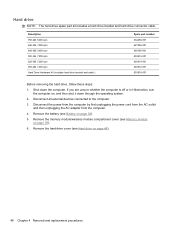
... then unplugging the AC adapter from the computer. 4. Remove the battery (see Memory module on , and then shut it down the computer. Shut down through the operating system. 2. Hard drive NOTE: The hard drive spare part kit includes a hard drive bracket and hard drive connector cable. Remove the memory module/wireless module compartment cover (see Battery on page 46). 46 Chapter 4 Removal and replacement procedures Remove the hard drive cover (see Hard drive on page 38). 5. Disconnect all external devices connected to the computer...
... then unplugging the AC adapter from the computer. 4. Remove the battery (see Memory module on , and then shut it down the computer. Shut down through the operating system. 2. Hard drive NOTE: The hard drive spare part kit includes a hard drive bracket and hard drive connector cable. Remove the memory module/wireless module compartment cover (see Battery on page 46). 46 Chapter 4 Removal and replacement procedures Remove the hard drive cover (see Hard drive on page 38). 5. Disconnect all external devices connected to the computer...
HP Pavilion dv3 Entertainment PC - Maintenance and Service Guide
Page 92
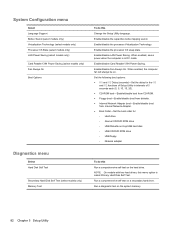
...―Enable/disable boot from Internal Network Adapter. ● Boot Order―Set the boot order for: ◦ Hard drive ◦ Internal CD/DVD ROM drive ◦ USB Diskette on Key/USB hard disk ◦ USB CD/DVD ROM drive ◦ USB floppy ◦ Network adapter To do this Change the Setup Utility language. Enable/disable the processor C6 sleep state. Run a comprehensive self-test on . Run a diagnostic test on the system memory. 82 Chapter 5 Setup Utility Enable/disable the capacitive button tapping sound. Enable/disable Fan Always On. When enabled, saves power...
...―Enable/disable boot from Internal Network Adapter. ● Boot Order―Set the boot order for: ◦ Hard drive ◦ Internal CD/DVD ROM drive ◦ USB Diskette on Key/USB hard disk ◦ USB CD/DVD ROM drive ◦ USB floppy ◦ Network adapter To do this Change the Setup Utility language. Enable/disable the processor C6 sleep state. Run a comprehensive self-test on . Run a diagnostic test on the system memory. 82 Chapter 5 Setup Utility Enable/disable the capacitive button tapping sound. Enable/disable Fan Always On. When enabled, saves power...
HP Pavilion dv3 Entertainment PC - Maintenance and Service Guide
Page 115
... audio 3 chipset 1 display panel 2 Ethernet 3 external media cards 3 graphics 1 hard drives 2 keyboard 4 memory module 2 microphone 3 operating system 4 optical drives 2 pointing device 4 ports 4 power requirements 4 processors 1 product name 1 security 4 video 3 wireless 3 product name 1, 14, 36 product number 14, 36 R removal/replacement preliminaries 31 procedures 35 right-side components 12 RJ-45 jack connector pinout 94 location 11 RJ-45 lights 11 RTC battery removal 45 spare part number 19, 26, 45 Rubber Feet Kit, spare part number 18, 28, 52 hard drive 84 optical drive...
... audio 3 chipset 1 display panel 2 Ethernet 3 external media cards 3 graphics 1 hard drives 2 keyboard 4 memory module 2 microphone 3 operating system 4 optical drives 2 pointing device 4 ports 4 power requirements 4 processors 1 product name 1 security 4 video 3 wireless 3 product name 1, 14, 36 product number 14, 36 R removal/replacement preliminaries 31 procedures 35 right-side components 12 RJ-45 jack connector pinout 94 location 11 RJ-45 lights 11 RTC battery removal 45 spare part number 19, 26, 45 Rubber Feet Kit, spare part number 18, 28, 52 hard drive 84 optical drive...
User Guide - Windows 7
Page 32
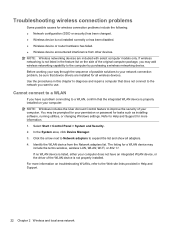
... way through the sequence of possible solutions to Help and Support for tasks such as installing software, running utilities, or changing Windows settings. Refer to your network connection problem, be prompted for your permission or password for more information on the side of the WLAN device is not installed correctly or has been disabled. ● Wireless device or router hardware has failed. ● Wireless device encountered interference from the Network adapters list.
... way through the sequence of possible solutions to Help and Support for tasks such as installing software, running utilities, or changing Windows settings. Refer to your network connection problem, be prompted for your permission or password for more information on the side of the WLAN device is not installed correctly or has been disabled. ● Wireless device or router hardware has failed. ● Wireless device encountered interference from the Network adapters list.
User Guide - Windows 7
Page 36
... customize settings for pointing devices, such as button configuration, click speed, and pointer options. Using the TouchPad To move the pointer, touch and slide one of the USB ports on the computer. Turning the TouchPad on and off To switch the TouchPad on and off, quickly double-tap the TouchPad on (amber), the TouchPad is on /off . 26 Chapter 3 Pointing devices and keyboard NOTE: If the TouchPad light is off button. To access Mouse...
... customize settings for pointing devices, such as button configuration, click speed, and pointer options. Using the TouchPad To move the pointer, touch and slide one of the USB ports on the computer. Turning the TouchPad on and off To switch the TouchPad on and off, quickly double-tap the TouchPad on (amber), the TouchPad is on /off . 26 Chapter 3 Pointing devices and keyboard NOTE: If the TouchPad light is off button. To access Mouse...
User Guide - Windows 7
Page 55
... put sp in front of the number) in the Search box, press enter, and follow the instructions provided. Click the option for software and driver downloads, type your drivers using the procedures in Windows Media Player produces no sound or display Use MediaSmart to update your computer model number in the System area, click Device Manager. 3. When prompted, click Save and then select a storage location on the computer. NOTE: If you...
... put sp in front of the number) in the Search box, press enter, and follow the instructions provided. Click the option for software and driver downloads, type your drivers using the procedures in Windows Media Player produces no sound or display Use MediaSmart to update your computer model number in the System area, click Device Manager. 3. When prompted, click Save and then select a storage location on the computer. NOTE: If you...
User Guide - Windows 7
Page 69
... using them . ● Disconnect external devices that are not using. ● Use the f2 and f3 action keys to adjust screen brightness as needed. ● If you are not plugged into external power and maintain external power until the battery is fully charged and the battery light has turned white. or - Select Start > Control Panel > System and Security > Power Options. 2. Reenter the settings that you recorded for extended periods of time. Click Change advanced power settings. 5. Click Save changes...
... using them . ● Disconnect external devices that are not using. ● Use the f2 and f3 action keys to adjust screen brightness as needed. ● If you are not plugged into external power and maintain external power until the battery is fully charged and the battery light has turned white. or - Select Start > Control Panel > System and Security > Power Options. 2. Reenter the settings that you recorded for extended periods of time. Click Change advanced power settings. 5. Click Save changes...
User Guide - Windows 7
Page 113
..., running utilities, or changing Windows settings. The BIOS initializes the operating system, determines how the computer will interact with your permission or password for a system BIOS update by identifying the BIOS version currently installed on the system ROM. Install the updates. 103 Some download packages contain a file named Readme.txt, which are packaged in the remainder of this guide: 1. Refer to a network, consult the network administrator before installing any software updates...
..., running utilities, or changing Windows settings. The BIOS initializes the operating system, determines how the computer will interact with your permission or password for a system BIOS update by identifying the BIOS version currently installed on the system ROM. Install the updates. 103 Some download packages contain a file named Readme.txt, which are packaged in the remainder of this guide: 1. Refer to a network, consult the network administrator before installing any software updates...
User Guide - Windows 7
Page 114
... System BIOS) can be displayed by pressing fn+esc (if you want to your hard drive. To exit Setup Utility, use the arrow keys to an optional power source. Follow the on battery power, docked in an optional docking device, or connected to select Exit > Exit Discarding Changes, and then press enter. You may need to select the Main menu. Follow the on your computer: Select Start > Help and Support, and...
... System BIOS) can be displayed by pressing fn+esc (if you want to your hard drive. To exit Setup Utility, use the arrow keys to an optional power source. Follow the on battery power, docked in an optional docking device, or connected to select Exit > Exit Discarding Changes, and then press enter. You may need to select the Main menu. Follow the on your computer: Select Start > Help and Support, and...
User Guide - Windows 7
Page 116
... the operation of drivers is downloaded, navigate to the folder where the file was stored, and double-click the file to your specific product from the models listed. 4. Proceed to install the updated driver. NOTE: In some locations you want a specific SoftPaq, enter the SoftPaq number in the Search box, and then press enter. - Updating programs and drivers To download and install software other than a BIOS update, follow the instructions provided. Open your...
... the operation of drivers is downloaded, navigate to the folder where the file was stored, and double-click the file to your specific product from the models listed. 4. Proceed to install the updated driver. NOTE: In some locations you want a specific SoftPaq, enter the SoftPaq number in the Search box, and then press enter. - Updating programs and drivers To download and install software other than a BIOS update, follow the instructions provided. Open your...
User Guide - Windows 7
Page 117
... SuperMulti DL Drive 65 Blu-ray ROM with LightScribe DVD ±R/RW SuperMulti DL Drive 65 Bluetooth device 12, 21 Bluetooth label 10 boot options 102 boot order 102 button sound 101 buttons left TouchPad 1 power 3 right TouchPad 1 TouchPad, on/off button 1 C cables eSATA 77 LAN 25 USB 75 caps lock light, identifying 2 Card Reader Power Saving 101 CD burning 69 copying 69 playing 67 removing 70 CD drive 64 Certificate of Authenticity label 10 charging batteries 53, 56 compartments memory module 8 wireless module 8 Index...
... SuperMulti DL Drive 65 Blu-ray ROM with LightScribe DVD ±R/RW SuperMulti DL Drive 65 Bluetooth device 12, 21 Bluetooth label 10 boot options 102 boot order 102 button sound 101 buttons left TouchPad 1 power 3 right TouchPad 1 TouchPad, on/off button 1 C cables eSATA 77 LAN 25 USB 75 caps lock light, identifying 2 Card Reader Power Saving 101 CD burning 69 copying 69 playing 67 removing 70 CD drive 64 Certificate of Authenticity label 10 charging batteries 53, 56 compartments memory module 8 wireless module 8 Index...
User Guide - Windows 7
Page 118
... Media Slot, identifying 5 Disk Cleanup software 71 Disk Defragmenter software 70 disk performance 70 display image, switching 30 drive light 71 drive light, identifying 7 drive media 47 drives boot order 102 hard 73 optical 64 DVD burning 69 changing region setting 68 copying 69 playing 67 removing 70 DVD drive 64 DVD region settings 68 E earbuds 34 encryption 16 End hotkey 32 eSATA cable, connecting 77 eSATA devices connecting 77 description 77 removing 77 stopping 77 eSATA/USB port, identifying 6 esc key, identifying 4 external audio devices, connecting 37 external monitor port 39 external...
... Media Slot, identifying 5 Disk Cleanup software 71 Disk Defragmenter software 70 disk performance 70 display image, switching 30 drive light 71 drive light, identifying 7 drive media 47 drives boot order 102 hard 73 optical 64 DVD burning 69 changing region setting 68 copying 69 playing 67 removing 70 DVD drive 64 DVD region settings 68 E earbuds 34 encryption 16 End hotkey 32 eSATA cable, connecting 77 eSATA devices connecting 77 description 77 removing 77 stopping 77 eSATA/USB port, identifying 6 esc key, identifying 4 external audio devices, connecting 37 external monitor port 39 external...
User Guide - Windows 7
Page 119
... label 10 Product Key 10 optical disc removing 70 optical drive 64 optical drive, identifying 5 P page down hotkey 32 page up hotkey 32 passwords administrator 88 power-on 89 set in Setup Utility 88 set in Windows 87 pinching TouchPad gesture 28 pointing devices, setting preferences 26 ports eSATA/USB 6 external monitor 39 HDMI 39 USB 5, 75 power connecting 50 conserving 59 power button, identifying 3 power connector, identifying 5 power cord, identifying 10 power light, identifying 2, 7 power-on password creating 90 entering 90 managing 90 Index 109
... label 10 Product Key 10 optical disc removing 70 optical drive 64 optical drive, identifying 5 P page down hotkey 32 page up hotkey 32 passwords administrator 88 power-on 89 set in Setup Utility 88 set in Windows 87 pinching TouchPad gesture 28 pointing devices, setting preferences 26 ports eSATA/USB 6 external monitor 39 HDMI 39 USB 5, 75 power connecting 50 conserving 59 power button, identifying 3 power connector, identifying 5 power cord, identifying 10 power light, identifying 2, 7 power-on password creating 90 entering 90 managing 90 Index 109

User Guide - Windows 7
Page 120
... TouchPad button, identifying 1 RJ-45 (network) jack, identifying 6 RJ-45 (network) lights, identifying 6 rotating TouchPad gesture 28 S screen brightness keys 30 screen image, switching 30 scrolling TouchPad gesture 27 secondary hard drive self test 102 security cable slot 6 security cable, installing 94 Security menu 101 security, wireless 15 serial number, computer 10 service tag 10 setup of WLAN 15 Setup Utility changing the language 98 displaying system information 99 exiting 99 menus 101 navigating 98 passwords set in 88 restoring default settings 99 selecting 98 starting...
... TouchPad button, identifying 1 RJ-45 (network) jack, identifying 6 RJ-45 (network) lights, identifying 6 rotating TouchPad gesture 28 S screen brightness keys 30 screen image, switching 30 scrolling TouchPad gesture 27 secondary hard drive self test 102 security cable slot 6 security cable, installing 94 Security menu 101 security, wireless 15 serial number, computer 10 service tag 10 setup of WLAN 15 Setup Utility changing the language 98 displaying system information 99 exiting 99 menus 101 navigating 98 passwords set in 88 restoring default settings 99 selecting 98 starting...


